

WordPress login security best practices are not optional in 2026. Your login page is public, the default address is the same on every WordPress site, and every bot on the internet already knows where to find it.
TL;DR: WordPress does not protect your login page by default. This guide covers 5 must have WordPress login security practices you need to set up right now: strong password enforcement, two-factor authentication, a custom login URL, login attempt limits, and CAPTCHA. Each section links to a full step-by-step guide if you want to go deeper.
What they do is run automated tools that scan millions of websites, land on that login page, and start trying passwords. Not one or two. Thousands per minute. Most site owners never know it is happening until something breaks, rankings drop, or a customer reports something wrong.
The good news is that securing your login page is not complicated. You do not need a developer or a security background. You need five things set up correctly, and this guide walks through all of them.
Table of Contents
Why Your WordPress Login Page Is the Weakest Point
WordPress is built to be flexible and easy to use. Security is not switched on by default. Out of the box, your login page has no limit on failed attempts, no second verification step, a predictable URL, and no bot filtering. That combination is exactly what attackers look for.
A single compromised account can do real damage. An attacker who gets in can install malware, redirect your visitors to spam sites, steal data, or quietly plant code that damages your SEO for months before you notice. And they do not need your account specifically. They just need any account on your site. This is why following WordPress login security best practices matters more than most site owners realize. The five steps below are not advanced measures. They are the basics every WordPress site should have in place
The 5 WordPress Login Security Best Practices You Need Right Now
These five practices work as a layered defense. Each one blocks a different type of attack. When you combine them, an attacker would need to get past all five layers to cause any damage. That is a very different problem for them than an unprotected site.
1. Force Strong Passwords for Every User on Your Site
Most WordPress sites get breached because of weak passwords, not sophisticated hacking. Someone picked “password123” or reused a password from another account that was already leaked somewhere. The attacker did not need skill. They just needed to try. WordPress has a password strength meter built in, but it does not enforce anything. A user can ignore the warning and set whatever password they want. That is a problem when you have multiple people logging into your site.
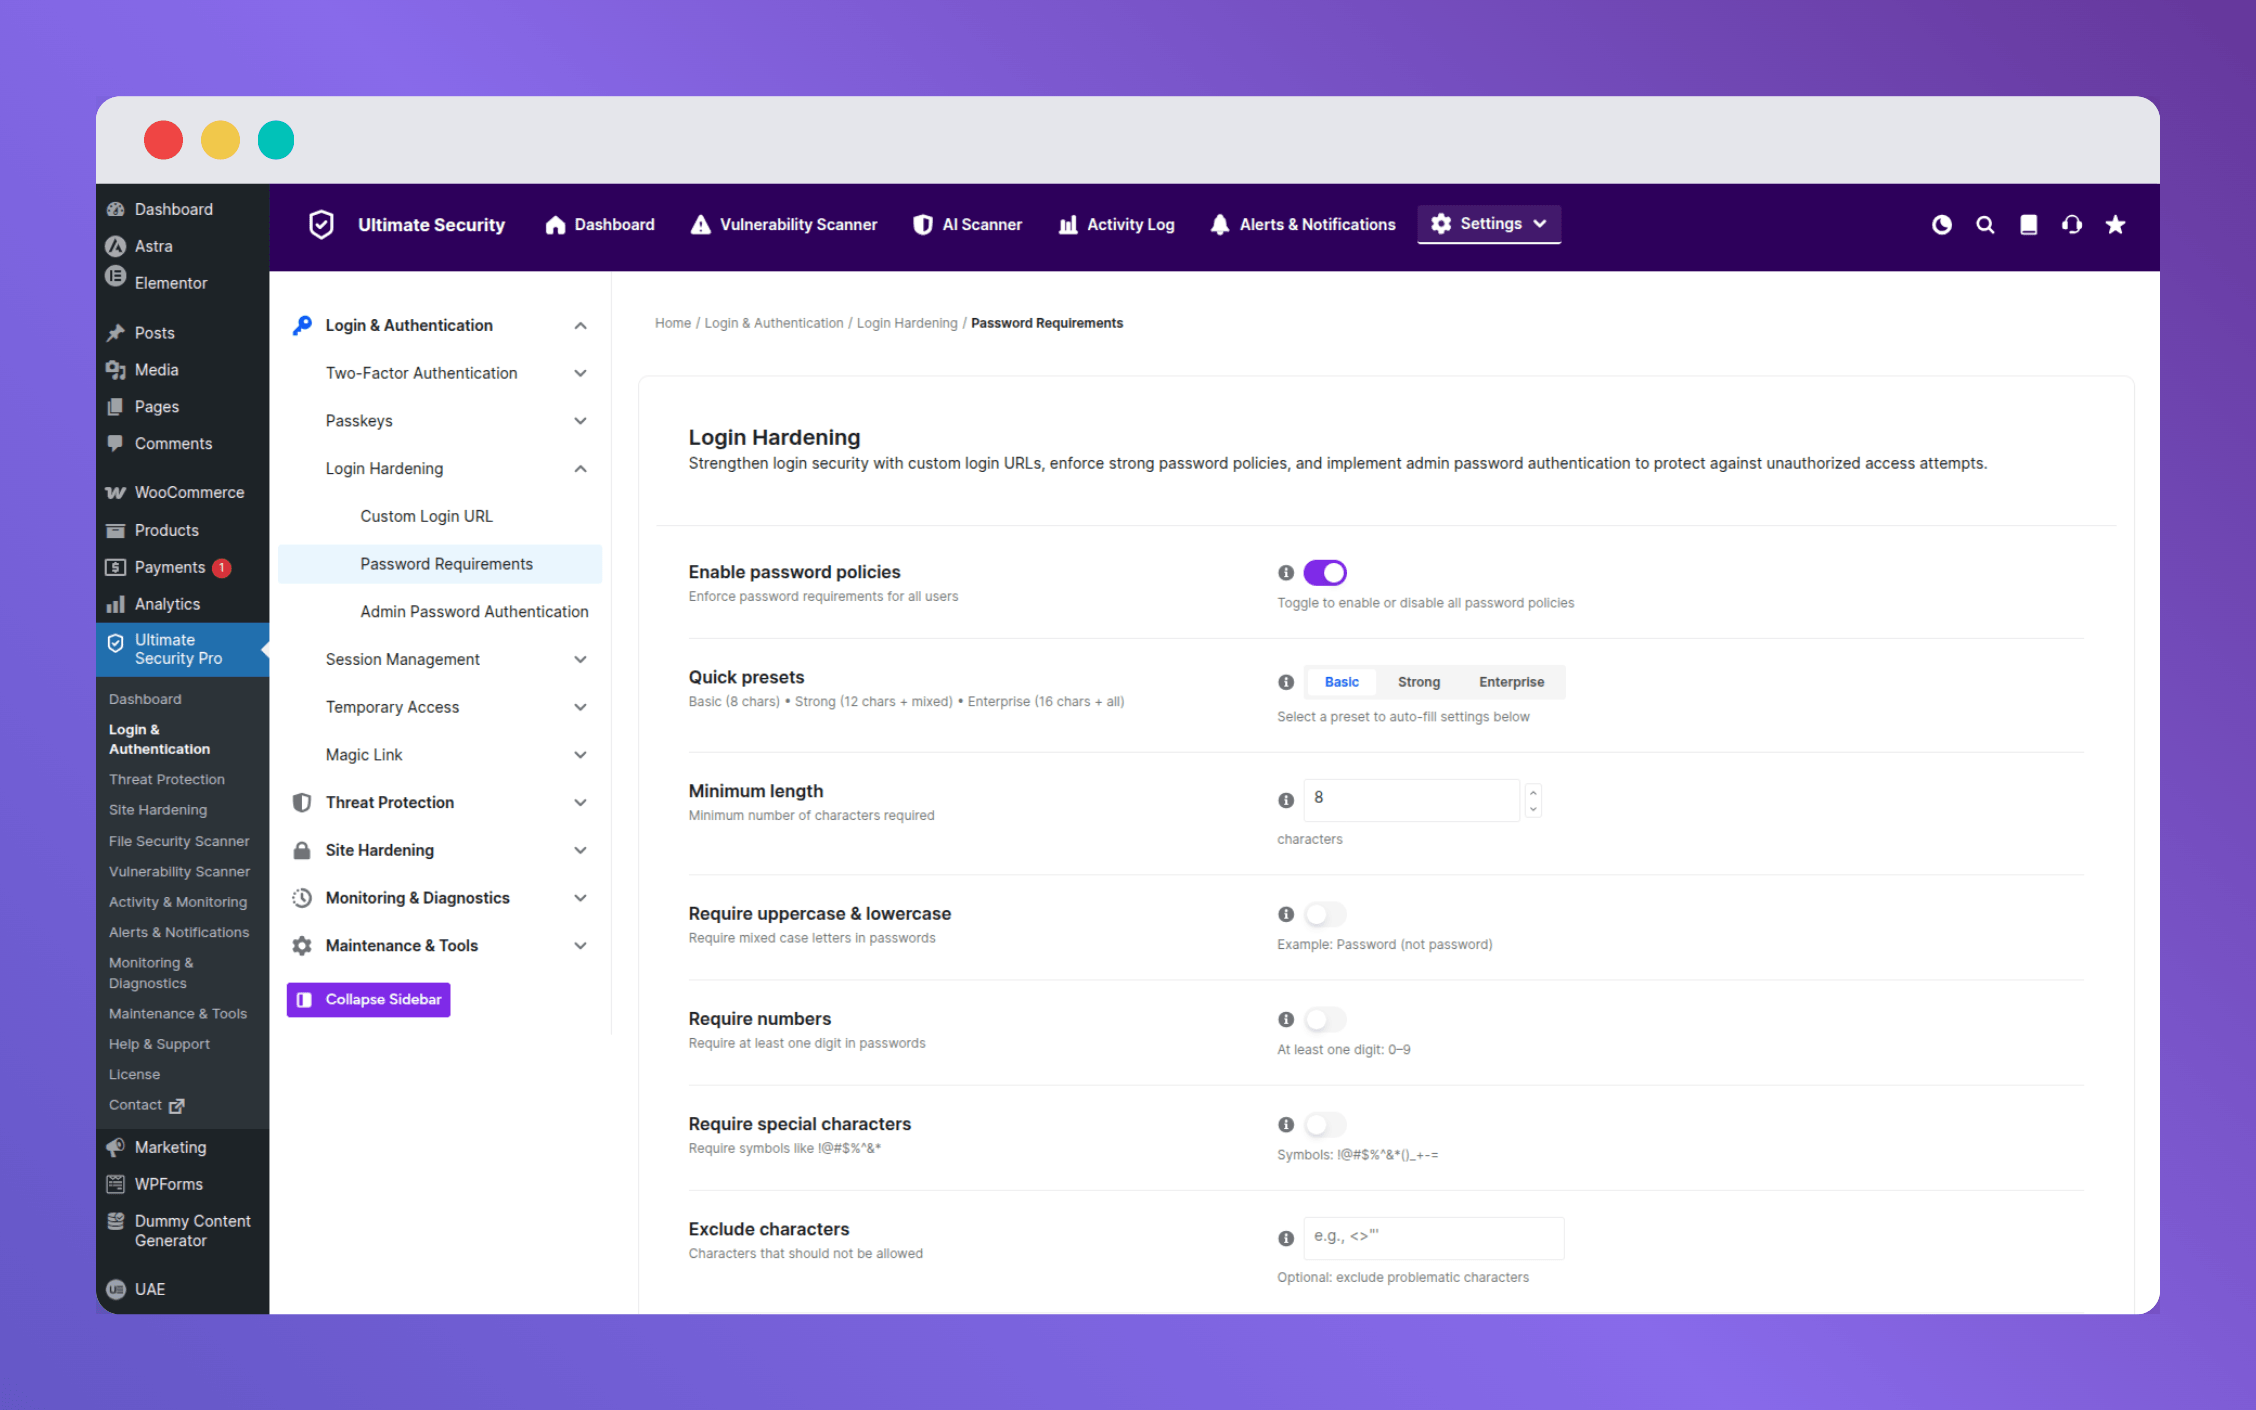
A proper WordPress password policy changes this. Instead of suggesting, it requires. Every user has to meet your minimum standard before their password is accepted.
Here is what a solid policy looks like:
- Minimum 10 to 12 characters
- Mix of uppercase, lowercase, numbers, and symbols
- No reusing the last three to five passwords
- Password expiry every six to twelve months for general users, every three months for admins
- New users forced to reset their password on first login
This applies to everyone, not just the admin account. An editor account with a weak password is just as dangerous. Editors can publish content, add links, and upload files. A compromised editor account can quietly damage your site’s reputation and SEO before you even notice.
The Ultimate Security plugin handles this with preset levels: Basic (8 characters), Strong (12 characters), and Enterprise (16 characters with full complexity). You pick your level, it enforces the rules across every role on your site.
Read the full setup guide: How to force strong passwords for WordPress users
2. Enable Two-Factor Authentication for All User Roles
Here is something that a lot of site owners do not think about. Strong passwords protect against guessing attacks. They do not protect against stolen passwords. If a site you signed up for years ago was breached, your email and password might already be in a database somewhere. Attackers run those leaked combinations against WordPress login pages automatically. This is called credential stuffing. The password is correct. The login attempt looks legitimate. Nothing flags it.
Two-factor authentication (2FA) closes that gap. Even if someone has the right password, they cannot get past the second step without access to your phone or email.
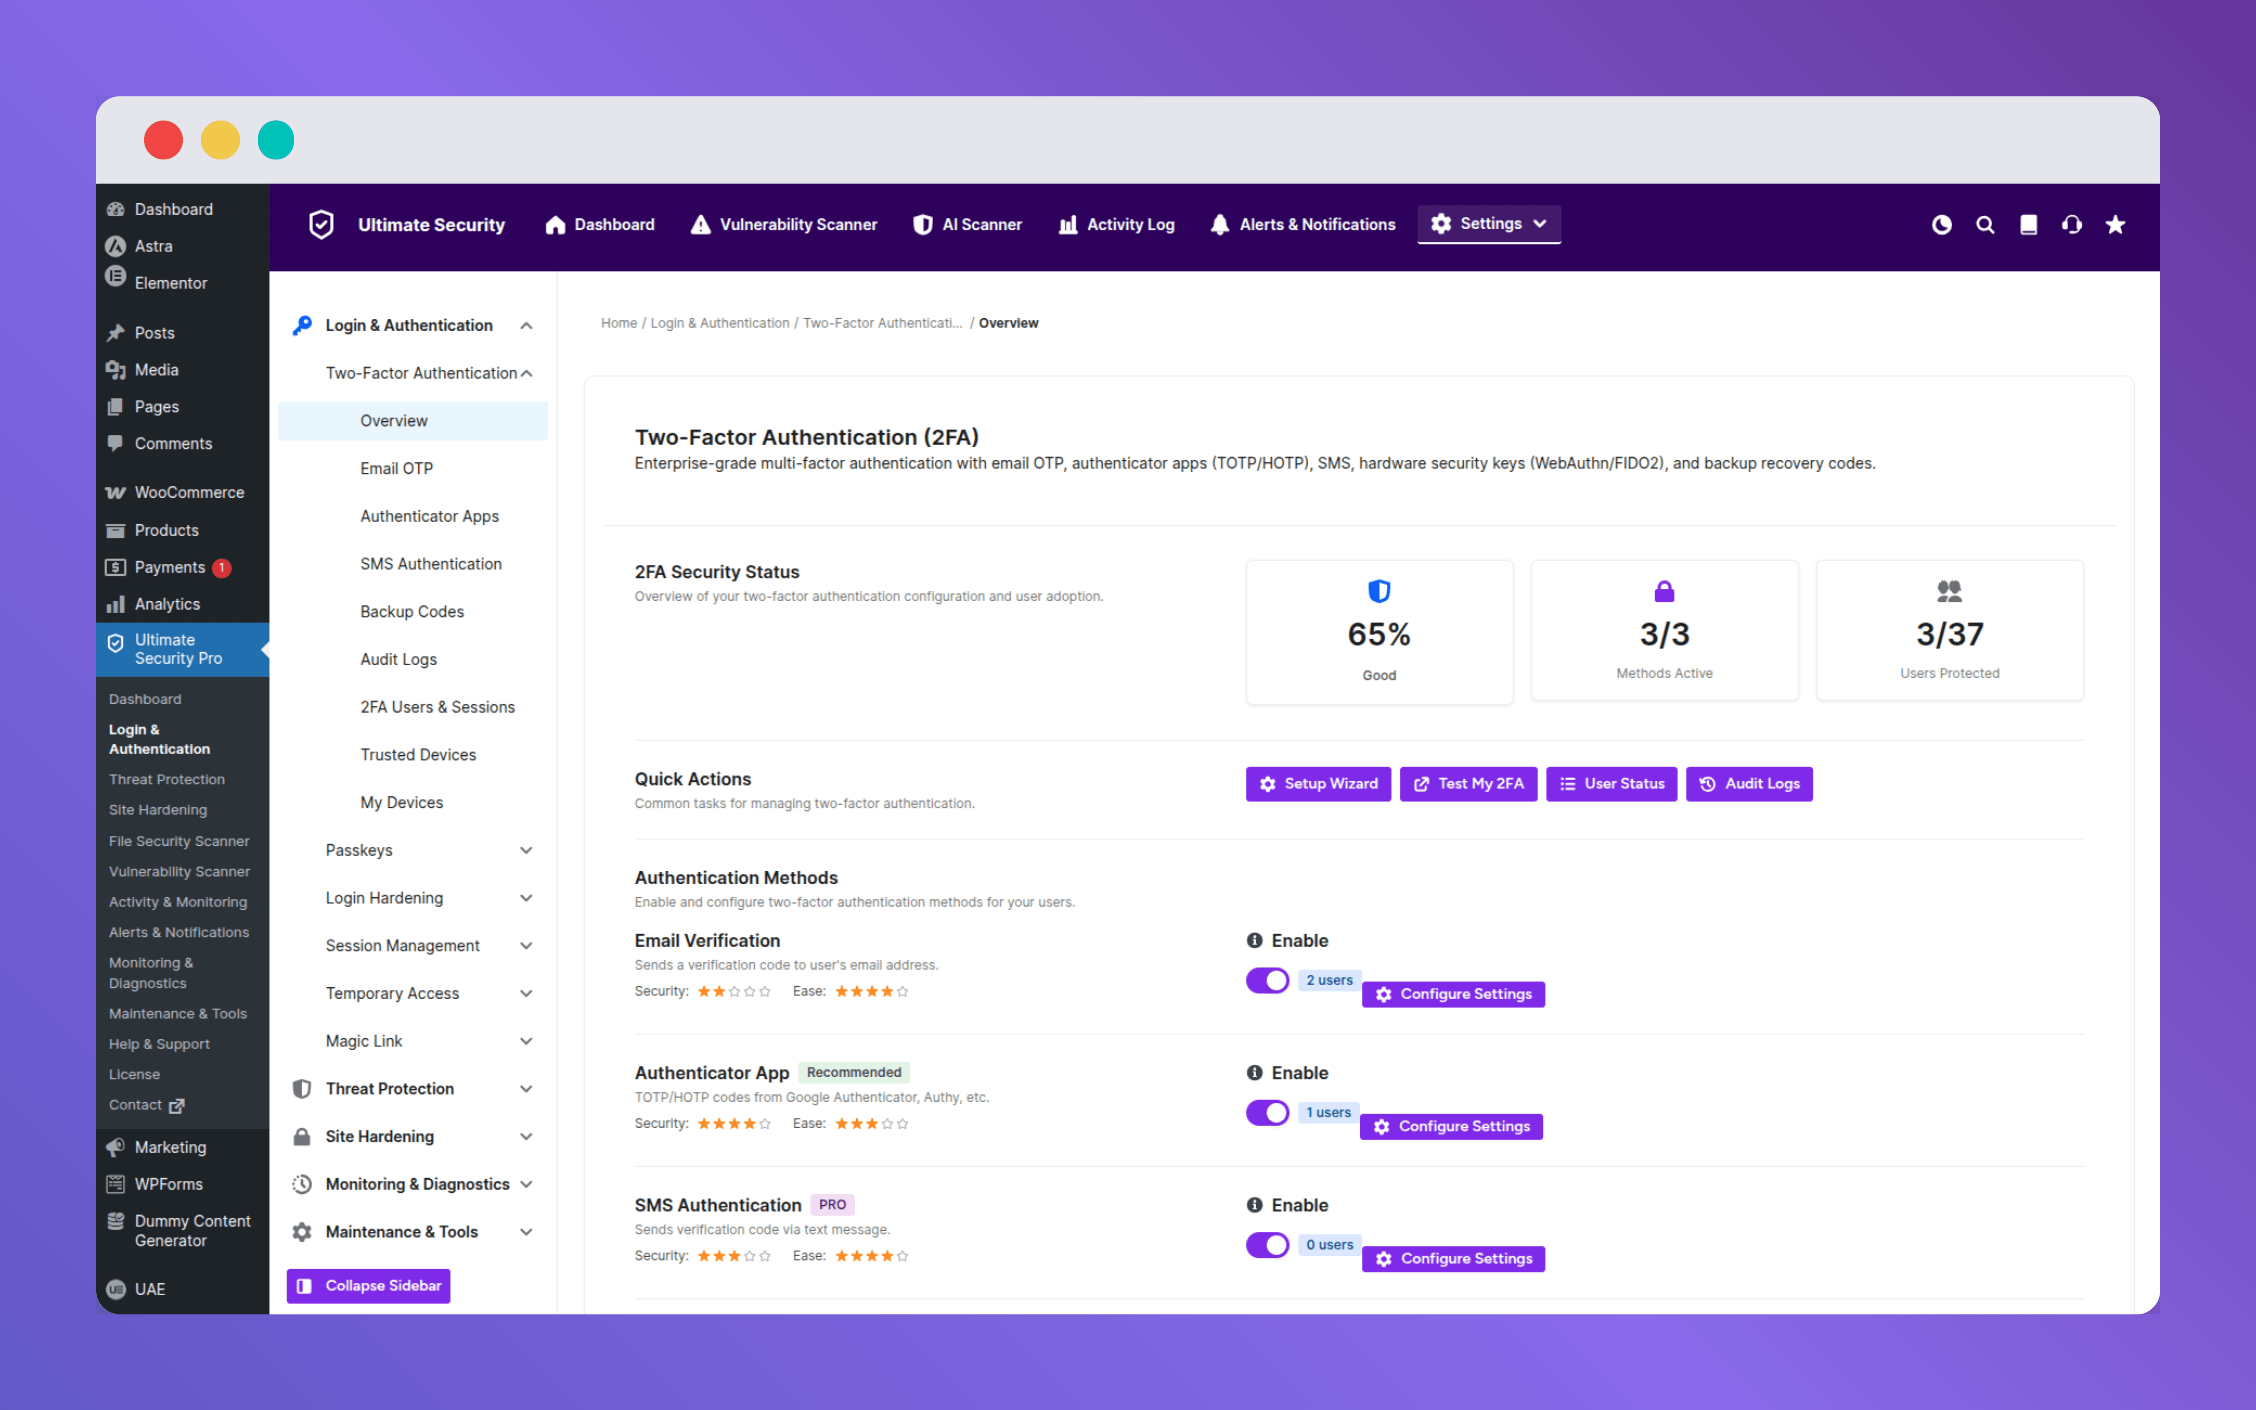
Two-factor authentication works by requiring two things to log in: something you know (your password) and something you have (a code from your phone or email). Both are required. One alone is not enough.
There are two practical options for most WordPress sites:
Authenticator App: A time-based code generated on the user’s phone every 30 seconds. Works offline. Does not depend on email delivery. This is the stronger option and the right choice for admin accounts.
Email OTP: A one-time code sent to the user’s registered email when they log in. No app required. Easier for users who are not comfortable installing new apps. Requires your site to have a reliable SMTP email setup.
You can run both on the same site and assign them by role. Admins and editors use the authenticator app. Subscribers use email OTP. That way security matches the access level.
One mistake almost every guide overlooks: most people only enable 2FA on the admin account. Think about what an editor can do on your site. They can publish posts, upload files, add external links. A compromised editor account can plant malicious links across your content. Protect every role that has dashboard access.
Read the full setup guide: How to secure WordPress login for every user with 2FA
3. Change Your WordPress Login URL
Every WordPress site on the internet shares the same two login addresses: (yoursite. com/wp-login. php) and (yoursite. com /wp-admin). Bots do not need to find your login page. They already know where it is.
Changing your login URL does one thing very well: it removes your login page from automated mass scanning. Bots that cannot find the login page cannot attack it. This will not stop a determined human attacker who specifically targets your site, but it eliminates a massive amount of automated traffic that was never going to be a real user anyway.
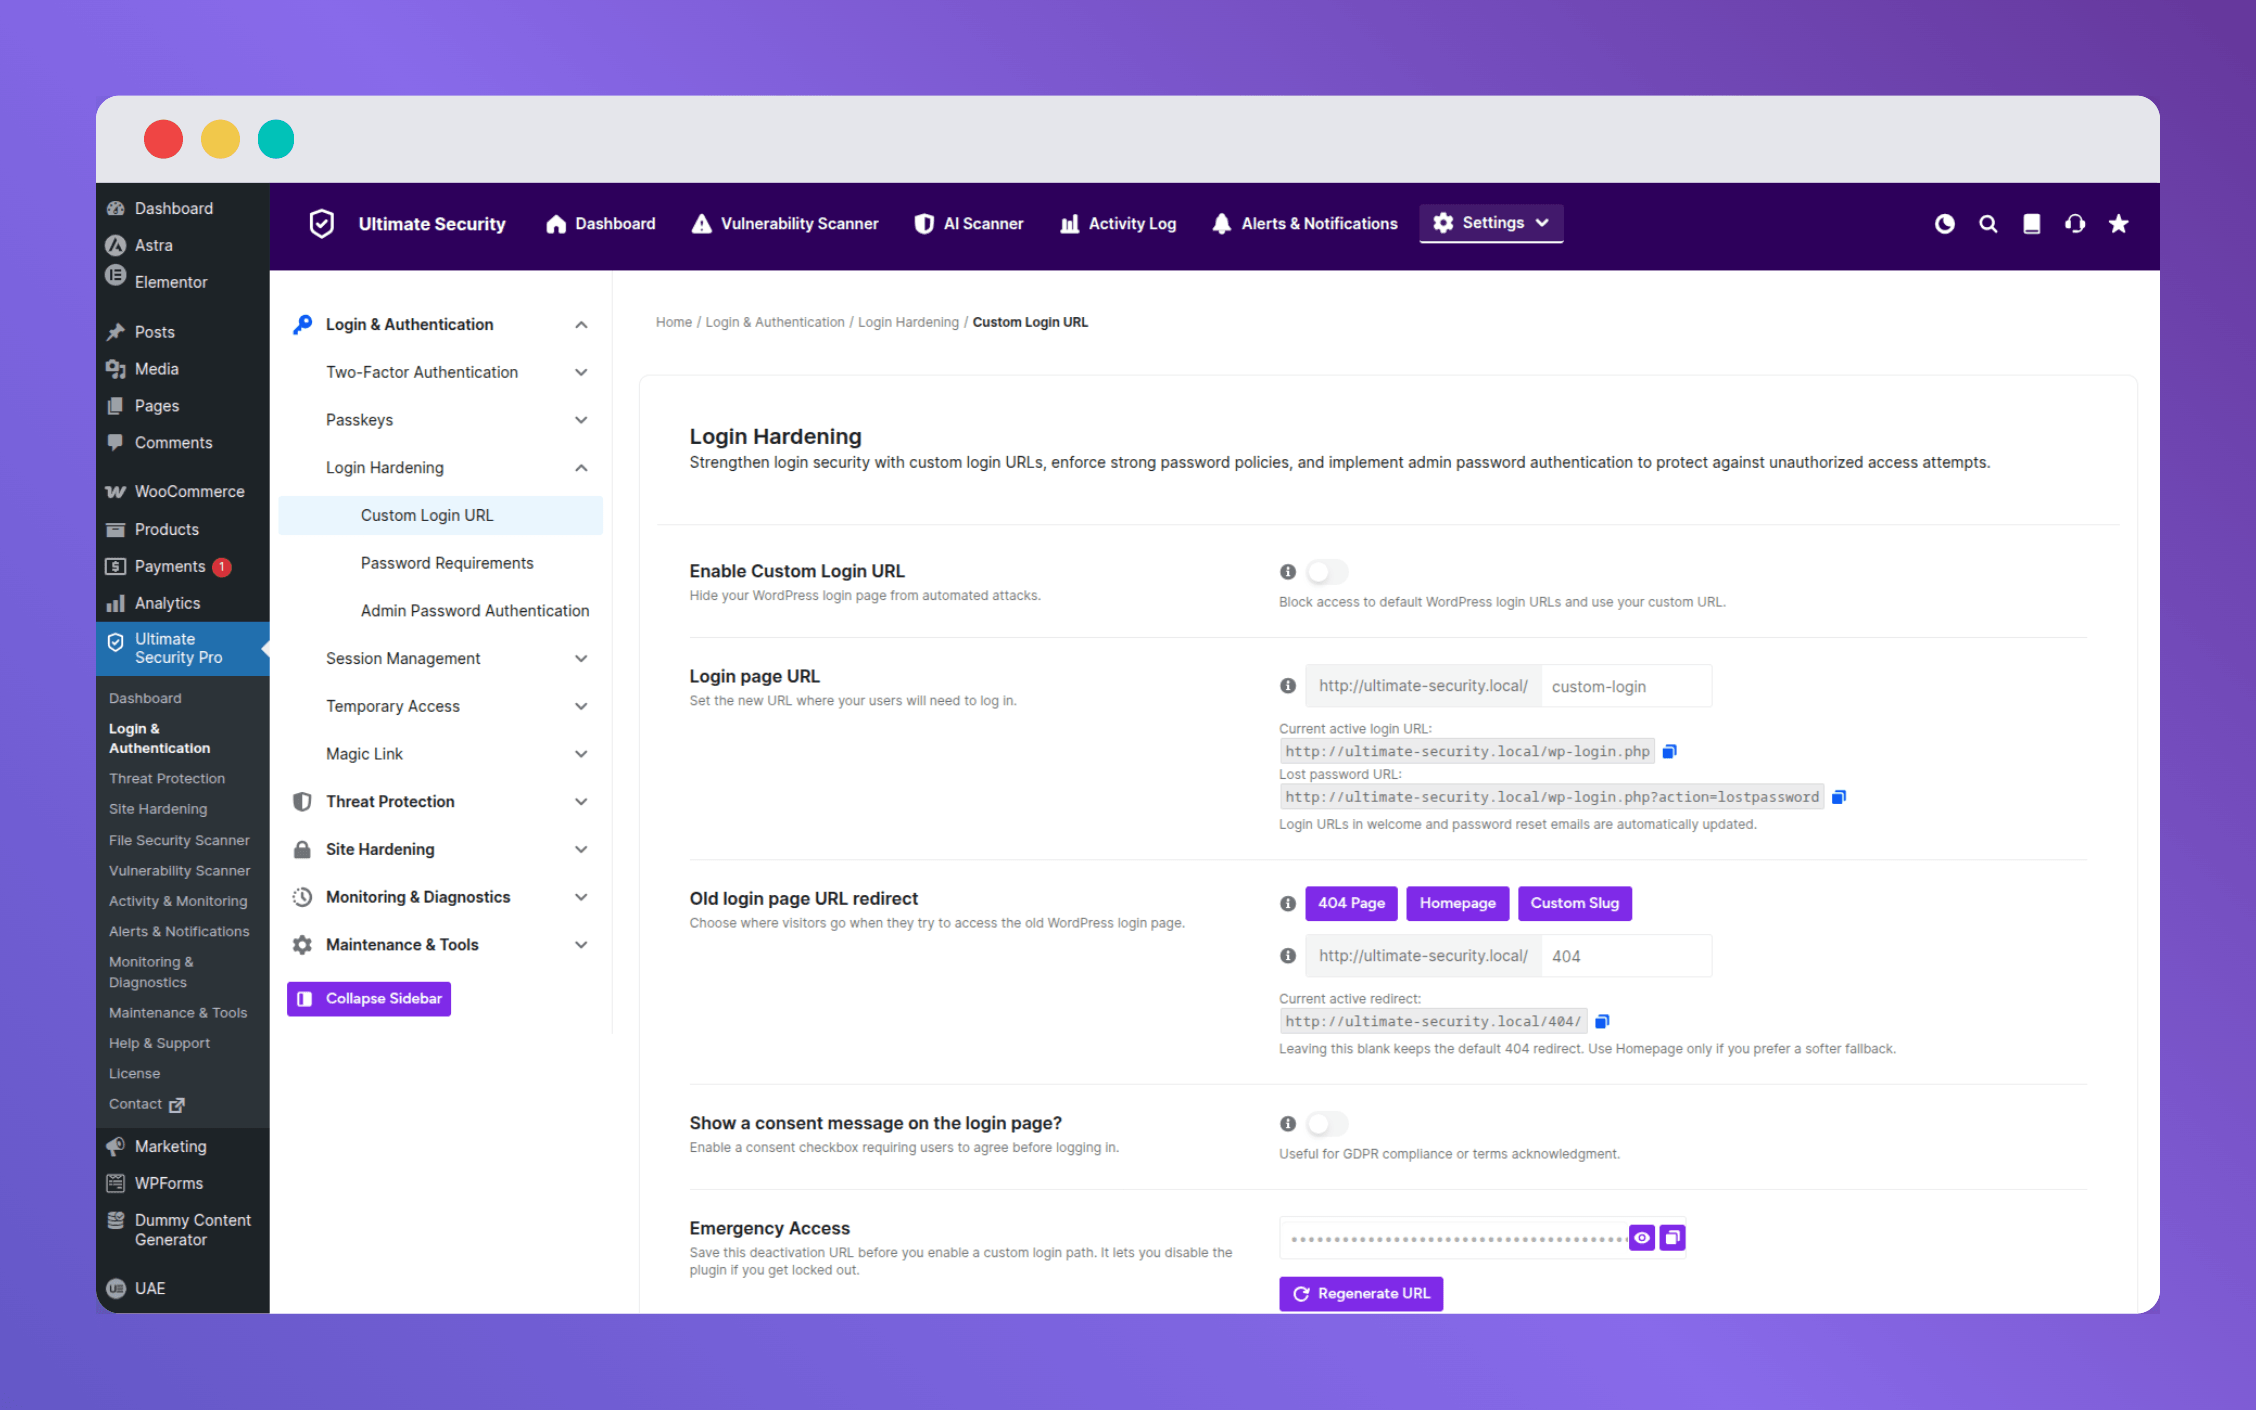
Setting this up takes about 30 seconds with a plugin. You pick a new URL slug, like (yoursite . com/ connect) or anything you choose, and the plugin handles the rest. The old address stops working immediately and returns a 404 error to anyone who visits it, including bots.
A few things to do before you switch:
- Write down or bookmark your new URL before you log out
- Test the new URL in a private browser window while still logged in to your current session
- Copy your recovery URL from the plugin settings before saving changes. This is your fallback if anything goes wrong.
Leave the old /wp-login. php redirect set to 404. Do not redirect it to your homepage or another page. A 404 gives bots nothing useful. Any other response confirms your site is alive and worth probing further.
Read the full setup guide: How to change your WordPress login URL
4. Limit Login Attempts to Stop Brute Force Attacks
By default, WordPress allows unlimited login attempts. A bot can try ten thousand password combinations on your login page and WordPress will keep accepting every single request without complaint. That is not a bug. It is just how WordPress was built. Flexibility first, security second.
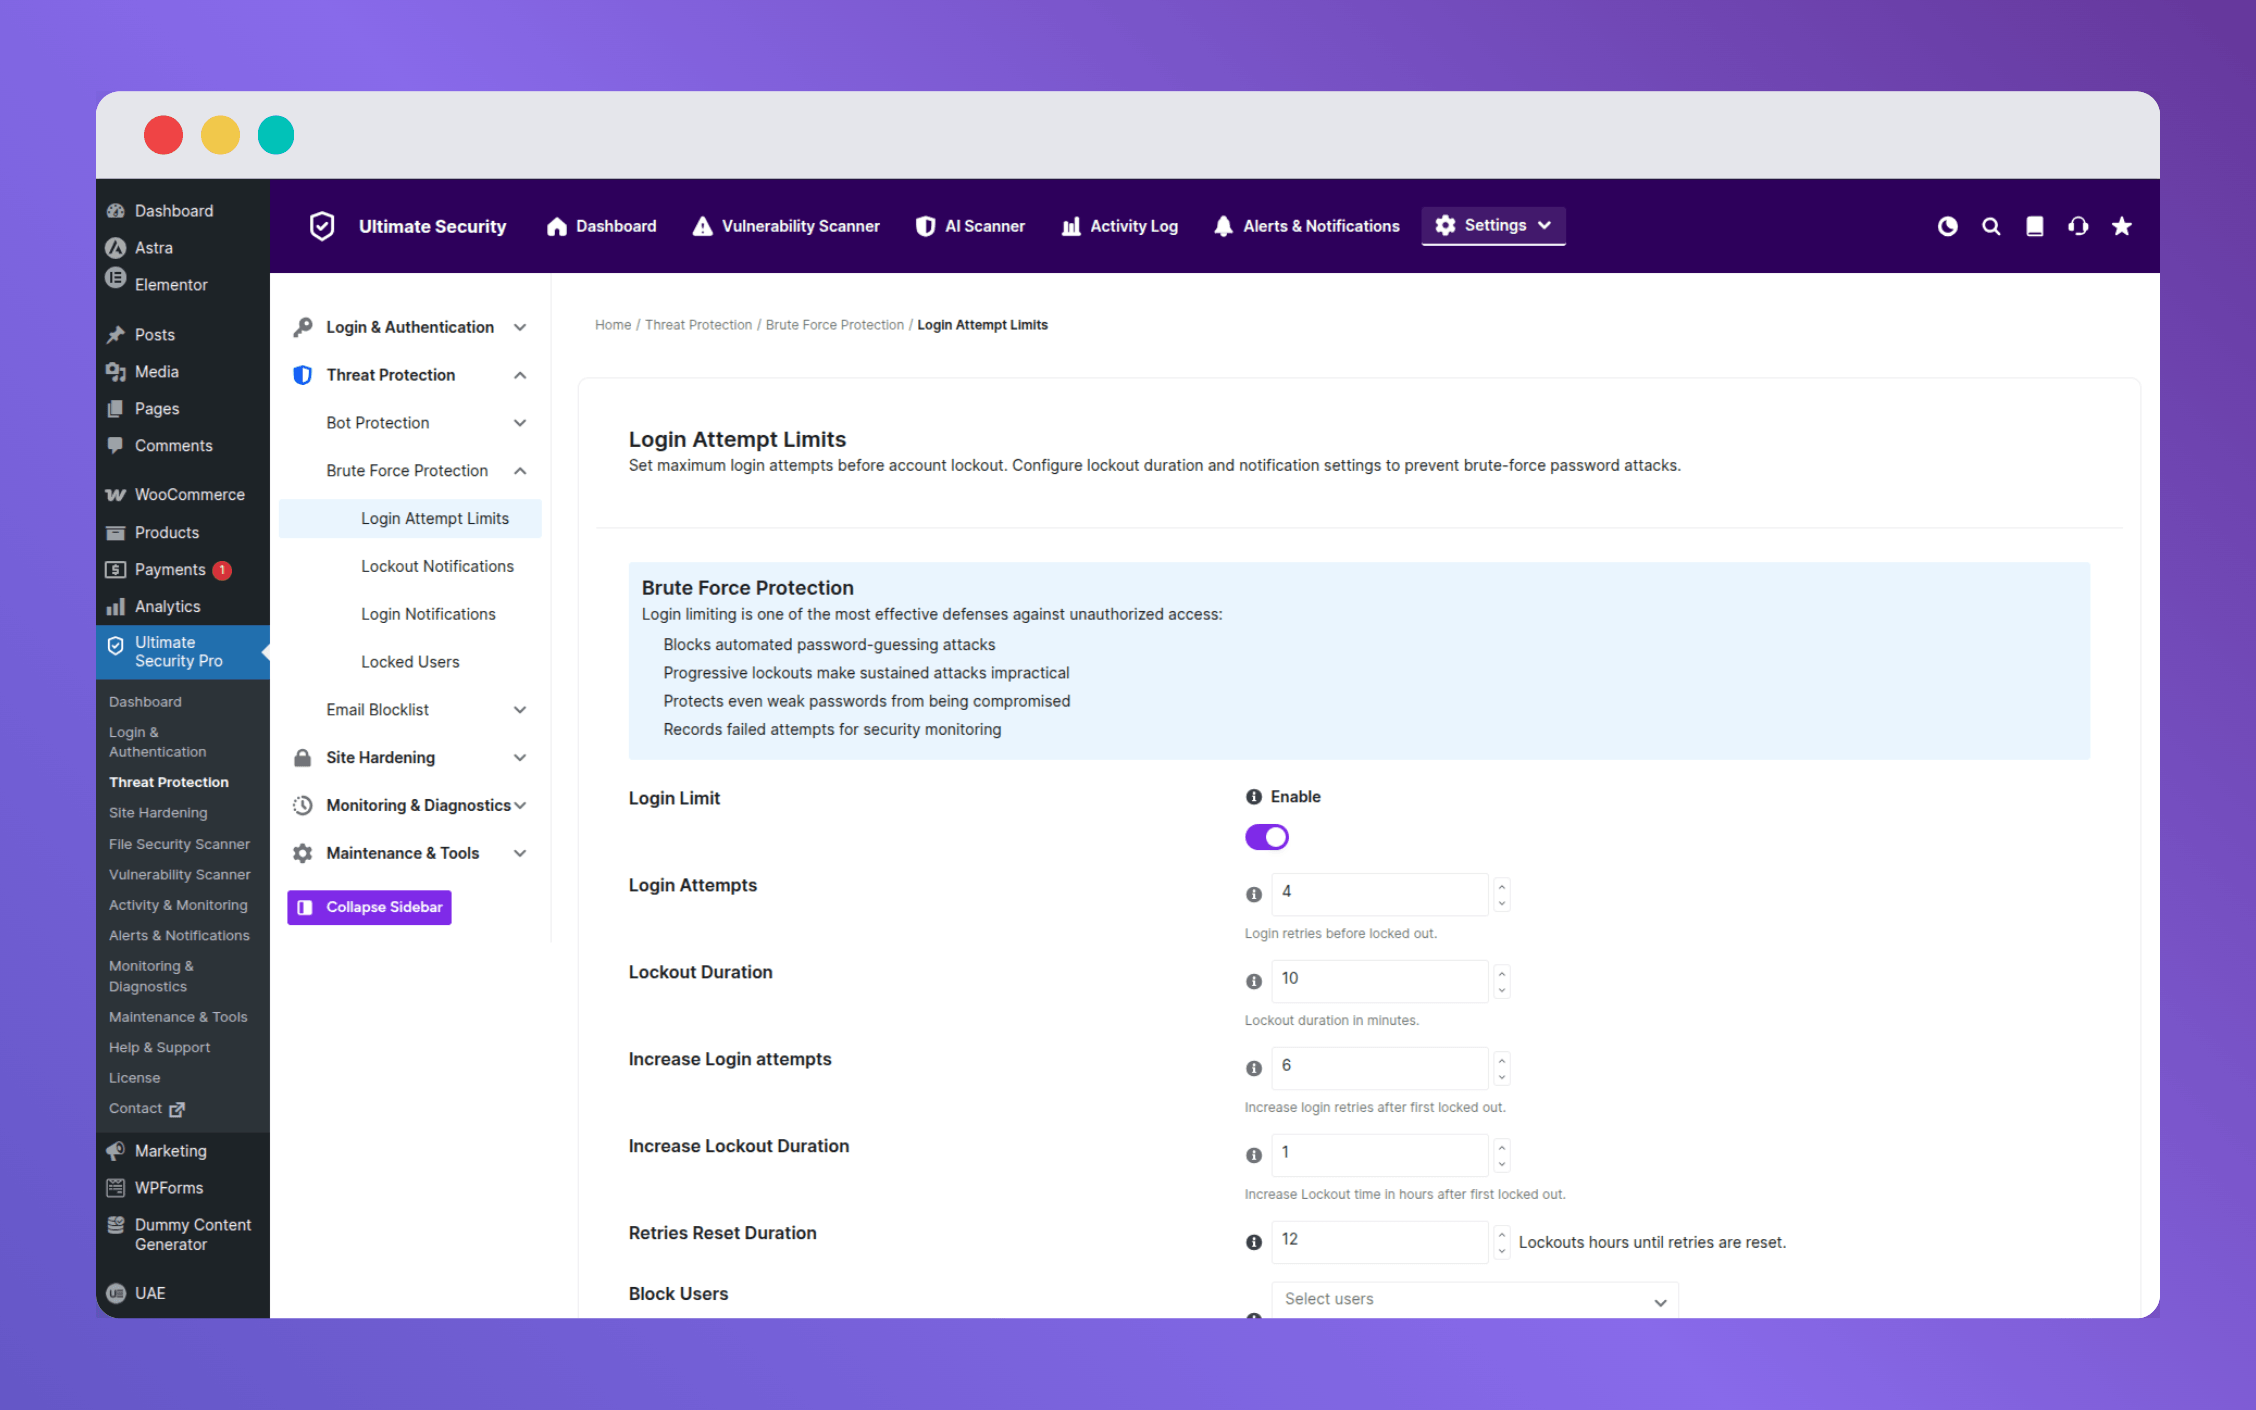
Limiting login attempts fixes this. After a set number of failed tries, the IP address is locked out. The attacker cannot try again until the lockout expires.
Here are the settings that work well for most sites:
| Setting | Recommended Value |
| Login attempts before lockout | 5 |
| First lockout duration | 15 minutes |
| Attempts before extended lockout | 10 |
| Extended lockout duration | 60 hours |
| Retry reset window | 24 hours |
The escalating lockout is what makes this effective. Basic setups lock someone out for 15 minutes every time. A patient bot can work around that by spacing out its attempts. When the second lockout is 60 hours, the attack stops completely. No bot operator wants to wait that long per IP.
One setting most people miss: you can block specific usernames from ever being allowed to log in. “Admin,” “administrator,” and “user” are the most commonly tried usernames. If you block them entirely, any login attempt using those names fails immediately, regardless of the password.
Read the full setup guide: How to limit login attempts for WordPress
One important step before you save anything: generate and copy your recovery URL. If you accidentally lock yourself out, this link bypasses all restrictions and lets you back in. Store it somewhere outside your site.
5. Add CAPTCHA or Cloudflare Turnstile to Your Login Page
Login limits stop brute force attacks. CAPTCHA stops bots from even reaching the authentication step. These two work at different points in the process, which is why using both makes sense.
CAPTCHA verifies that the person trying to log in is a human before checking their password. If a bot cannot pass the check, it never gets to attempt a username and password combination. It is an earlier filter.
Two options worth knowing about:
Google reCAPTCHA: The more established option with strong bot detection. The v2 version shows users a checkbox or image puzzle. The v3 version runs invisibly in the background and scores each visitor. Better at catching sophisticated bots, but v2 adds friction to the login experience and Google collects behavioral data from your visitors.
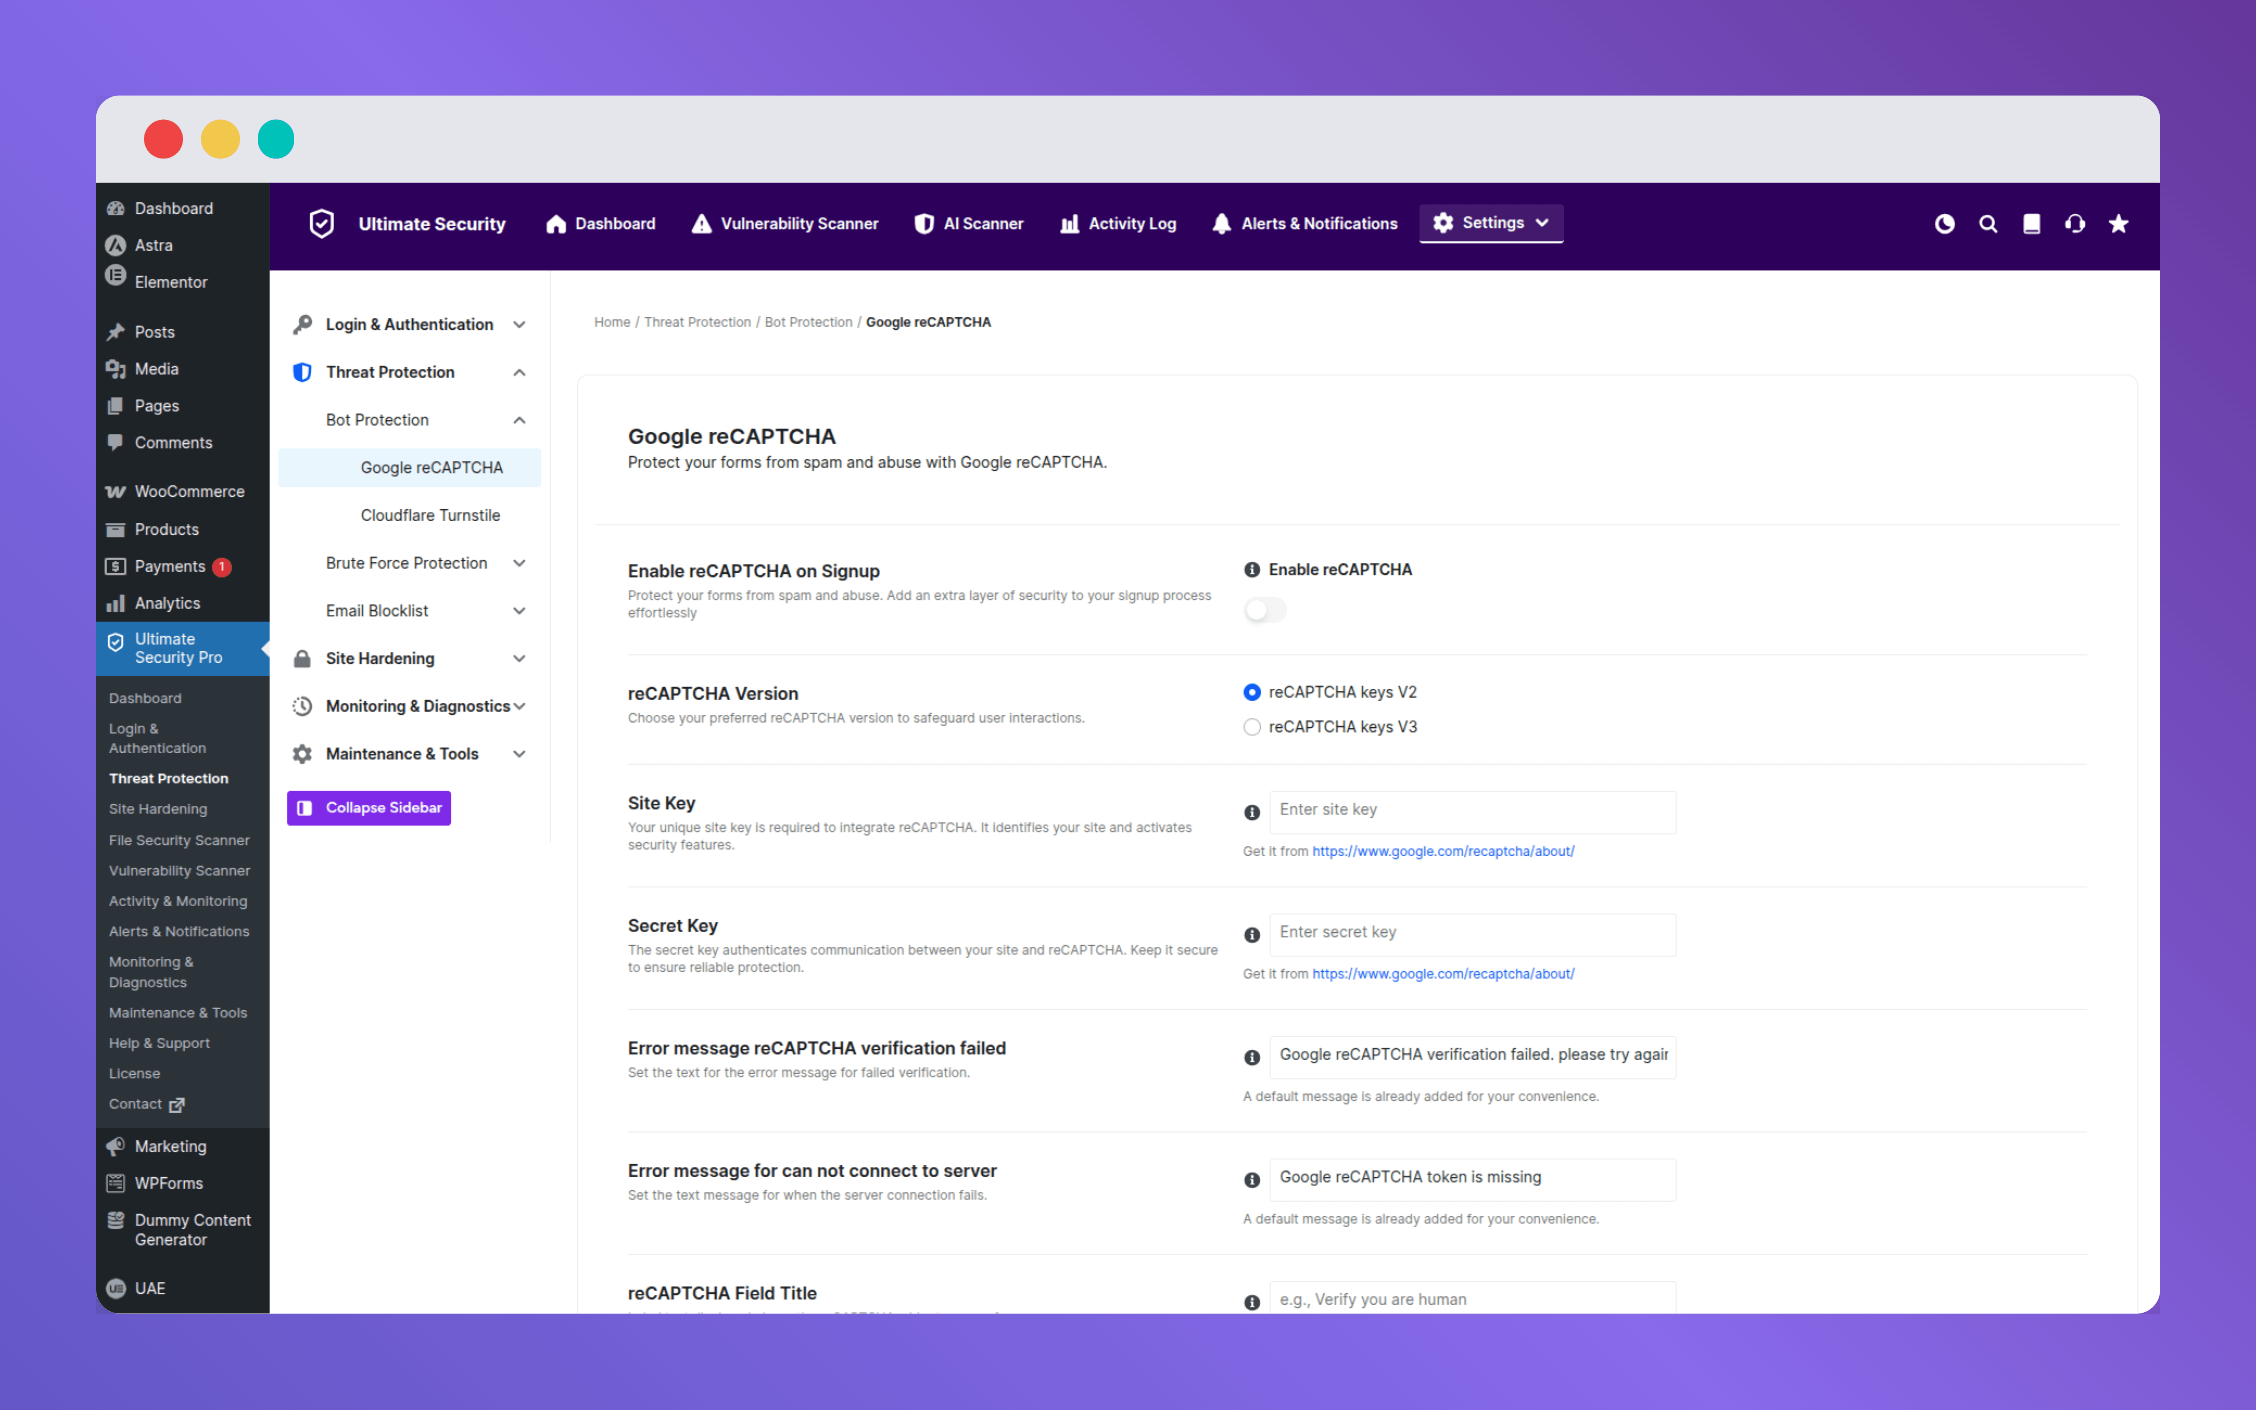
Cloudflare Turnstile: A newer alternative that runs entirely invisibly. Most users never see any challenge. Turnstile analyzes browser signals and device behavior to verify humans without asking them to do anything. Privacy-friendly, fast, and does not send user data to Google. For most WordPress sites in 2026, this is the better balance.
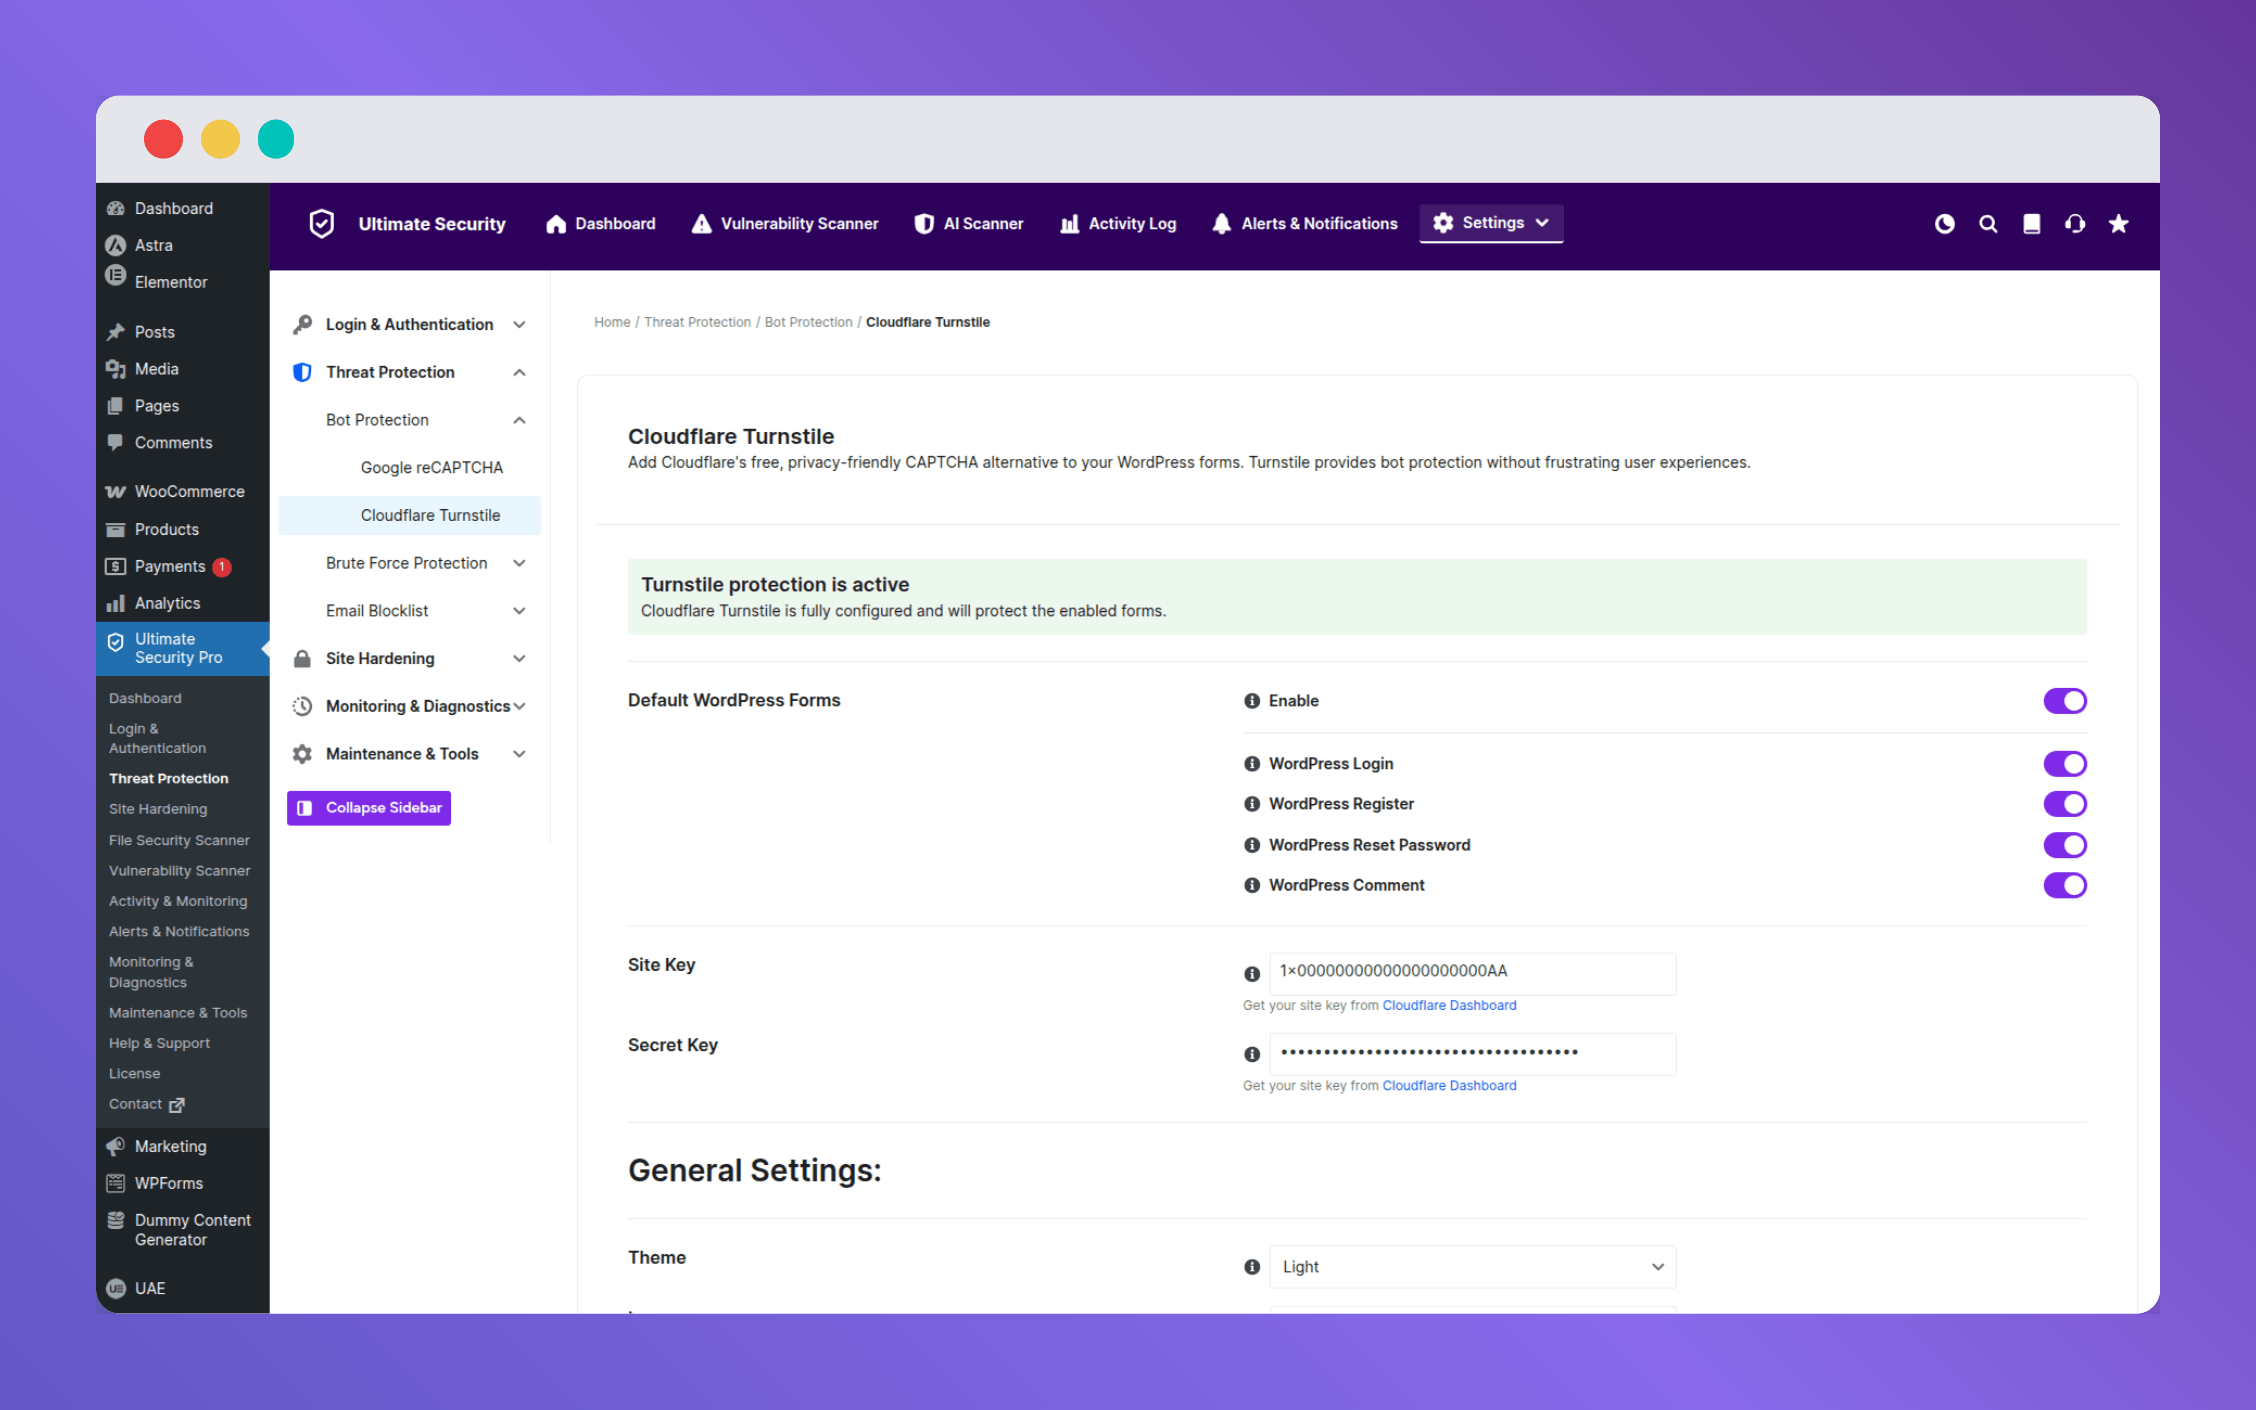
Where to apply bot protection:
- Login page (most important)
- Registration forms
- Contact forms and comment sections
- WooCommerce checkout pages
Both tools are free. Both take under two minutes to set up. The Ultimate Security plugin supports both and lets you switch between them without touching any code.
Read the full comparison: Turnstile vs reCAPTCHA for WordPress
These 5 Practices Cover Different Attack Types
Here is why each one matters and what it actually stops:
| Practice | Attack It Blocks |
| Strong passwords | Password guessing and weak credential attacks |
| Two-factor authentication | Credential stuffing using stolen passwords |
| Custom login URL | Automated mass scanning bots |
| Login attempt limits | Brute force volume attacks |
| CAPTCHA or Turnstile | Bots reaching the authentication step at all |
None of these works perfectly alone. A bot that finds your login page still hits the CAPTCHA. A bot that passes CAPTCHA still hits login limits. An attacker who gets a leaked password still hits 2FA. That layered coverage is the point.
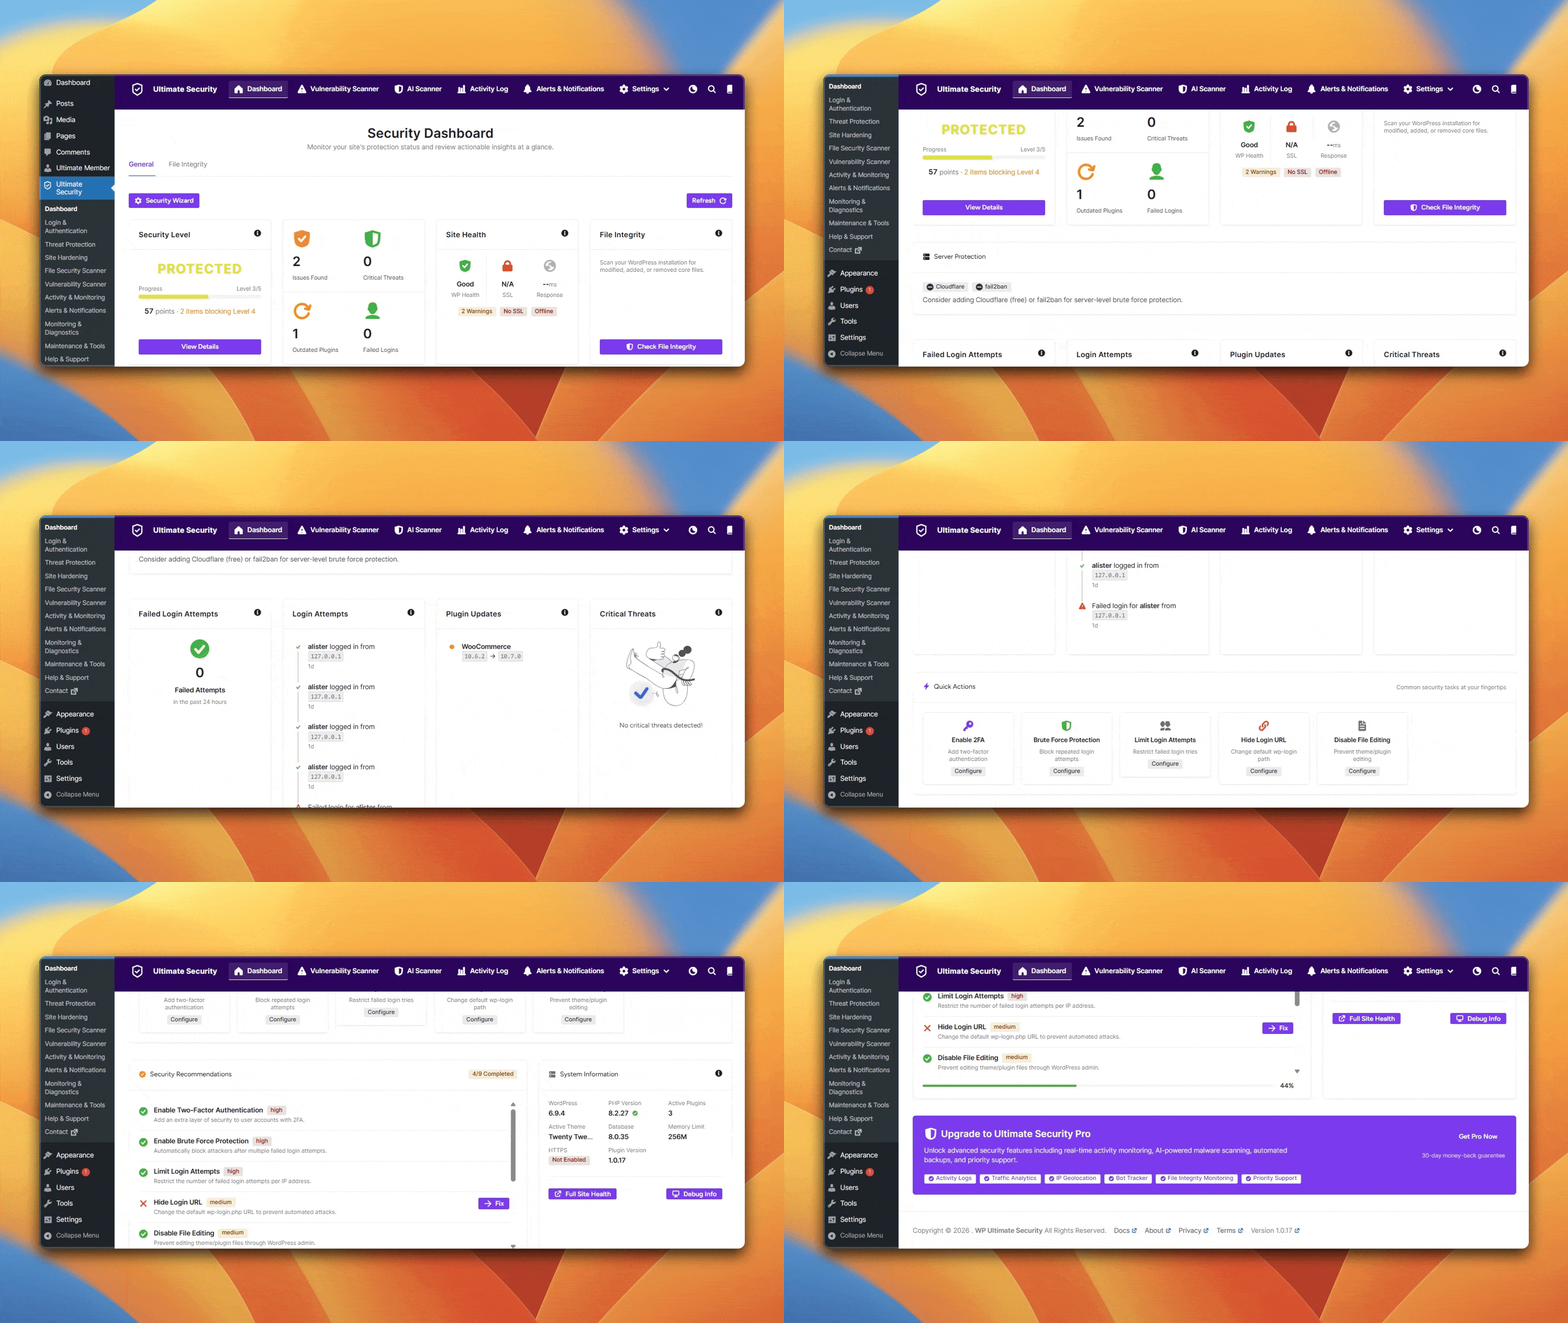
Running all five from separate plugins creates maintenance overhead and potential conflicts.
The Ultimate Security plugin handles every one of these from a single dashboard, which keeps things simpler and reduces the chance of something breaking.
WordPress Login Security Best Practices Checklist for 2026
Use this as a quick reference to check where your site stands:
- Strong password policy enforced across all user roles
- Two-factor authentication enabled for admins and editors at minimum
- Default login URL changed to a custom slug
- Old /wp-login.php address returning a 404 error
- Login attempt limits configured with escalating lockouts
- Recovery URL saved before activating login limits
- CAPTCHA or Cloudflare Turnstile active on the login page
- Bot protection applied to registration and contact forms as well
If you have all eight in place, your login page is significantly more secure than the average WordPress site. Most breaches target the easy ones. Make sure yours is not one of them.
Frequently Asked Questions
What is the most important WordPress login security setting to enable first?
Start with login attempt limits. It is the fastest to configure and immediately stops the most common attack type: brute force. From there, add 2FA and strong password enforcement.
Does changing the WordPress login URL actually make a difference?
Yes, especially against automated bots. Bots scan for the default login URL. If it is not there, they move on. It does not protect against a targeted human attacker who actively hunts for your new address, which is why pairing it with 2FA and login limits is important.
Do I still need 2FA if I already use strong passwords?
Yes. Strong passwords stop guessing attacks. They do not stop credential stuffing, where attackers use passwords stolen from other websites. Your password could be completely strong and still appear in a breach database from a different service. 2FA blocks that scenario entirely.
Is Cloudflare Turnstile better than reCAPTCHA for WordPress?
For most WordPress sites, Turnstile is the better fit in 2026. It is invisible, privacy-friendly, and does not slow your site down. reCAPTCHA offers stronger detection and suits high-risk environments like WooCommerce stores handling large transaction volumes.
Can I run all five of these security practices from one plugin?
Yes. The Ultimate Security plugin covers all five: strong password enforcement, 2FA with both authenticator app and email OTP, custom login URL, login attempt limits with escalating lockouts, and both reCAPTCHA and Cloudflare Turnstile support.
Will any of these settings affect my site’s speed?
None of these measures affect your site’s load speed for regular visitors. They all operate at the login and authentication layer, which only activates when someone is actively trying to log in.
What if I lock myself out after setting login limits?
Before saving your login limit settings, the Ultimate Security plugin generates a recovery URL. Copy it and keep it somewhere safe outside your site. If you get locked out, that URL bypasses the restriction and lets you back in immediately.
One Last Thing
These WordPress login security best practices are not a one-time task you set up and forget. Threats change. Bots get smarter. Settings need an occasional review. But the five practices in this guide give you a solid foundation that covers the most common attack types used against WordPress sites today. Setting them up takes under an hour. Skipping them can cost you your site. Pick one practice from this list and set it up today. The rest will follow.