
By default almost every WordPress login form on the internet accepts as many guesses as someone wants to try at it, unless something is built to stop that. Your WordPress login page has no limit on how many times a person, or a bot, can try a password. That gap sits there quietly until it becomes a real problem. Learning how to limit login attempts in WordPress is one of the simpler fixes you can make to your site, and setting it up takes far less time than most people expect.
What makes this approach even stronger is that you don’t have to stop attacks at the WordPress level alone. A good security setup can also connect to Cloudflare and block brute force attempts at the edge. So you are not relying on just one layer of defense. You get protection at the edge and inside WordPress working together. This guide walks through how the login attempt limit works, how to configure it, and how to stop brute force with Cloudflare.
Table of Contents
What Is a Login Attempt Limit?
A login attempt limit does exactly what it sounds like. It counts how many times someone enters the wrong password on your login page, and once that number crosses a set point, it blocks further attempts for a while.
This is different from a firewall. A firewall looks at traffic before it even reaches your login form and filters out requests based on patterns, IP reputation, or known bad behavior. A login attempt limit works at a narrower level. It doesn’t care where the traffic came from. It only cares about what’s happening at the login form itself, tracking failed attempts and reacting when they pile up. Both approaches are useful, and they work well together rather than replacing each other.
How Brute Force Attacks Depend on Unlimited Login Attempts
A brute force attack is a method used by hackers to crack passwords and login credentials. It only works because most login pages let it keep guessing forever without ever getting stopped. That’s the whole weakness these attacks rely on. Take away the unlimited tries, and the bot has nothing left to work with. It can guess a few times, then it’s locked out.
This is exactly why setting up “limit login attempts in WordPress” matters so much. It doesn’t need to be clever or complicated. It just needs to say, “You’ve tried enough times, now wait,” and that alone is enough to stop this kind of attack.
Introducing Ultimate Security’s Brute Force Protection
Ultimate Security is a WordPress plugin built to cover several sides of site security, from scanning for malware to managing Cloudflare WAF rules and login activity. One part of it, called Brute Force Protection, deals specifically with the problem described above: repeated login guesses.
The core piece of this, the Login Attempts feature, is free to use. You don’t need a paid plan to turn on the basic protection, which makes it a reasonable starting point for anyone running a WordPress site who hasn’t set up anything like this yet.
Configuring Limit Login Attempts in WordPress
Before you follow the steps below, you need to install and activate Ultimate Security inside your WordPress site. Now, once you open the plugin, you will find the Login Attempts settings inside Brute Force Protection. You’ll see a handful of fields. Here’s what each one actually does when you’re trying to limit login attempts in WordPress:
- Login Limit: This is the main switch. Nothing else on this page works until you turn this on.
- Login Attempts: This sets how many wrong passwords someone can enter before getting blocked. The default is 4, which is a fair middle ground. Too low, and real users locking themselves out over typos becomes annoying. Too high, and you’re giving bots more room to keep guessing.
- Lockout Duration: This decides how long someone stays blocked after hitting the attempt limit. Think of it as a timeout period before they can try again.
- Retries Reset Duration: This one is for the benefit of the doubt. If someone hasn’t tried logging in for a set number of hours, their past failed attempts get wiped clean, so a forgetful user isn’t punished for a mistake they made days ago.
If you want the full technical breakdown of these fields straight from the source, the Login Attempts documentation covers it in more detail. Getting these four settings right covers most of what you need to limit login attempts in WordPress without adding friction for legitimate users.
Escalating Protection Against Repeat Offenders
A basic lockout works fine for casual guessing, but some attackers keep coming back. This is where the escalation settings come in.
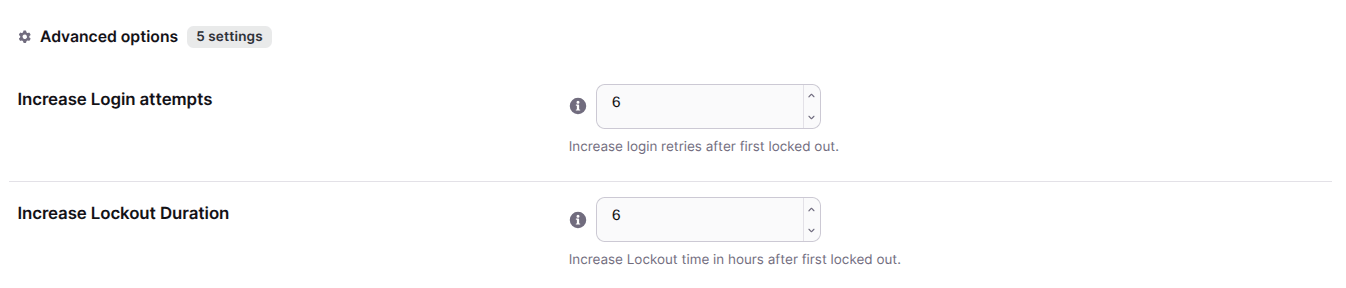
- Increase Login Attempts: If the same person or bot gets locked out multiple times within a set number of hours, the system treats them as a serious threat rather than a one-off mistake.
- Increase Lockout Duration: Once flagged as a serious threat, the lockout period itself gets longer, so repeat offenders wait considerably more time before they’re allowed to try again.
This two-step approach means a normal user who forgot their password gets a short, fair timeout, while a bot hammering your login page repeatedly ends up locked out for much longer stretches.
Blocking Specific Users Manually
Sometimes you already know exactly who or what you want kept out, without waiting for the attempt limit to trigger. The Block Users section handles that directly.

- Type the exact username into the input box to block that account from logging in.
- Use Select All if you want to highlight every entry on your current block list at once.
- Use Remove All to clear the list entirely and unblock everyone in one go.
This is a manual override sitting alongside the automatic attempt limit, useful for situations where you’ve spotted a problem account and don’t want to wait for the system to catch it on its own.
Recovering Access If You Get Locked Out
Attempt limits protect your site, but they don’t know the difference between an attacker and you forgetting your own password on a bad day. That’s what the Recovery URL is for.

Generate the key, copy the link it gives you, and store it somewhere safe and offline, not in your email inbox or a shared document. If you ever get locked out of your own site, this link is the only way back in without waiting out the lockout period. Treat it the same way you’d treat a spare house key. Useful to have, risky to leave lying around.
Going Further with Ultimate Security Brute Force Protection
The free Login Attempts feature covers the basics well. If you want more visibility into what’s happening on your login page, Ultimate Security’s paid plan adds a few extra layers on top of Brute Force Protection.
Lockout Notifications
This is a more focused set of alerts tied specifically to lockout events. You get notified when a user is locked out, when someone is hit with an extended lockout for repeated attempts, and when the Recovery URL is used to bypass a lockout.
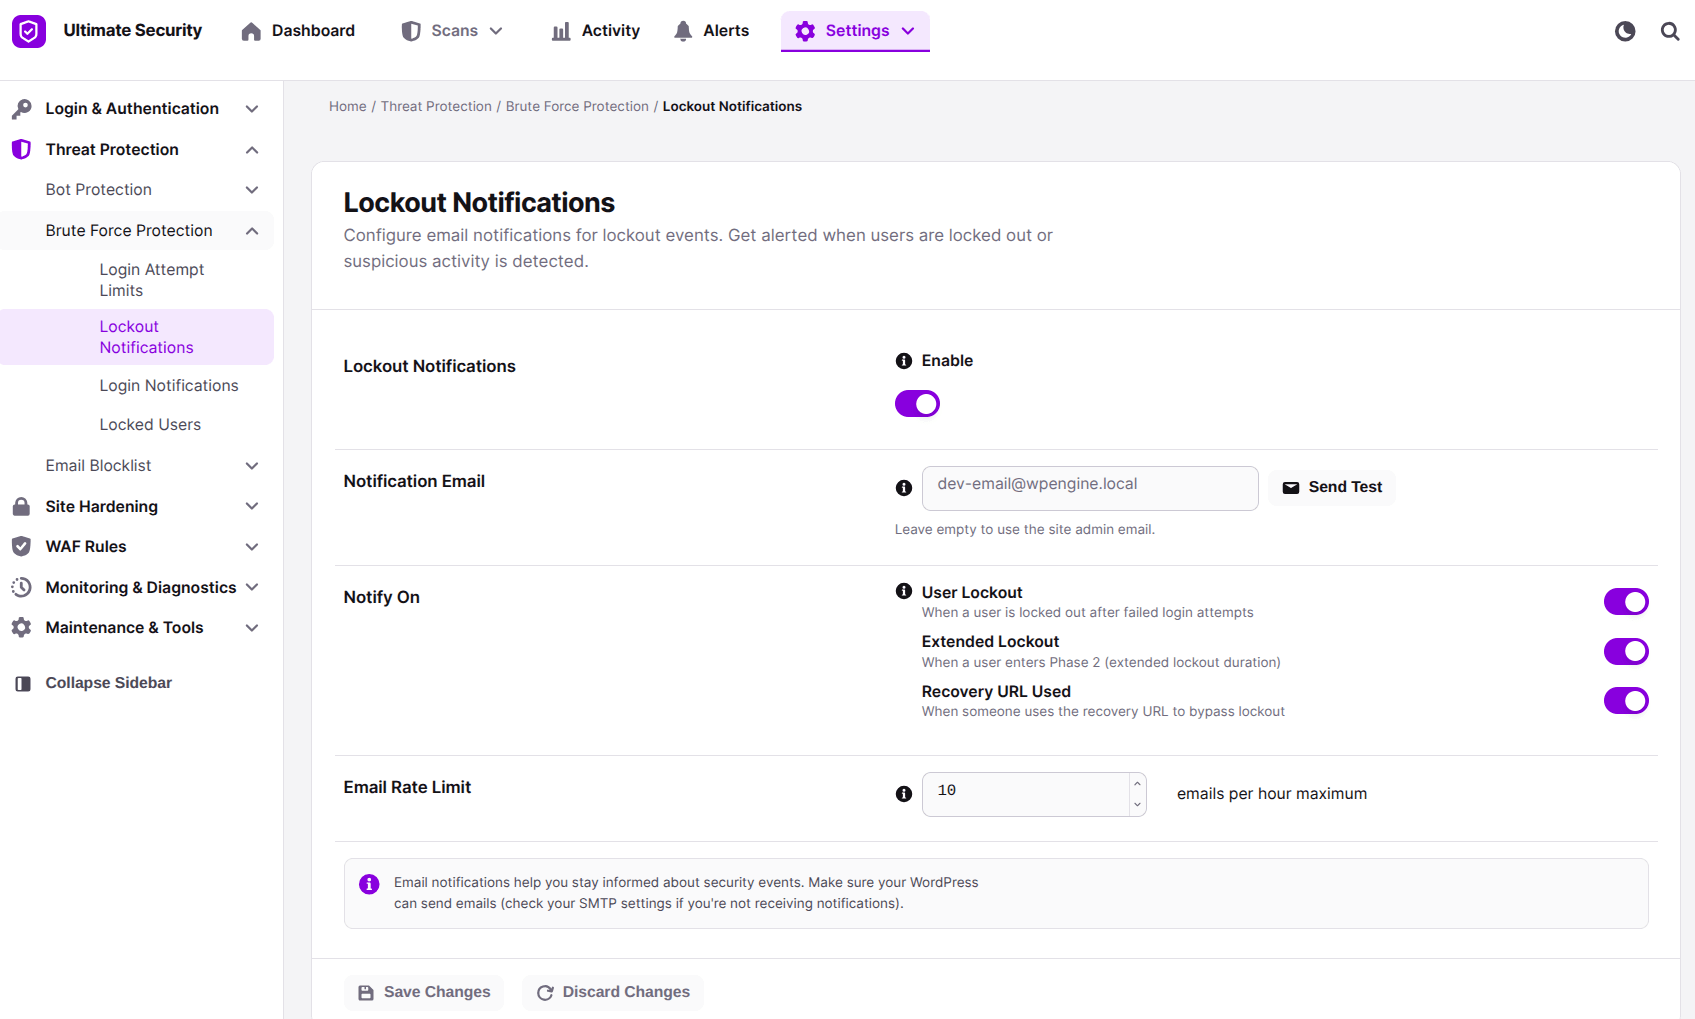
It’s useful if you want a quick heads-up without digging through a full activity log.
Login Notifications
This turns on email alerts and a running activity log for login events. You get notified about failed logins, lockouts, and even successful logins that happen right after a string of failures, which can be a sign someone finally guessed correctly.
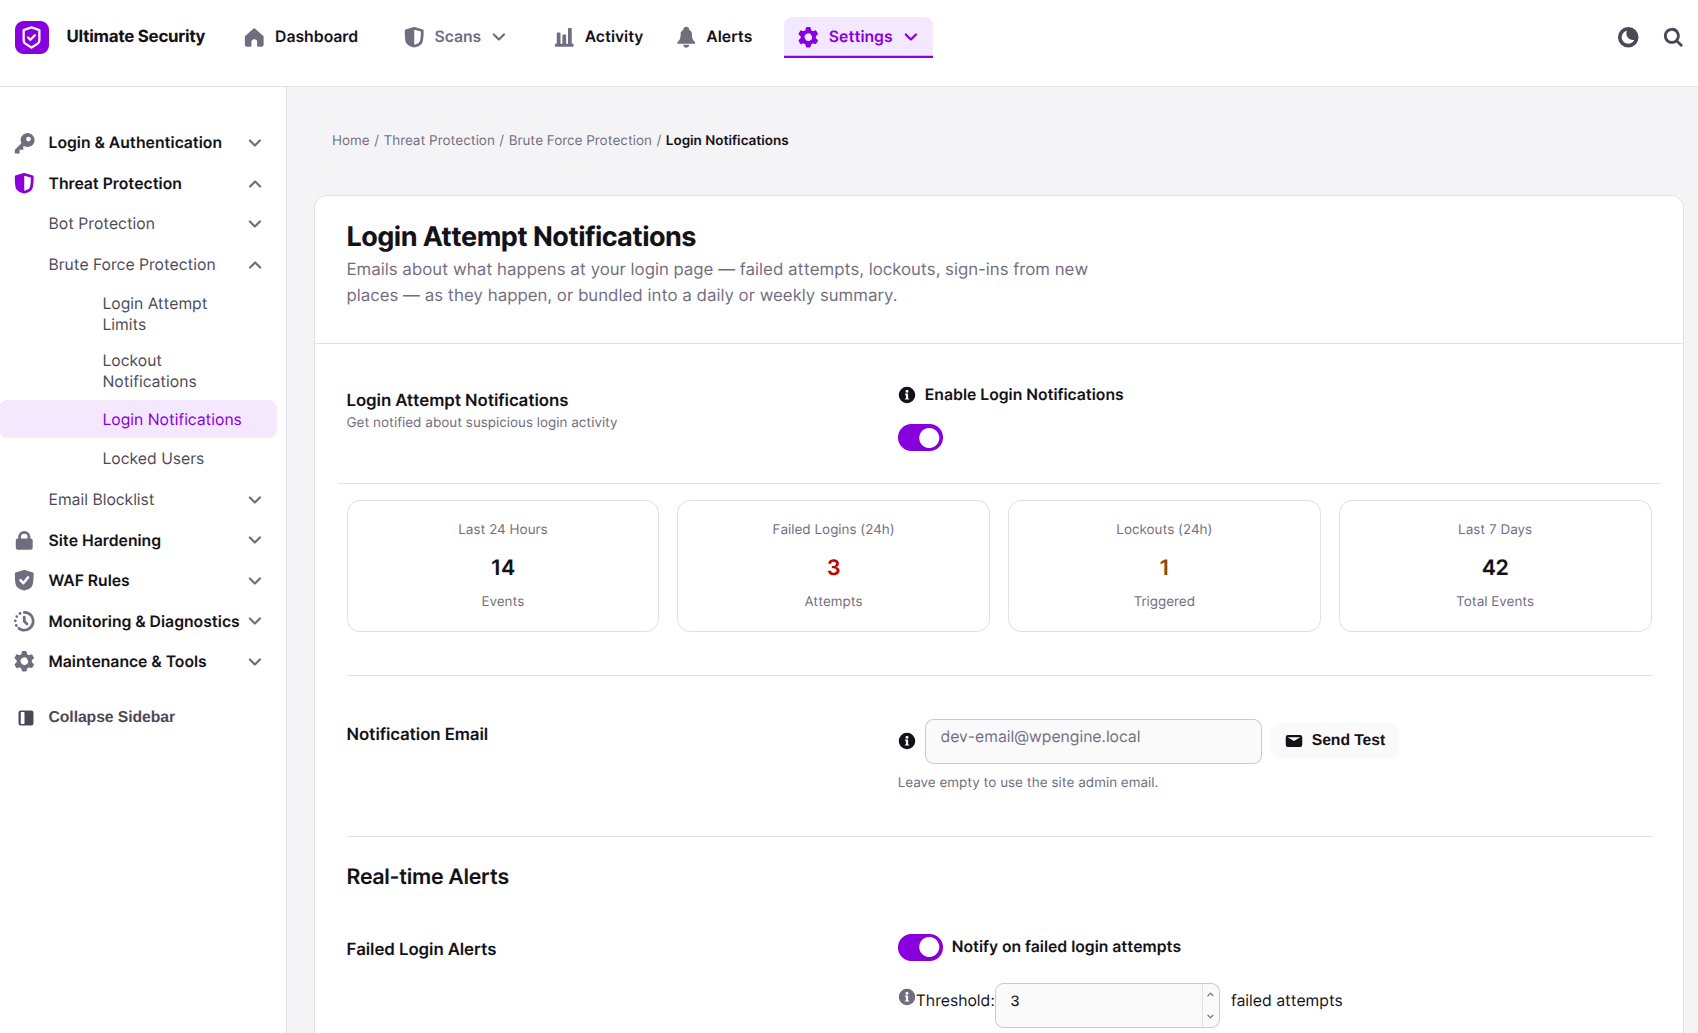
There’s also a daily or weekly digest option if you’d rather check in periodically instead of getting instant alerts.
Recent Activity Log
Inside the login notification settings, there’s a live table showing every login event on your site. Each row shows the type of event (Failed, Lockout, or Success), the username and IP address involved, and how long ago it happened.
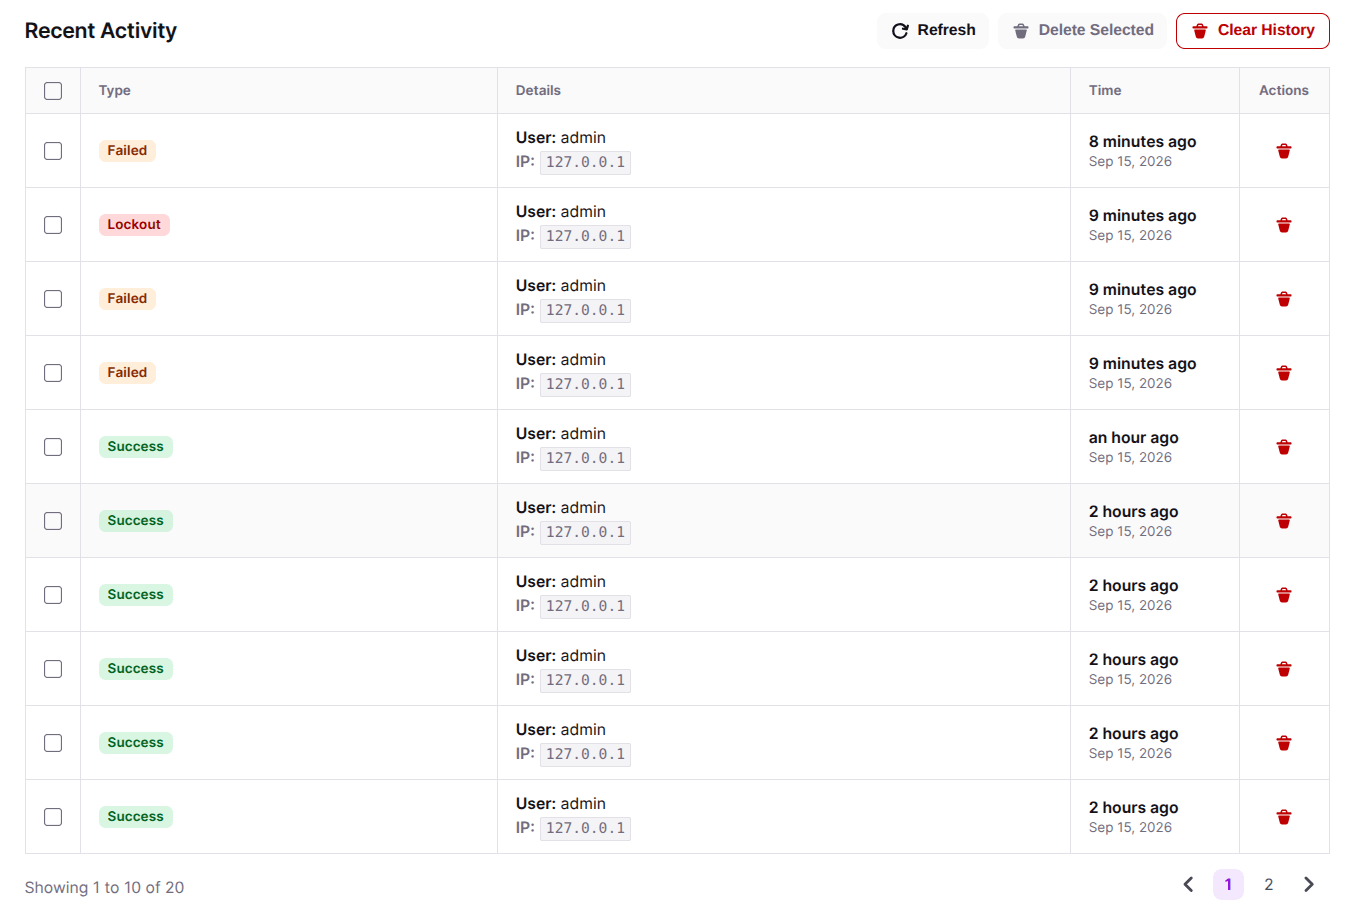
You can delete individual entries, select and remove several at once, or clear the whole history if you want to start fresh.
Locked Users
This gives you a real-time table of every account currently locked out. You can see the username, how many failed attempts led to the lockout, which lockout phase they’re in, and how much time is left before they can try again.
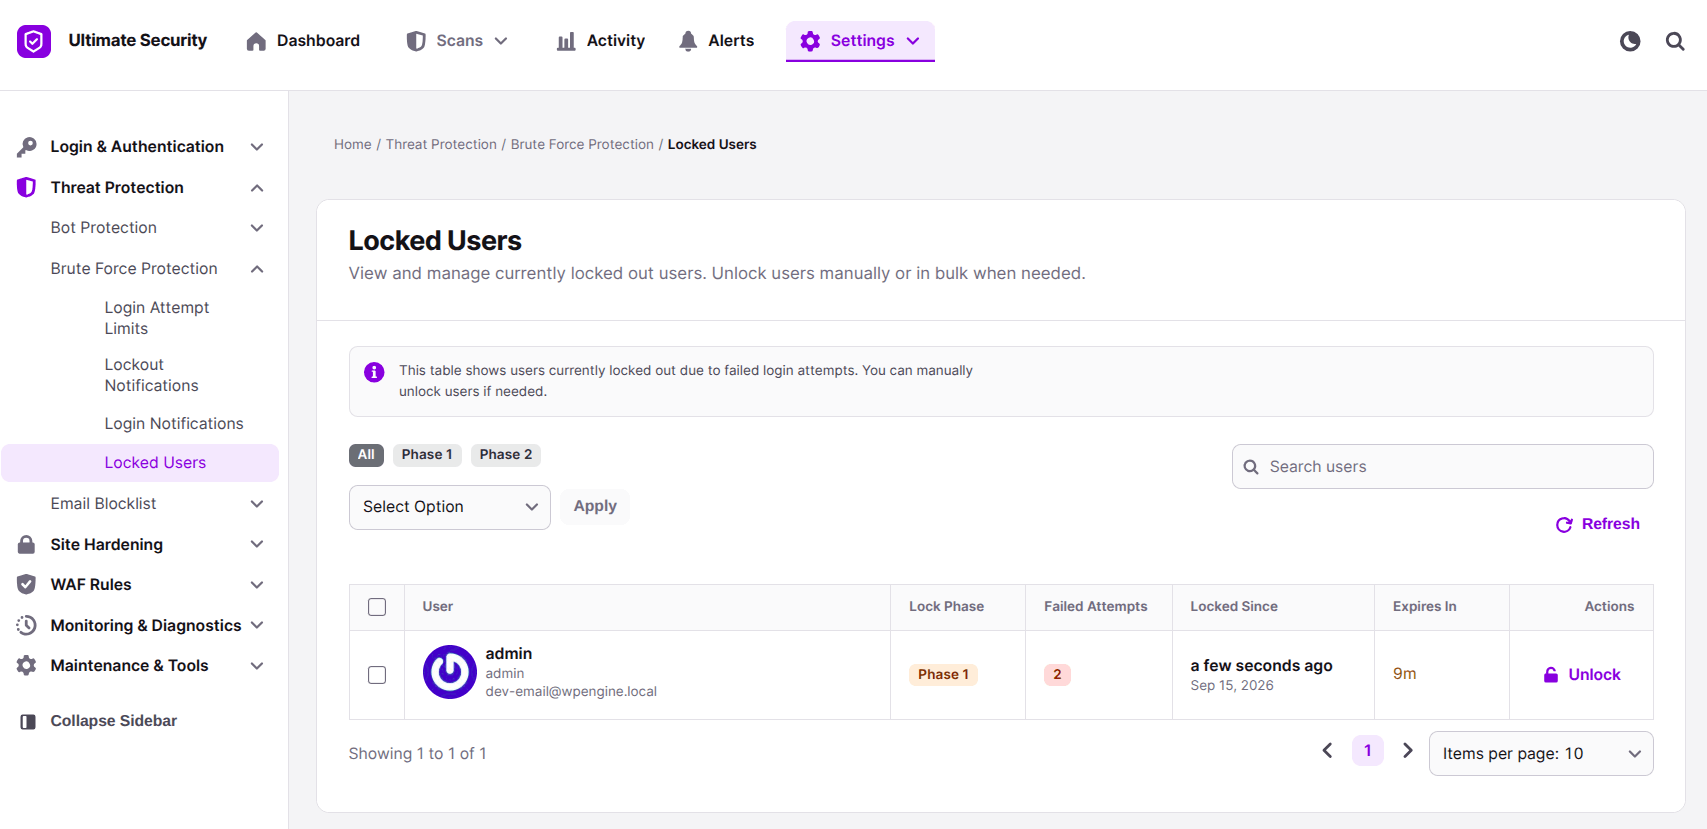
If your site is under a heavy attack, this table also lets you unlock or extend a ban in bulk instead of handling accounts one by one.
Stop Brute Force with Cloudflare
With Ultimate Security you can also connect your Cloudflare account and manage WAF rules from inside the plugin. Two settings here matter most for stopping brute force attacks before they even reach your login form:
- Protected Paths: This applies a managed challenge to wp-login.php, which is the actual file every login attempt has to pass through. This is one of the most targeted paths on any WordPress site. Challenging traffic here before it reaches WordPress at all is one of the highest-value rules you can turn on.
- Custom Login URL: If you have already changed your default login URL, you can protect that custom path too.
Together, these two settings mean bots get stopped at Cloudflare’s level, before they ever reach WordPress and before the Login Attempts feature even needs to count a single failed try.
One thing to keep in mind: this feature only works once your Cloudflare account is connected. Without that connection, these rules are saved inside the plugin but won’t actually deploy or do anything on your site.
Best Practices for Login Security Beyond Attempt Limits
A login attempt limit closes one gap, but it works best alongside a few other habits:
- Use long, unique, strong passwords instead of anything reused across sites.
- Turn on two-factor authentication wherever it’s available.
- Keep WordPress core, themes, and plugins updated, since outdated software is a common entry point on its own.
None of these take much effort individually, but together they cover far more ground than any single setting can on its own.
Frequently Asked Questions
What does it mean to limit login attempts in WordPress?
It means setting a maximum number of times someone can enter the wrong password before the login form blocks further tries for a set period.
Is limiting login attempts free to set up?
Yes, with Ultimate Security the core Login Attempts feature is free. You don’t need a paid plan to turn on the basic protection.
What is the default number of login attempts allowed?
The default is 4 failed attempts before a lockout kicks in, though this number can be adjusted in the settings.
How long does a lockout usually last?
That depends on the lockout duration setting, which you control. It’s meant to act as a timeout period rather than a permanent block.
What happens if I forget my password and get locked out by mistake?
The Retries Reset Duration setting handles this. If you haven’t attempted a login in a set number of hours, your past failed attempts are cleared automatically.
Does limiting login attempts stop all brute force attacks?
No single setting stops everything on its own. It closes a major gap, but pairing it with strong passwords and two-factor authentication gives much stronger protection.
What happens if the same attacker keeps getting locked out?
The Increase Login Attempts and Increase Lockout Duration settings detect repeat offenders and apply longer lockout periods after multiple failed lockouts.
Conclusion
Limiting login attempts is one of those small changes that quietly does a lot of work in the background. It won’t stop every kind of attack, but it closes a gap that’s left wide open by default on nearly every WordPress site. Setting the attempt count, lockout duration, and reset window correctly takes a few minutes.
Pairing that with Cloudflare WAF rules through Ultimate Security takes things a step further, since it stops bots at the edge before they ever reach your login page at all. Between the two, you get protection working from both directions instead of relying on just one layer. If you haven’t set any of this up yet, it’s worth doing today rather than after something goes wrong.


Comments are moderated. Stay on topic: spam and link drops are removed.