
Every WordPress site comes with the same two login addresses: wp-login. php and wp-admin. Bots do not need to search for your login page. They already know where it is. Automated tools hit these addresses across millions of sites every day, trying thousands of username and password combinations without stopping. Your server processes every single failed attempt.
This is where you need to rename default WordPress login URL. When bots look for the default URL and find nothing, they move on. They never reach your login form. That also means less junk traffic hitting your server, which is better for your site’s performance.
A security plugin is the easiest way to get this done. No code, no file editing, no risk of breaking your site.
In this guide you will learn why the default login URL puts your site at risk, how to rename it safely, and how to add an extra security layer using Login Gate.
Table of Contents
Why You Should Rename the Default WordPress Login URL
WordPress powers nearly half of websites on the internet. Attackers do not customize their tools for each site. They write one script that hits the default login URL and run it against millions of sites at once.
Keeping the default login URL means:
- Bots find your login page without any effort
- Your server processes thousands of failed login attempts, adding unnecessary load
- Attackers have a known starting point for brute force and credential stuffing attacks
- Your login page is publicly visible and scannable by anyone
When you rename default WordPress login URL to something private, those automated attacks stop reaching your login form. The bots look for the default login path and find a 404 error, then move on. They never reach your login page at all.
That said, this is one layer of protection, not a complete security solution on its own. It works best when combined with strong passwords, login attempt limits, and two-factor authentication. More on that at the end of this guide.
One thing to understand clearly: Renaming your login URL is security through obscurity. It is not foolproof. A determined attacker who knows your custom URL can still try to brute force it. This is why it belongs in a stack of security measures, not as a standalone fix.
Before you start, you will need:
- Admin access to your WordPress dashboard
- An active SSL certificate on your site
- 5 minutes
Prerequisites and Safety Measures
Before you change anything, take a few minutes to prepare. Skipping this step is where most people run into trouble.
- Back up your site. A backup before any security change means you have a safe restore point if something goes wrong.
- Make sure HTTPS is active on your site. The Login Gate feature (covered in the steps below) sends credentials with each request, so your site needs an SSL certificate before you enable it. If you are not sure whether HTTPS is active, check whether your site loads with a padlock icon in the browser. If it does not, set up a free SSL certificate before continuing.
- Use a staging site if you have one. If your host provides a staging environment, test the change there first. This is especially useful if you manage a live business site where downtime would be a problem.
- Why a dedicated plugin is safer than manual methods. You can technically change the WordPress login URL by editing your (.htaccess) file or functions.php. But one typo in either file can break your site completely. Ultimate Security handles the change through a controlled settings panel and includes an emergency access option if you get locked out.
How to Rename Default WordPress Login URL with Ultimate Security
Ultimate Security includes a Custom Login URL feature built into its Login and Authentication section. The setting lets you rename default WordPress login URL. Here is how to set it up, step by step. In case you need help installing the plugin. Read our installation guide.
Navigate to the Custom Login URL Settings
Log into your WordPress dashboard. In the left sidebar, go to Ultimate Security, then open Login and Authentication. Find Login Hardening and click on Custom Login URL.
Read the custom login URL documentation.
Set Your New Custom Login URL
In the input field below the current URL, type your new login address. This becomes the only working address for your login page.
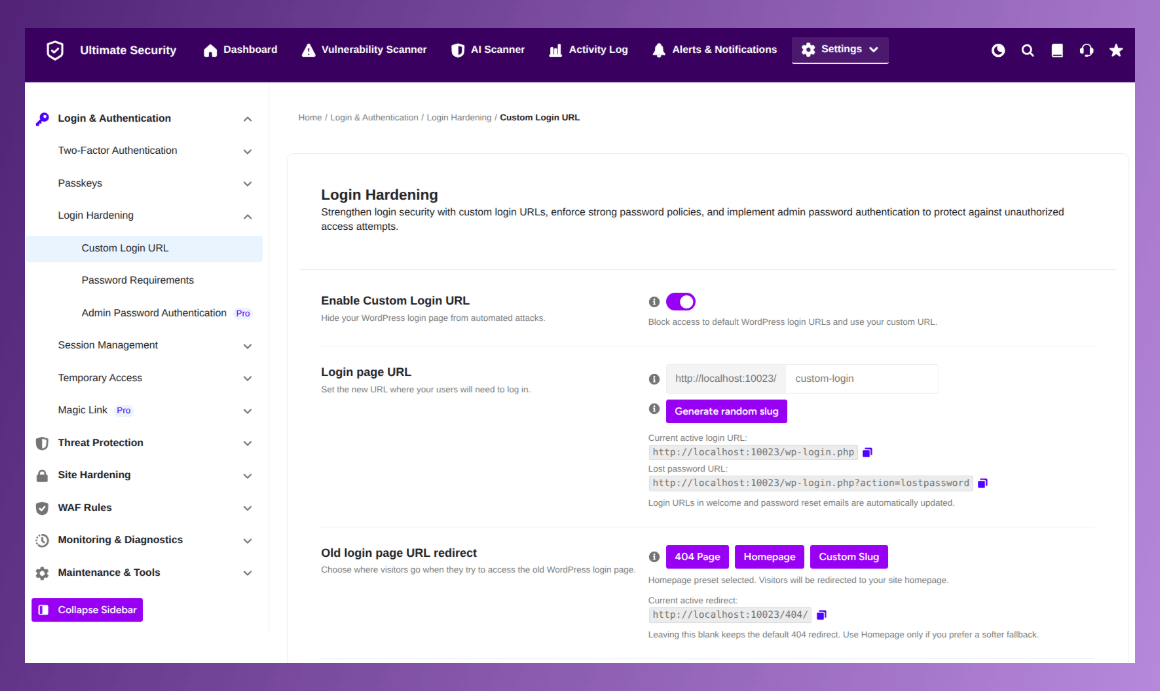
A few tips for choosing a good custom login URL:
- Avoid obvious words like “login,” “admin,” “dashboard,” “backend,” or “wp”
- Pick something memorable to you but meaningless to anyone else
- Keep it lowercase with hyphens if needed, no spaces
- Treat it like a password. Do not share it publicly or include it in any documentation that is accessible to others
Configure the Old Login Page Redirect
This setting controls what happens when someone visits the (wp-login.php or wp-admin) URL after you rename it.
You have two options:
- 404 (Page Not Found) — This is the recommended setting. Bots and attackers hit the old address and see nothing. The page appears to not exist.
- HomePage — It redirects to the homepage.
- Custom redirect URL — You can redirect them to any page on your site instead. Some site owners redirect to the homepage. This is optional and up to your preference.
Stick with the 404 option unless you have a specific reason to redirect. A 404 tells attackers and bots that the page does not exist, which gives away less information than a redirect.
Add a Consent Message (Optional)
The consent message feature lets you display custom text on your login page before the form loads. You will see a toggle switch and a text box with a default message already filled in.
Toggle it on if you want to use it. Common uses include:
- A legal notice for client or membership sites
- An access reminder for team-based sites (“Authorized personnel only”)
- A simple welcome message or “Terms and Conditions”
This is completely optional. If you do not need it, leave the toggle off and move to the next step.
Generate Your Emergency Access Link Before Saving
This step is important and easy to overlook. Before you save your new login URL settings, generate an emergency access link. This link lets you temporarily deactivate the plugin and regain access to the default login URL if you ever get locked out.
To generate it: click the Generate Key button. The plugin creates a private, secret link unique to your site. Click Copy to save it to your clipboard.
Store this link somewhere outside your site. A password manager, a notes app on your phone, or an email to yourself all work. The only requirement is that it is somewhere you can access without logging into WordPress.
Important note: Passwords for the Login Gate (covered next) are stored using bcrypt encryption. That means they cannot be recovered if lost. Write them down and store them safely before enabling anything.
Now click Save Changes at the bottom of the section.
Right after saving, open a private browser tab and test your new login URL. Do not close your current session until you have confirmed the new address works. This one step prevents the most common lockout scenario.
Enable and Configure Login Gate (HTTP Authentication)
This is the feature that separates a basic login URL change from a genuinely hardened setup. Login Gate adds a browser-level authentication checkpoint before your WordPress login form even loads.
Here is what that means in practice: when someone visits your login URL, they first see a browser popup asking for a username and password. This is not the WordPress login form. Only after they pass this checkpoint do they reach the WordPress login form.
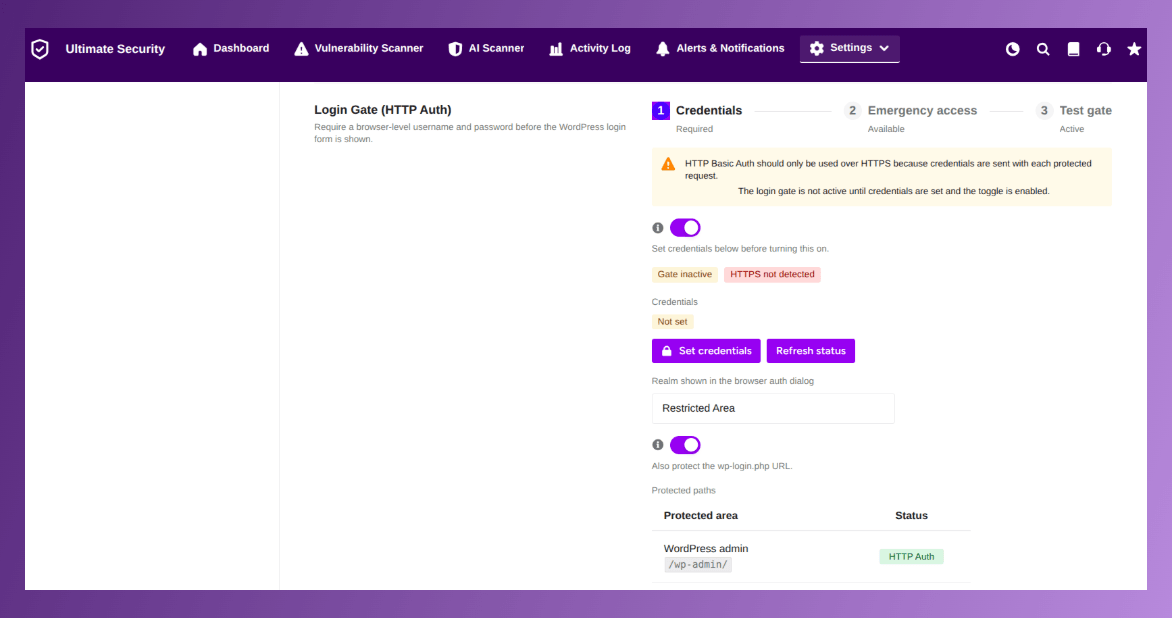
Most automated bots are not built to handle this kind of two-step barrier. They hit the browser-level checkpoint and stop. They never reach the WordPress form at all.
Setting up credentials:
Click Set Credentials to choose the username and password for this checkpoint. These are separate from your WordPress login credentials. Someone trying to reach your login page needs to know both sets.
HTTPS requirement: Login Gate must only be used on sites with an active SSL certificate. Credentials are sent with each page request, and without HTTPS they would travel in plain text. If your site is not already on HTTPS, set that up before enabling login gate.
Enabling path protection:
Once credentials are set, enable the toggle switch. Ultimate Security automatically protects the two most vulnerable paths:
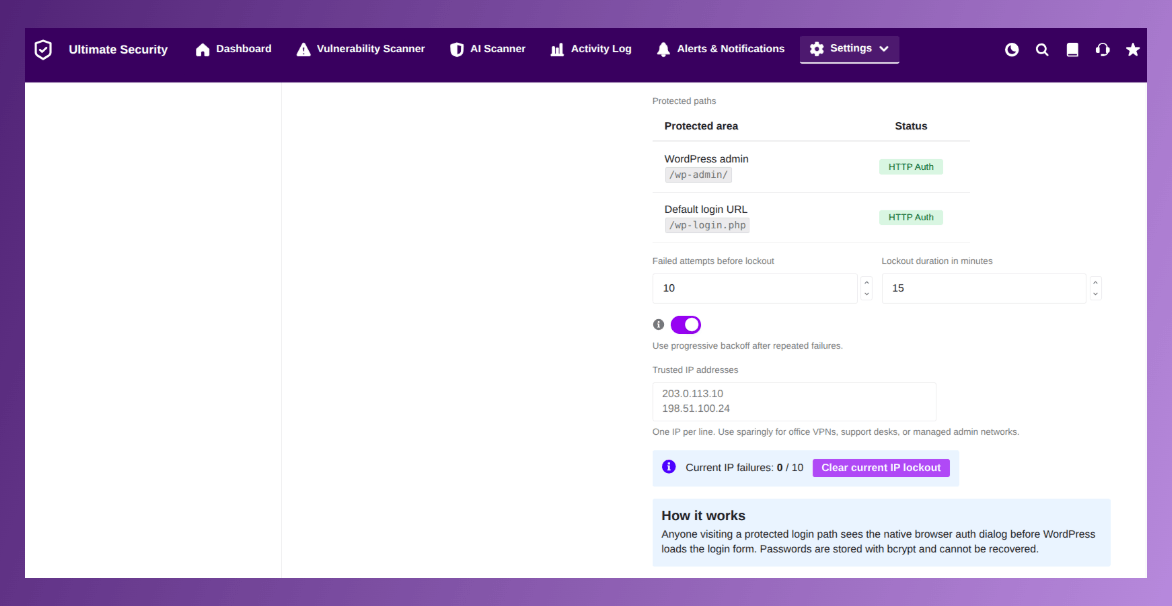
- /wp-admin — the WordPress admin folder
- /wp-login.php — the default login file
Both are covered when you enable the toggle. A green badge confirms that HTTP Auth protection is active on each path.
Setting failed attempt limits:
To prevent someone from guessing the login gate password through trial and error, configure these limits:
- Failed attempts before lockout: How many wrong attempts are allowed before a temporary block? A setting around 5 to 10 works well for most sites.
- Lockout duration: How long the block lasts after the limit is reached. 15 minutes is a reasonable starting point.
Adding trusted IP addresses:
If you work from a fixed location with a static IP address (a home office or company network), add that IP here. The Login Gate will recognize your IP and skip the checkpoint for you. You go straight to the WordPress login form without needing the extra step.
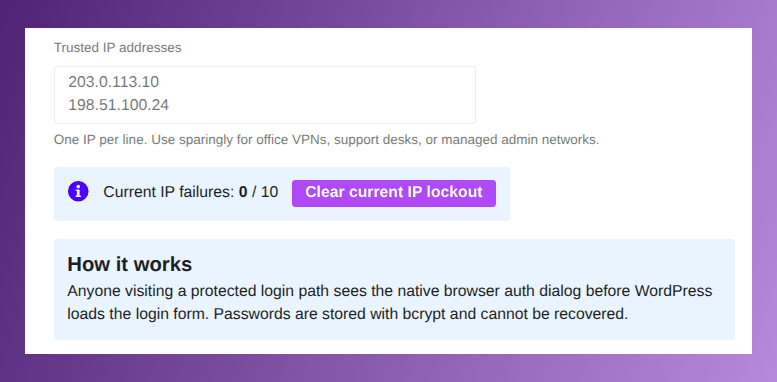
This is worth setting up if you log in frequently, since it removes the extra step for you while keeping the checkpoint in place for everyone else.
After Renaming: Testing and Best Practices
Once your new settings are saved, go through this checklist before considering the job done.
Test your new login URL in a private browser tab. Open an incognito window, type in your new URL, and confirm the login page loads. If you enabled Login Gate, you should see the browser-level prompt first, then the WordPress login form after entering those credentials.
Test what happens at the old URL. In the same private window, try visiting (yoursite. com/wp-admin). If your settings are correct, you should see a 404 error or the redirect you configured. If the old URL still loads the login form, go back and check that your settings were saved correctly.
Bookmark your new login URL. Add it to your browser bookmarks now. If you share site access with a team, send them the new URL and update any internal documentation.
Update any hardcoded login links. If you have any links pointing to wp-admin somewhere on your site or in automated tools, update them to the new URL.
Combine with other security layers. When you rename default WordPress login URL, it removes one attack vector. For complete login security, also make sure you have:
- Login attempt limits with lockout set up so brute force attempts get blocked at the form level too
- Two-factor authentication enabled, especially for admin accounts. Even if someone gets past the custom URL, 2FA stops them from completing the login
- Strong password requirements enforced across all user roles
These three measures, combined with your new custom login URL and Login Gate, cover every major attack path against your WordPress login page.
Frequently Asked Questions
How do I rename default WordPress login URL?
Install the Ultimate Security plugin, go to Login and Authentication, open the Custom Login URL settings, type your new login address in the input field, configure the redirect for the old URL, generate your emergency access link, and save. The whole process takes about two minutes.
Is it safe to rename default WordPress login URL?
Yes, as long as you bookmark your new URL and store your emergency access link before saving. The change does not affect how your login form works. It only changes the address used to reach it. If you forget the new URL, the emergency access link lets you deactivate the plugin temporarily and regain access through the original address.
Will renaming the login URL affect my site’s SEO or performance?
No. The custom login URL only applies to the login page, which is not indexed by search engines and is not part of your public-facing site. It has no effect on your SEO, page speed, or visitor experience.
What makes a good custom login URL?
Choose something that is easy for you to remember but has no obvious connection to your site, brand, or role. Avoid words like “login,” “admin,” “wp,” or “dashboard.” Something like yoursite.com/morning-brief or yoursite.com/team-gate is far better than yoursite.com/my-wp-login. Treat it the way you would treat a password.
How does Login Gate in Ultimate Security improve protection?
Login Gate adds a browser-level username and password checkpoint before your WordPress login form loads. This is handled separately from WordPress itself, at the server level. Most automated bots are not built to pass this kind of checkpoint, so they get stopped before they can even attempt to guess your WordPress credentials. It acts as a second gate in front of your login page rather than a second step inside it.
Do I need to rename both wp-login.php and wp-admin?
You do not need to handle them separately. When you rename default WordPress login URL, both /wp-login.php and /wp-admin are protected automatically. The plugin covers both paths once the settings are saved and active.
Conclusion
The default login URL is one of the few things every WordPress site has in common. Bots exploit that predictability constantly. Renaming it takes about five minutes and immediately removes your site from the targeting path of every scanner looking for that default address.
The steps in this guide give you more than just a renamed URL. With Login Gate enabled, you have a browser-level checkpoint in front of your login form that stops most automated tools before they even see a password field. That is a meaningful upgrade to your site’s security posture without any technical complexity.
Do this now, bookmark your new URL, store your emergency access link somewhere safe, and then look at the other layers mentioned at the end of this guide. Each one adds a defense that the others do not cover.