
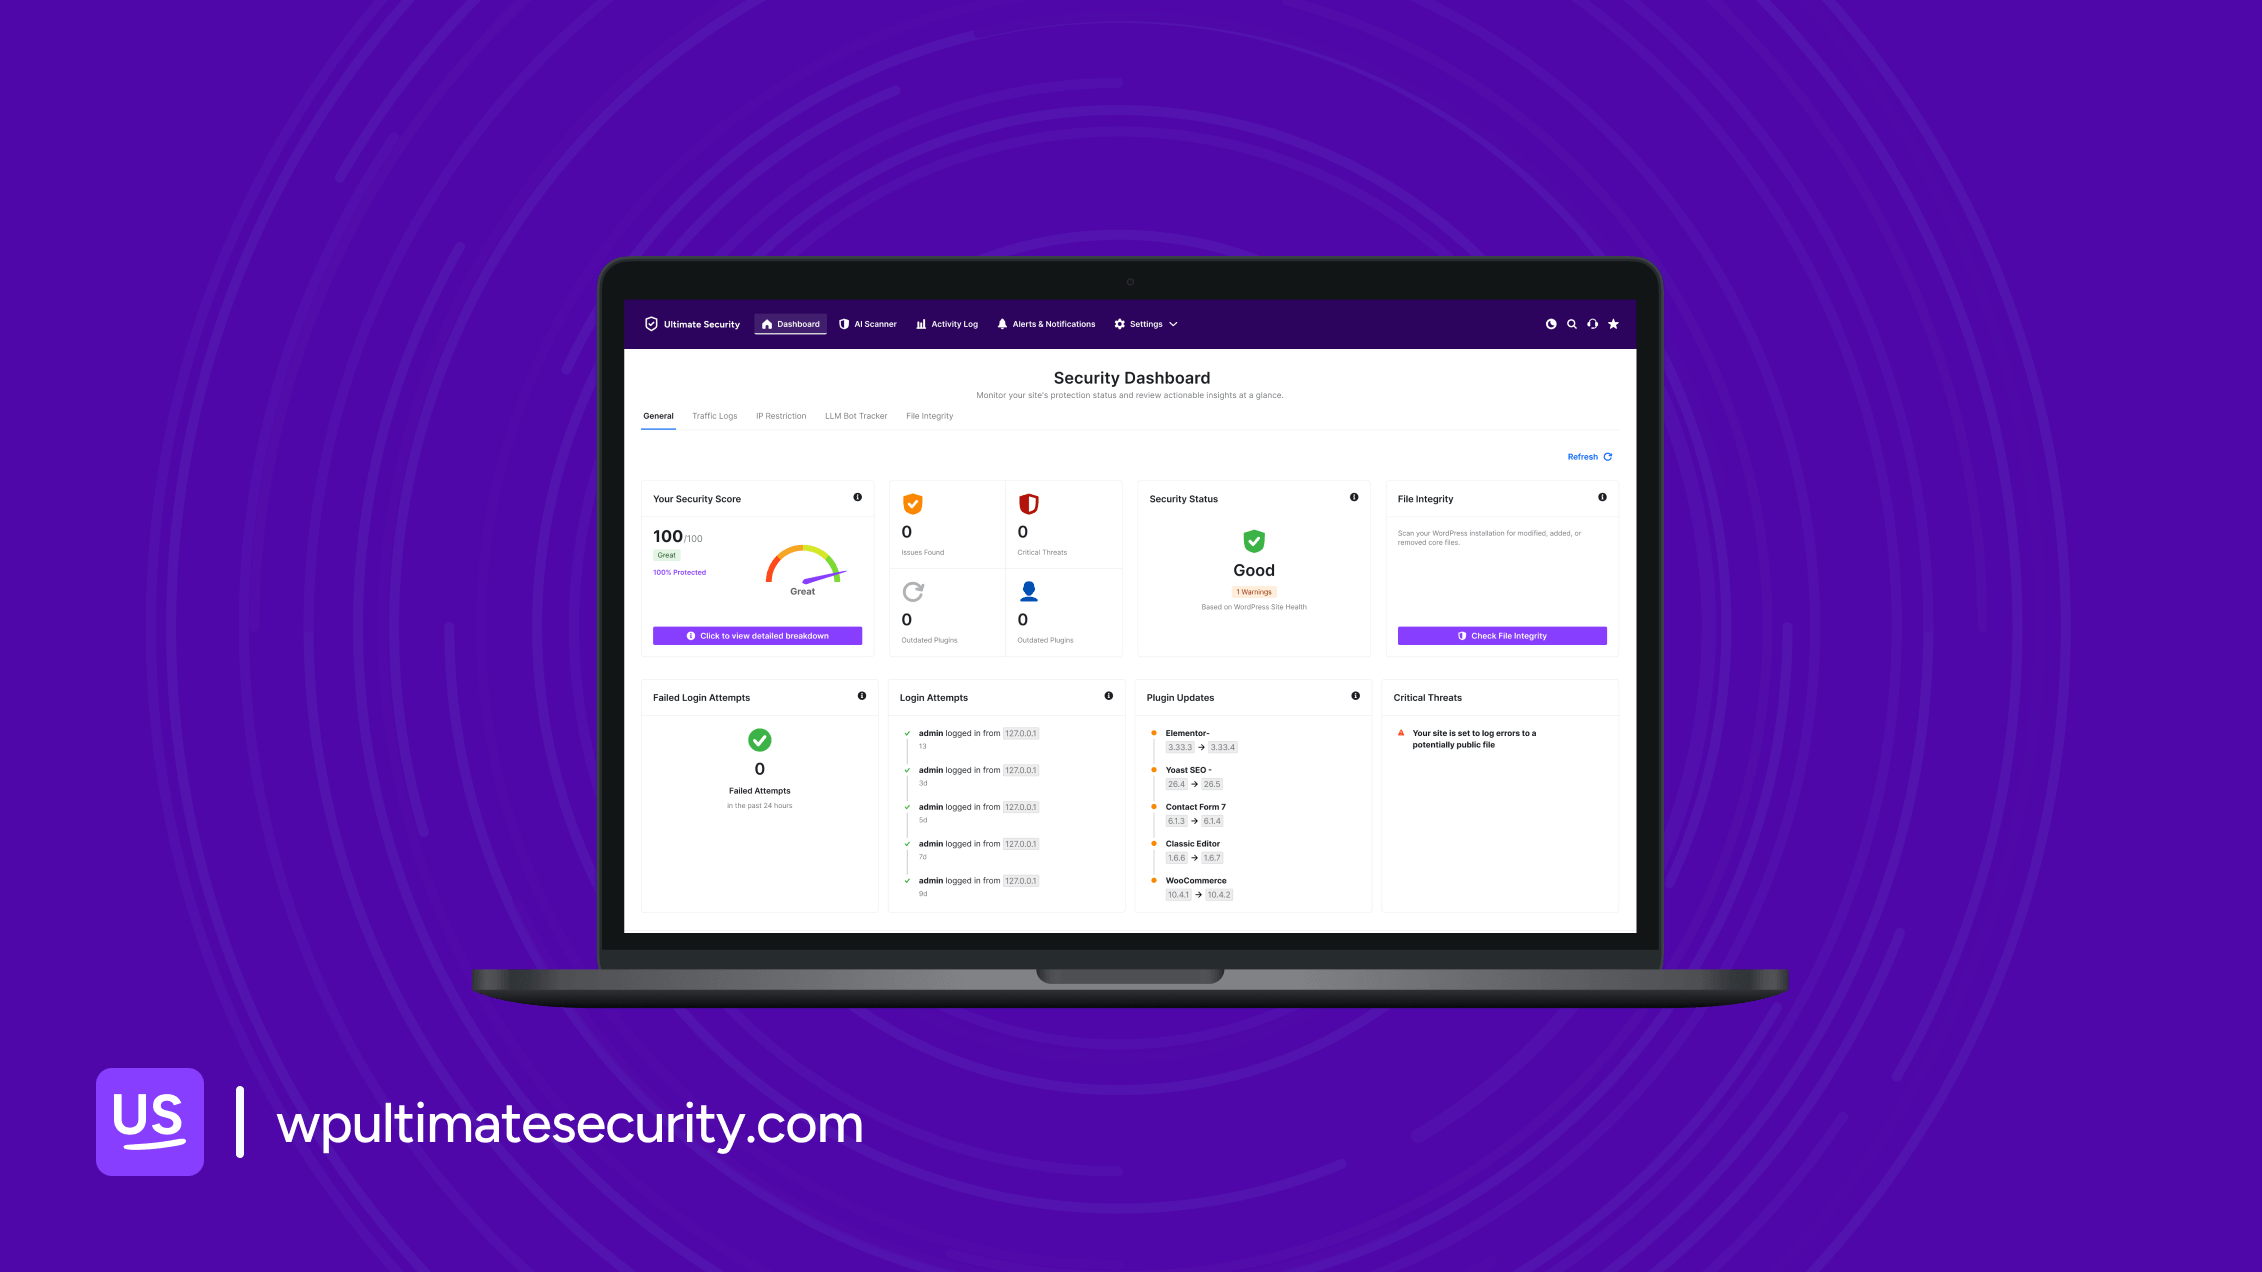
Security breaches can put your customer data at risk and damage your reputation, which is a massive headache for any business owner. Because WordPress powers such a massive portion of the web, it remains a primary target for hackers looking for vulnerabilities. Fortunately, you don’t need specialized technical skills to defend your brand. By utilizing the Best WordPress Security Dashboard, you can access an all-in-one solution designed to monitor, detect, and ward off threats automatically, giving you total peace of mind.
TLDR;
- The Ultimate Security Dashboard consolidates all vital security functions into one intuitive interface, eliminating the need for multiple disparate tools.
- Features like real-time alerts, file integrity monitoring, and vulnerability scanning ensure threats are identified and addressed swiftly, often before they can cause significant damage.
- Designed for all technical levels, the Security Wizard simplifies complex security configurations, making robust protection accessible to every WordPress site owner.
Table of Contents
The Ultimate Security: Best WordPress Security Dashboard
The Ultimate Security Dashboard is crafted with simplicity in mind, ensuring that even non-technical users can effectively manage their site’s defenses. Let’s delve into the core components that make this dashboard an indispensable tool for WordPress security.
Dashboard Overview: The main Dashboard is your central nerve center, offering an immediate, at-a-glance view of your site’s overall security status. Here, you’ll find a holistic assessment of your site’s health, including a security grade and prominent alerts for any critical issues demanding immediate attention. This feature acts as your website’s daily health check, pinpointing areas of vulnerability and highlighting necessary improvements. It provides instantaneous visibility into your security posture, enabling swift identification and remediation of critical vulnerabilities.
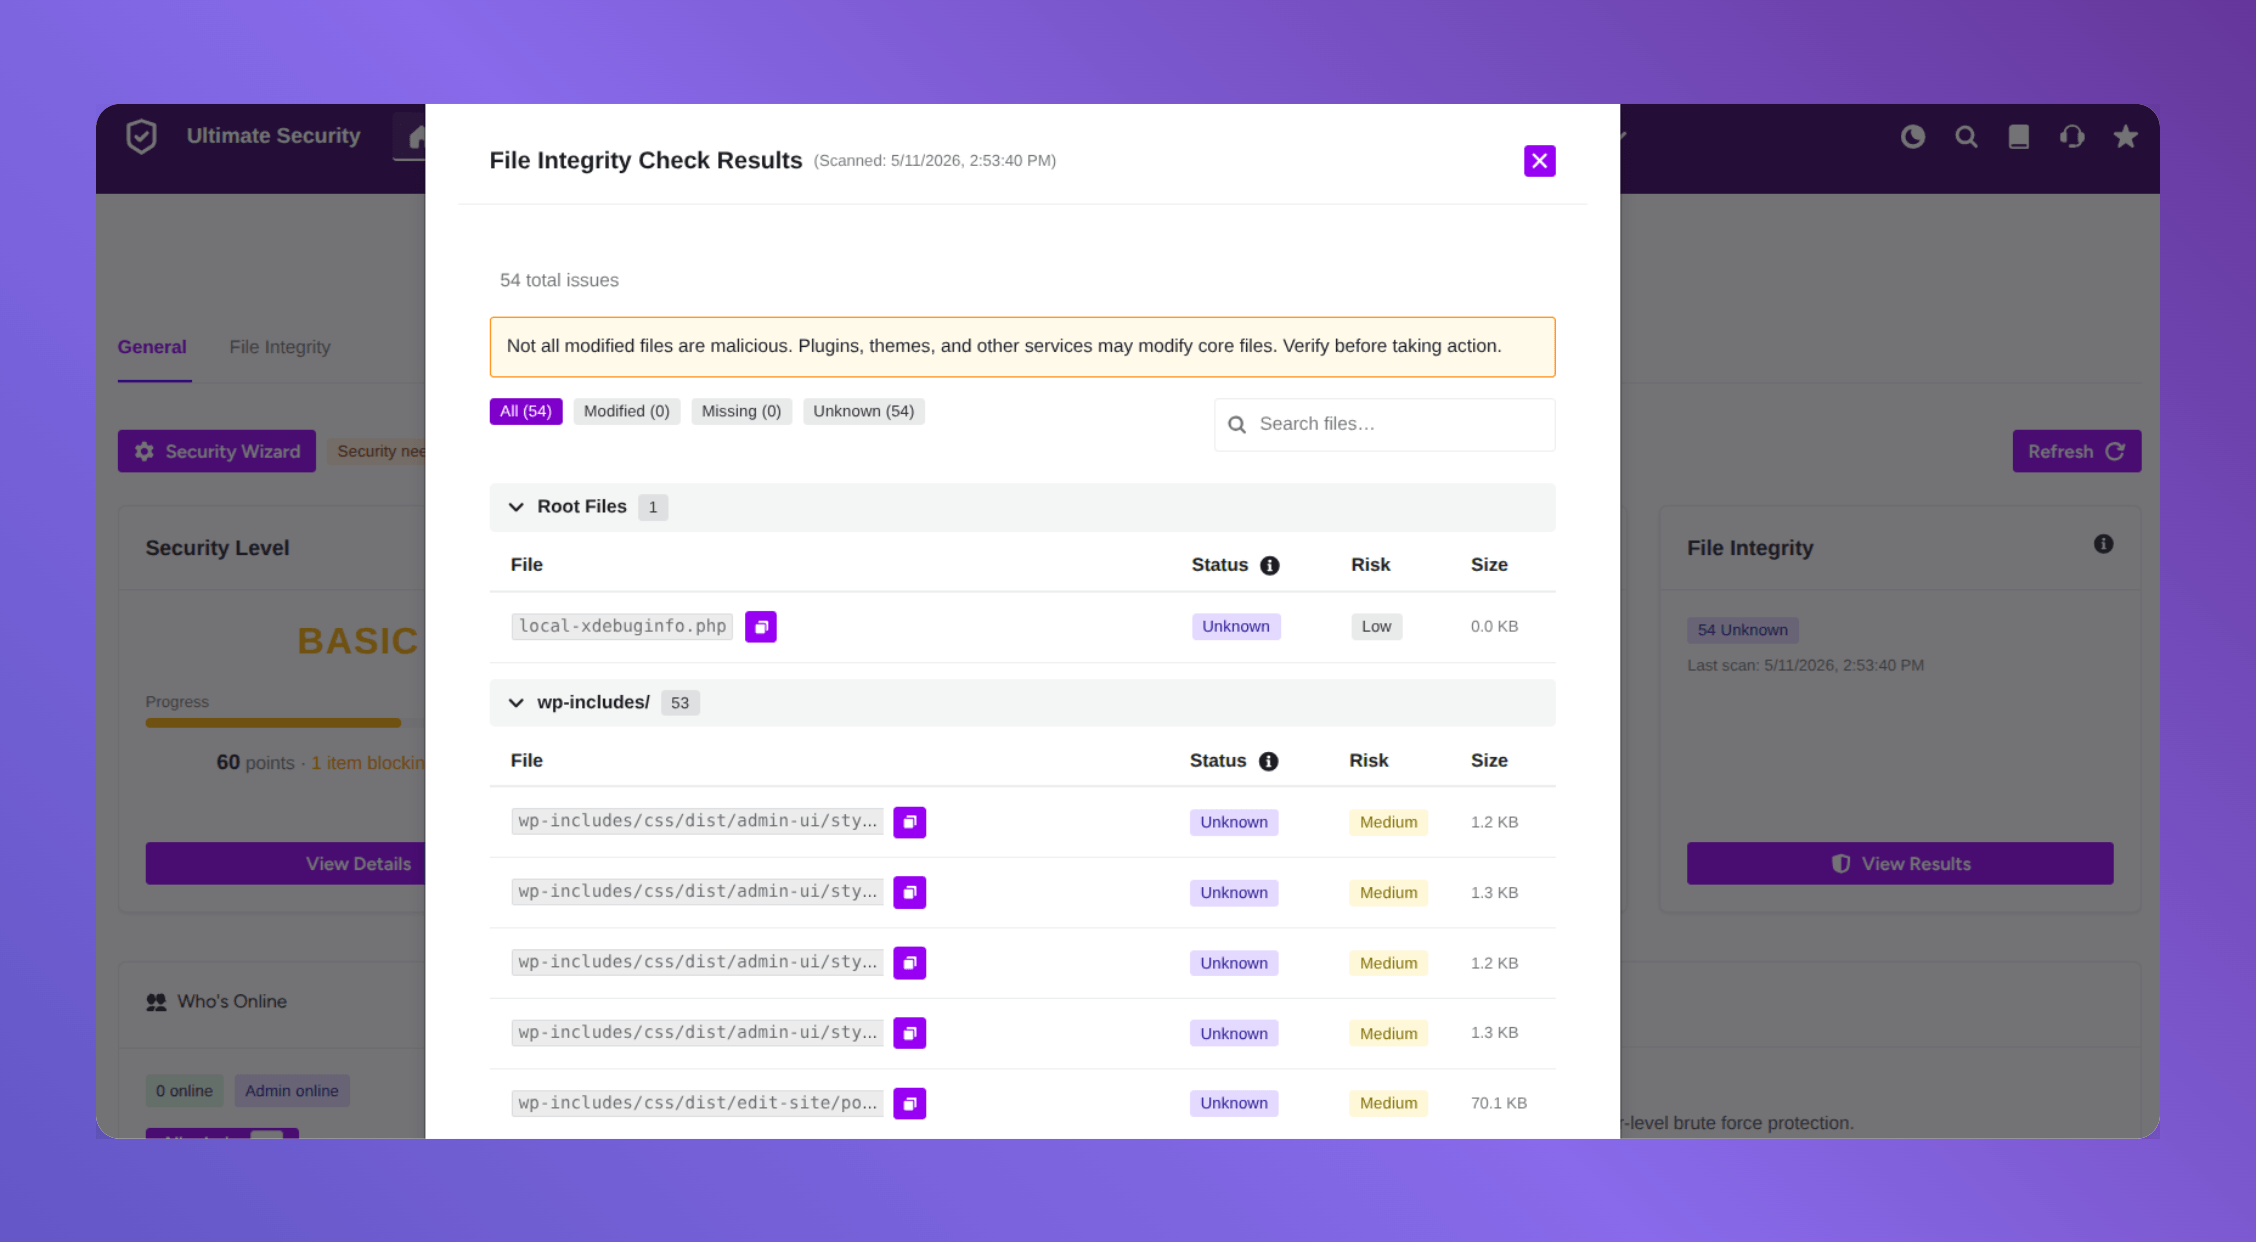
File Integrity: One of the most insidious threats to a WordPress site is unauthorized modification of its core files, themes, or plugins. The File Integrity feature is meticulously designed to monitor these critical components, immediately alerting you to any illicit changes. This is crucial for detecting malware injections, backdoors, or malicious code that could compromise your site’s functionality and data. By establishing a baseline and meticulously tracking deviations, it acts as an early warning system, catching threats before they escalate.
Security Wizard: The Security Wizard is where the promise of “easy setup” truly comes to life. This intuitive guide walks you through essential security configurations in a straightforward, four-step process:
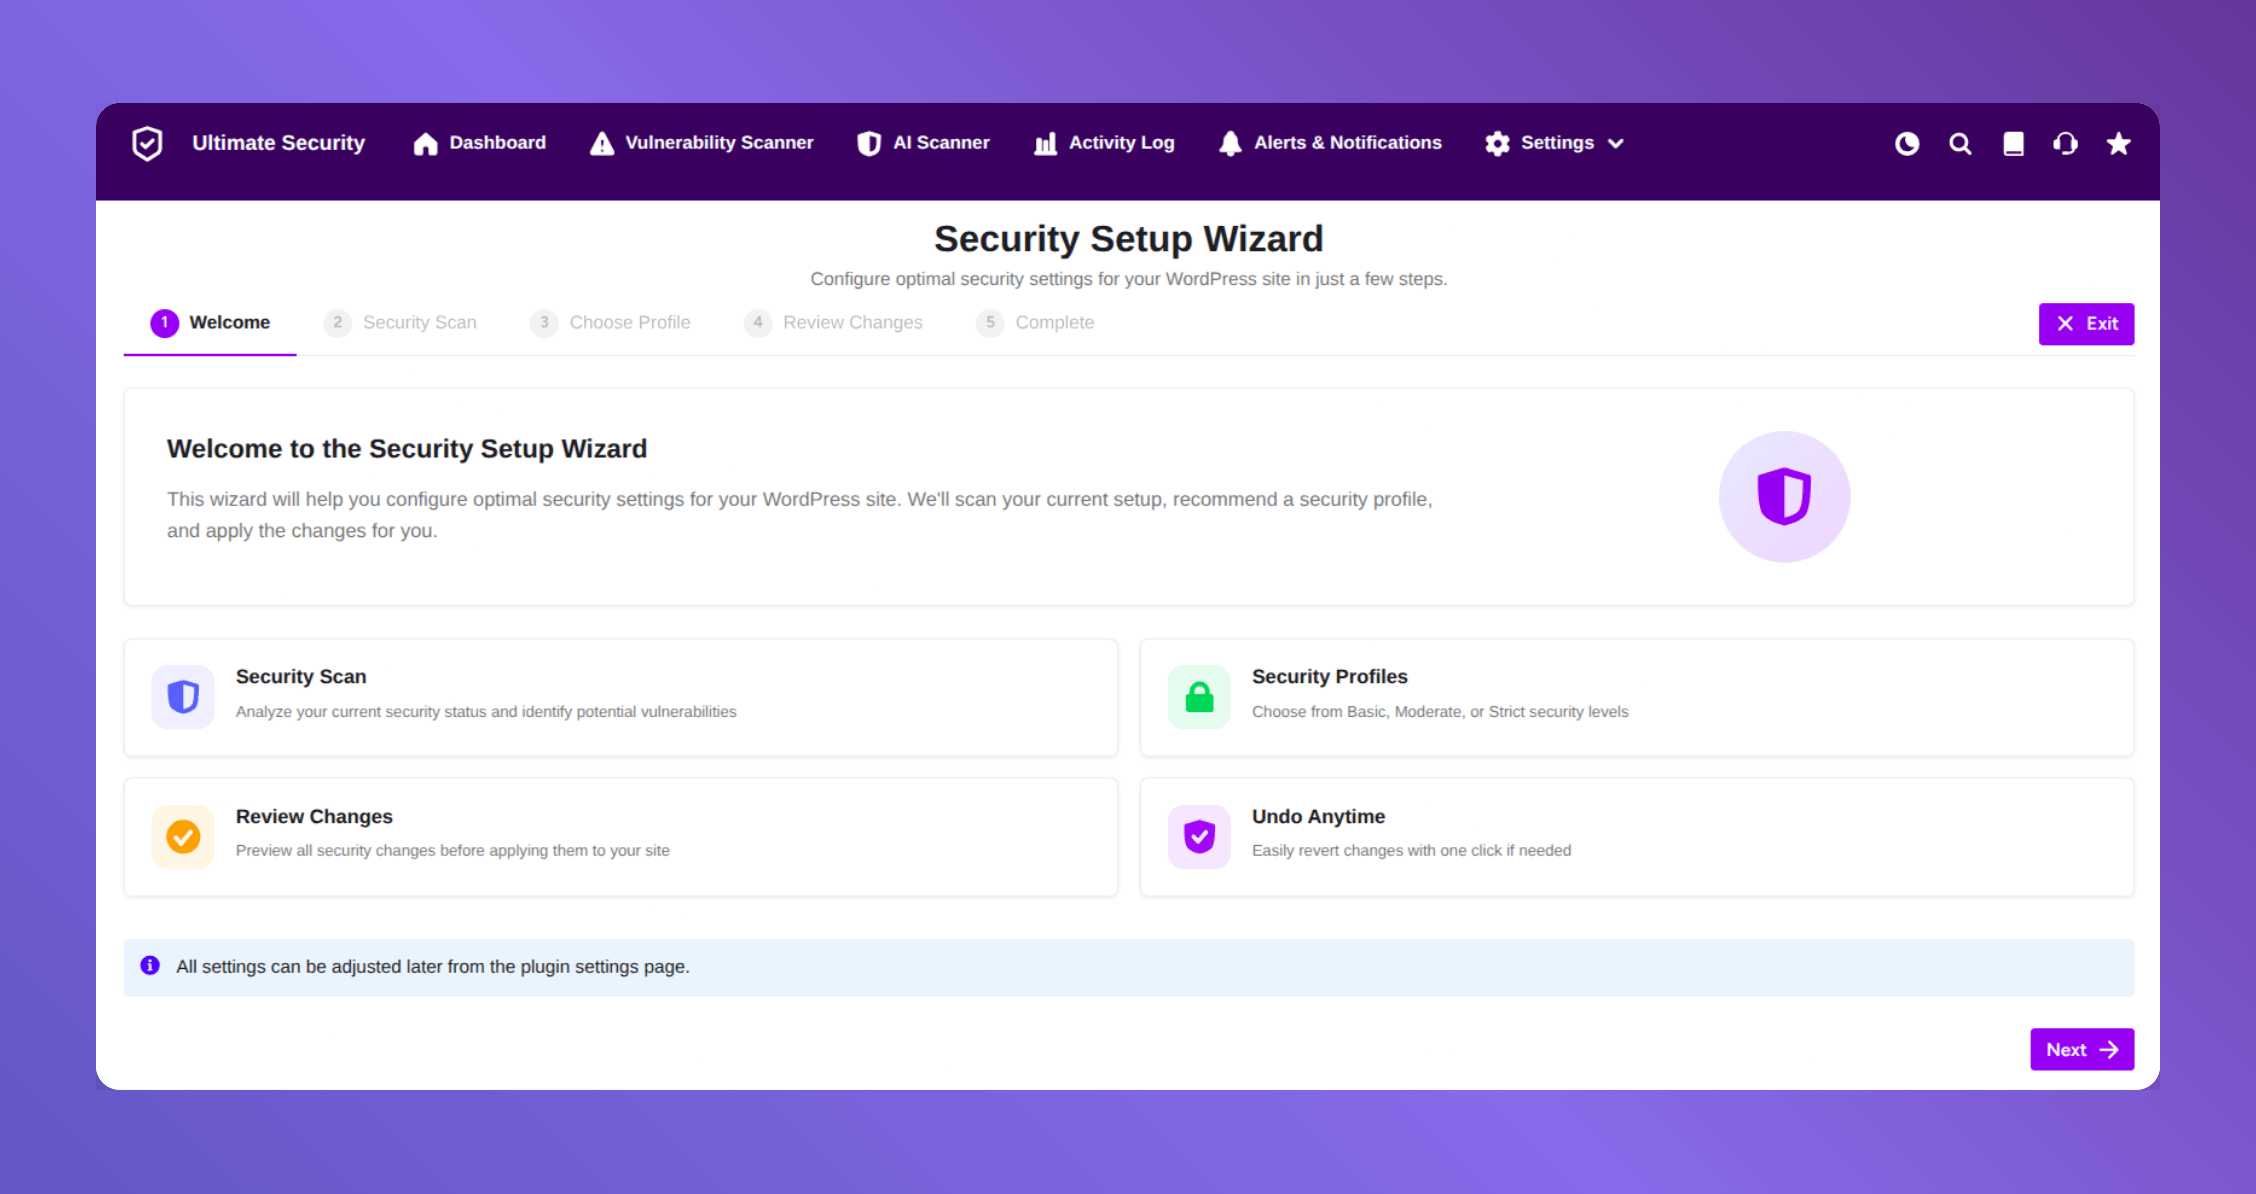
- Security Scan: An initial assessment of your site’s current security posture.
- Choose Profile: Select a protection level (e.g., Basic, Balanced, or Maximum) tailored to your needs.
- Review Changes: Understand the proposed security adjustments before implementation.
- Complete: Apply the new settings to secure your site.
This wizard demystifies the often-complex process of securing your website, making robust protection accessible even to beginners. It ensures that critical vulnerabilities are addressed promptly and effectively, without requiring deep technical expertise.
Beyond the Basics: Key Benefits You Can Rely On
The Ultimate Security Dashboard is all about features, the tangible benefits it brings to your WordPress site and, more importantly, to your security needs.
Real-Time Alerts: Stay Informed, Act Fast
Speed is paramount in defense. The dashboard provides instant notifications the moment something suspicious occurs. Be it a brute-force attack, an unauthorized file change, or a detected vulnerability. This allows you to react swiftly, preventing minor incidents from escalating into major breaches. You’re always in the loop, empowering you to make informed decisions and take immediate action.
Easy Setup: Security Without the Headache
Gone are the days when securing a website required extensive coding knowledge or a deep dive into complex server configurations. The intuitive Security Wizard, as discussed, ensures that implementing robust security measures is a straightforward process. You don’t need to be a coding wizard; the dashboard guides you step-by-step, making professional-grade security accessible to everyone.
24/7 Monitoring: Unwavering Vigilance
Your business operates around the clock, and so should your security. This best WordPress security Dashboard continuously monitors your site for threats, day and night. This constant vigilance means you can focus on growing your business, creating content, or serving your customers, safe in the knowledge that your online assets are protected by an ever-watchful guardian.
The Role of WordPress Security Plugins
This video provides a detailed overview of the WordPress Ultimate Security Plugin, discussing its features and why it’s a crucial tool for any WordPress site owner concerned about robust security.
This video covers practical insights into how such plugins function and the truth behind their effectiveness, directly complementing the comprehensive security dashboard concept.
Ultimate Security Dashboard: A Complete Guide to Getting Started
Now you’re staring at the dashboard wondering what everything does and where to begin. We will go deep dive to the three core sections you’ll use right after activation. If you dont know to install the plugin go through our installiation documentation and then install it to your WordPress site. The main Dashboard, File Integrity monitoring, and the Security Wizard. By the end, you’ll know exactly what each section shows you and what actions to take.
The Main Dashboard: Your Security Control Center
Once you activate WordPress Ultimate Security, a new menu item called Ultimate Security appears in your WordPress admin. Click it, and you land on the main dashboard.
The first time you open it, two pop-ups appear. The first is a welcome message. The second gives you an emergency URL. Save this somewhere safe. If a security setting ever locks you out of your site, this URL lets you deactivate the plugin instantly.
After that, you’re on the main dashboard. Here’s what you’re looking at.
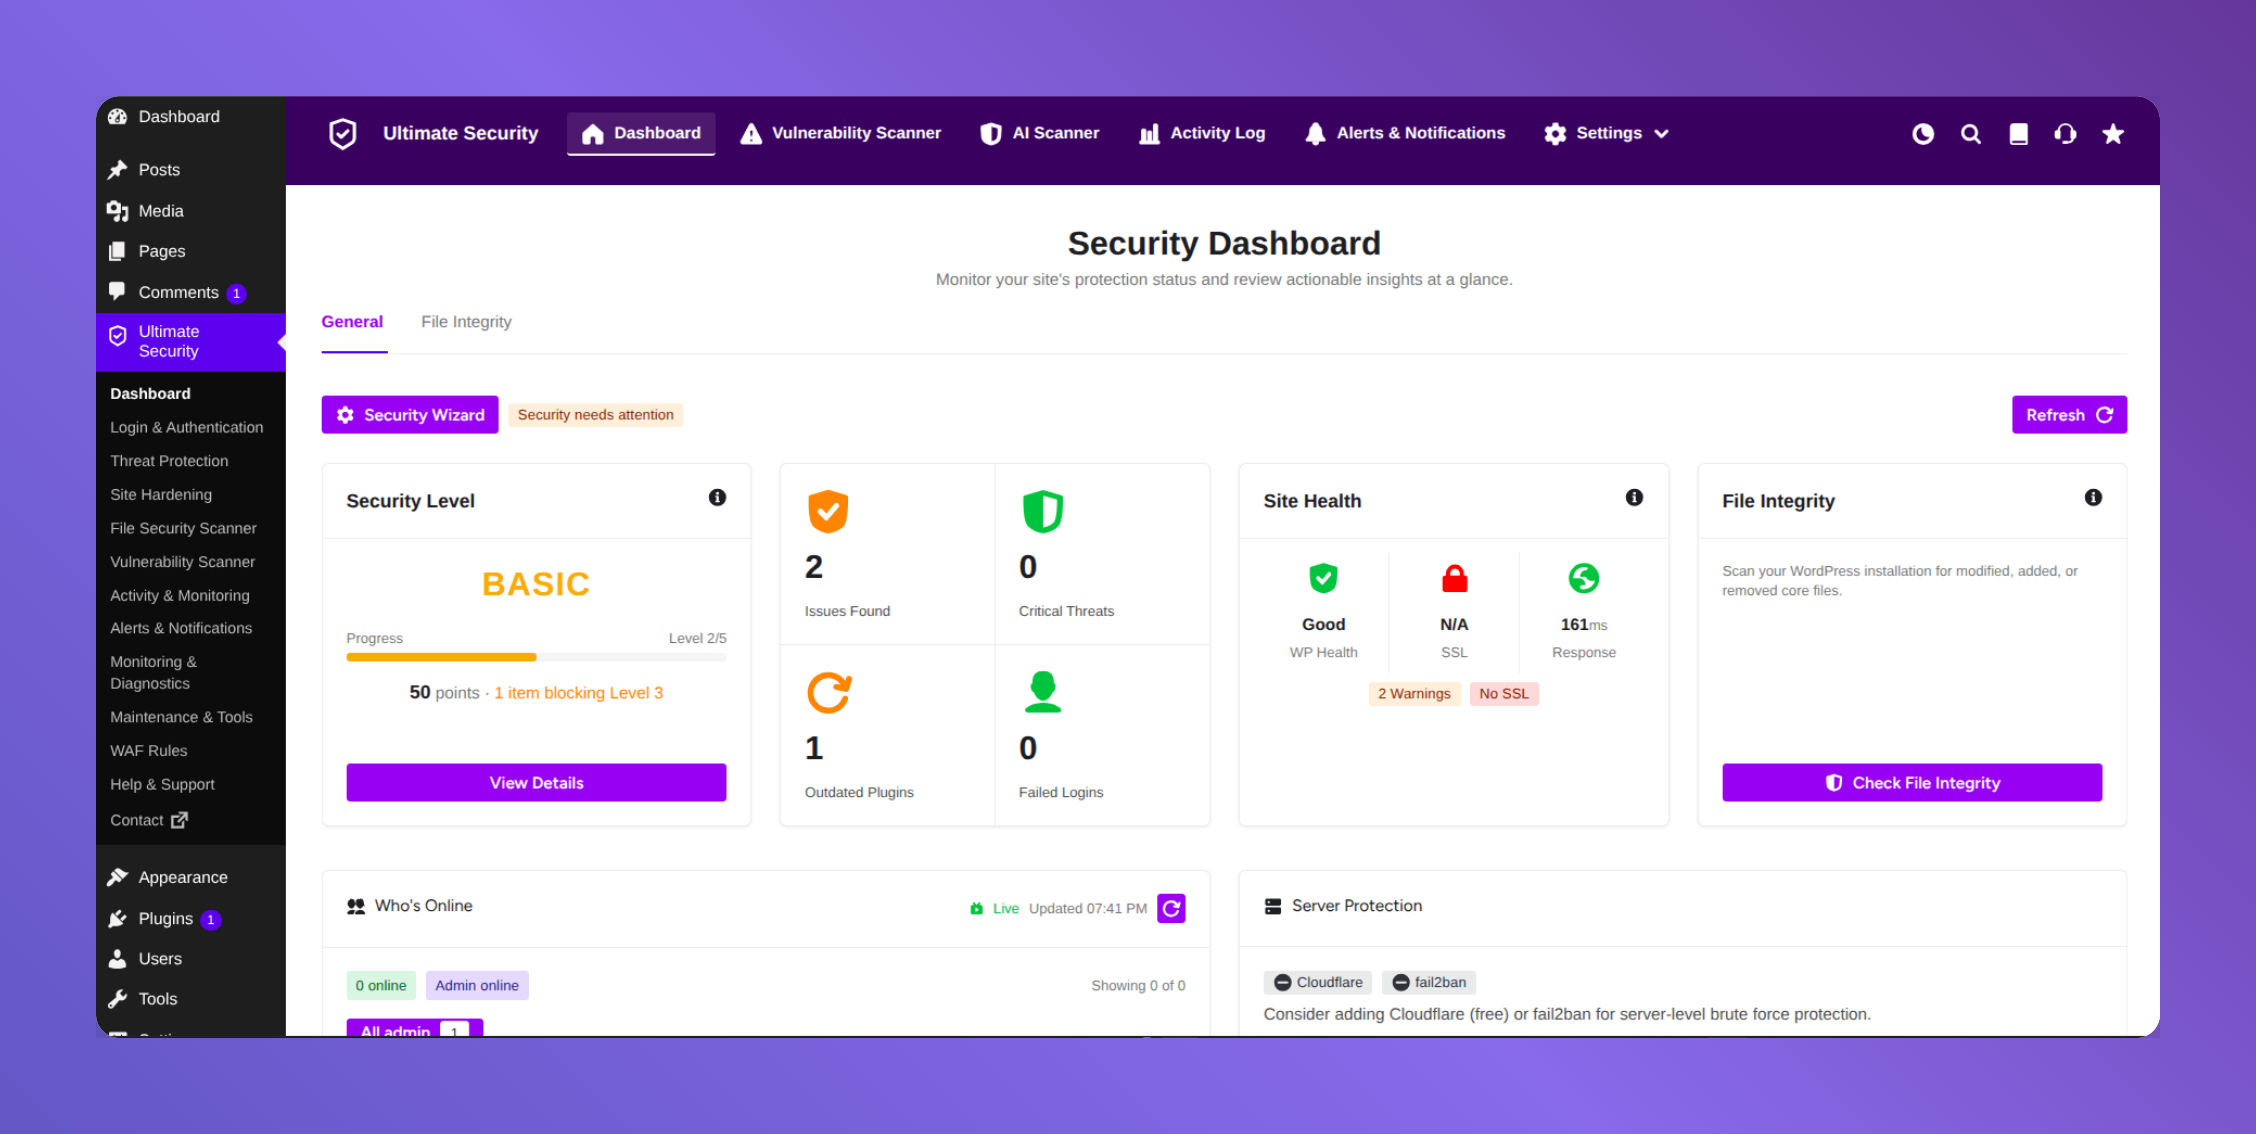
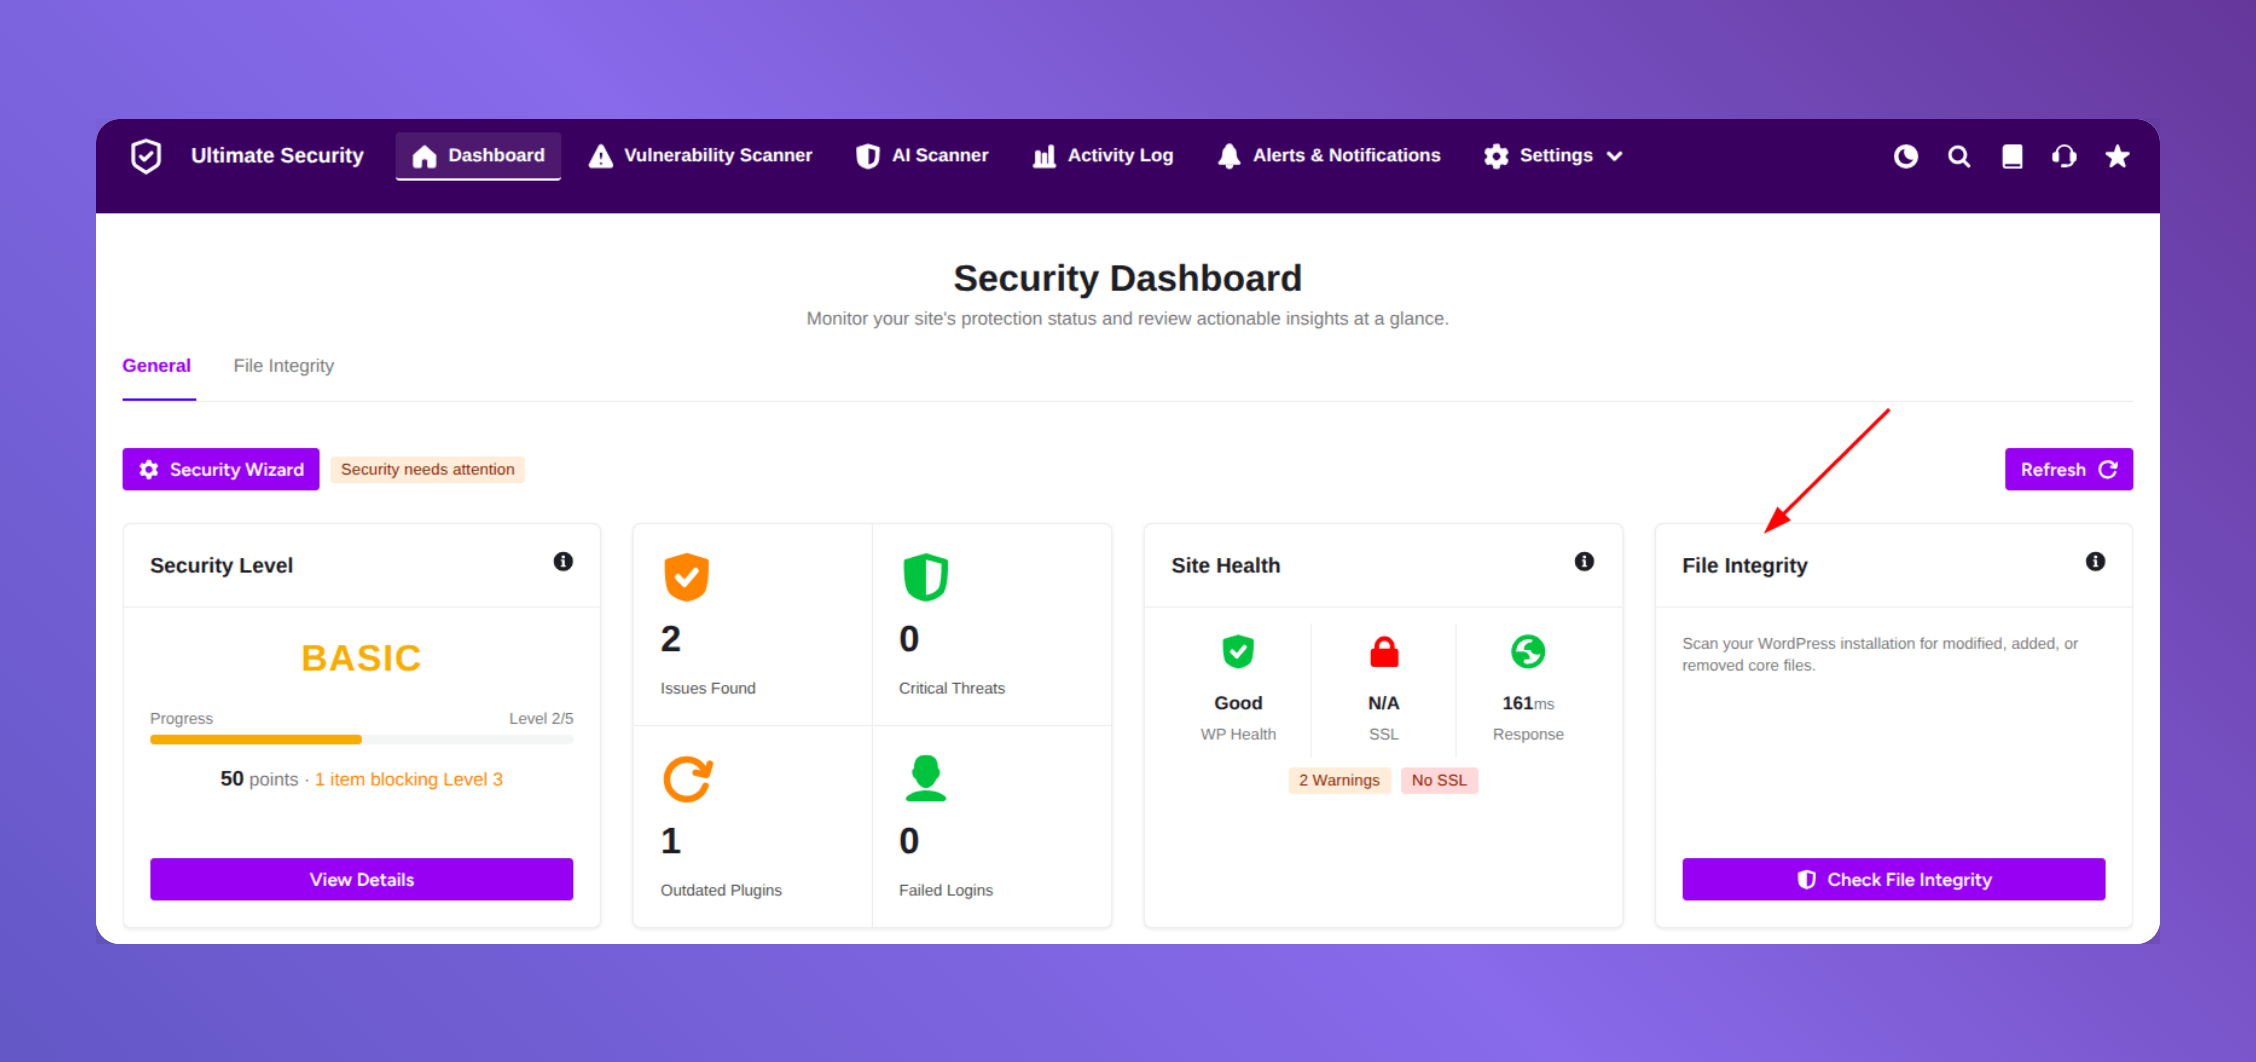
Security Level
This is the first thing you see in the top left corner and it’s the most important card on the dashboard. The Security Level card tells you how well your site is currently protected. It shows you:
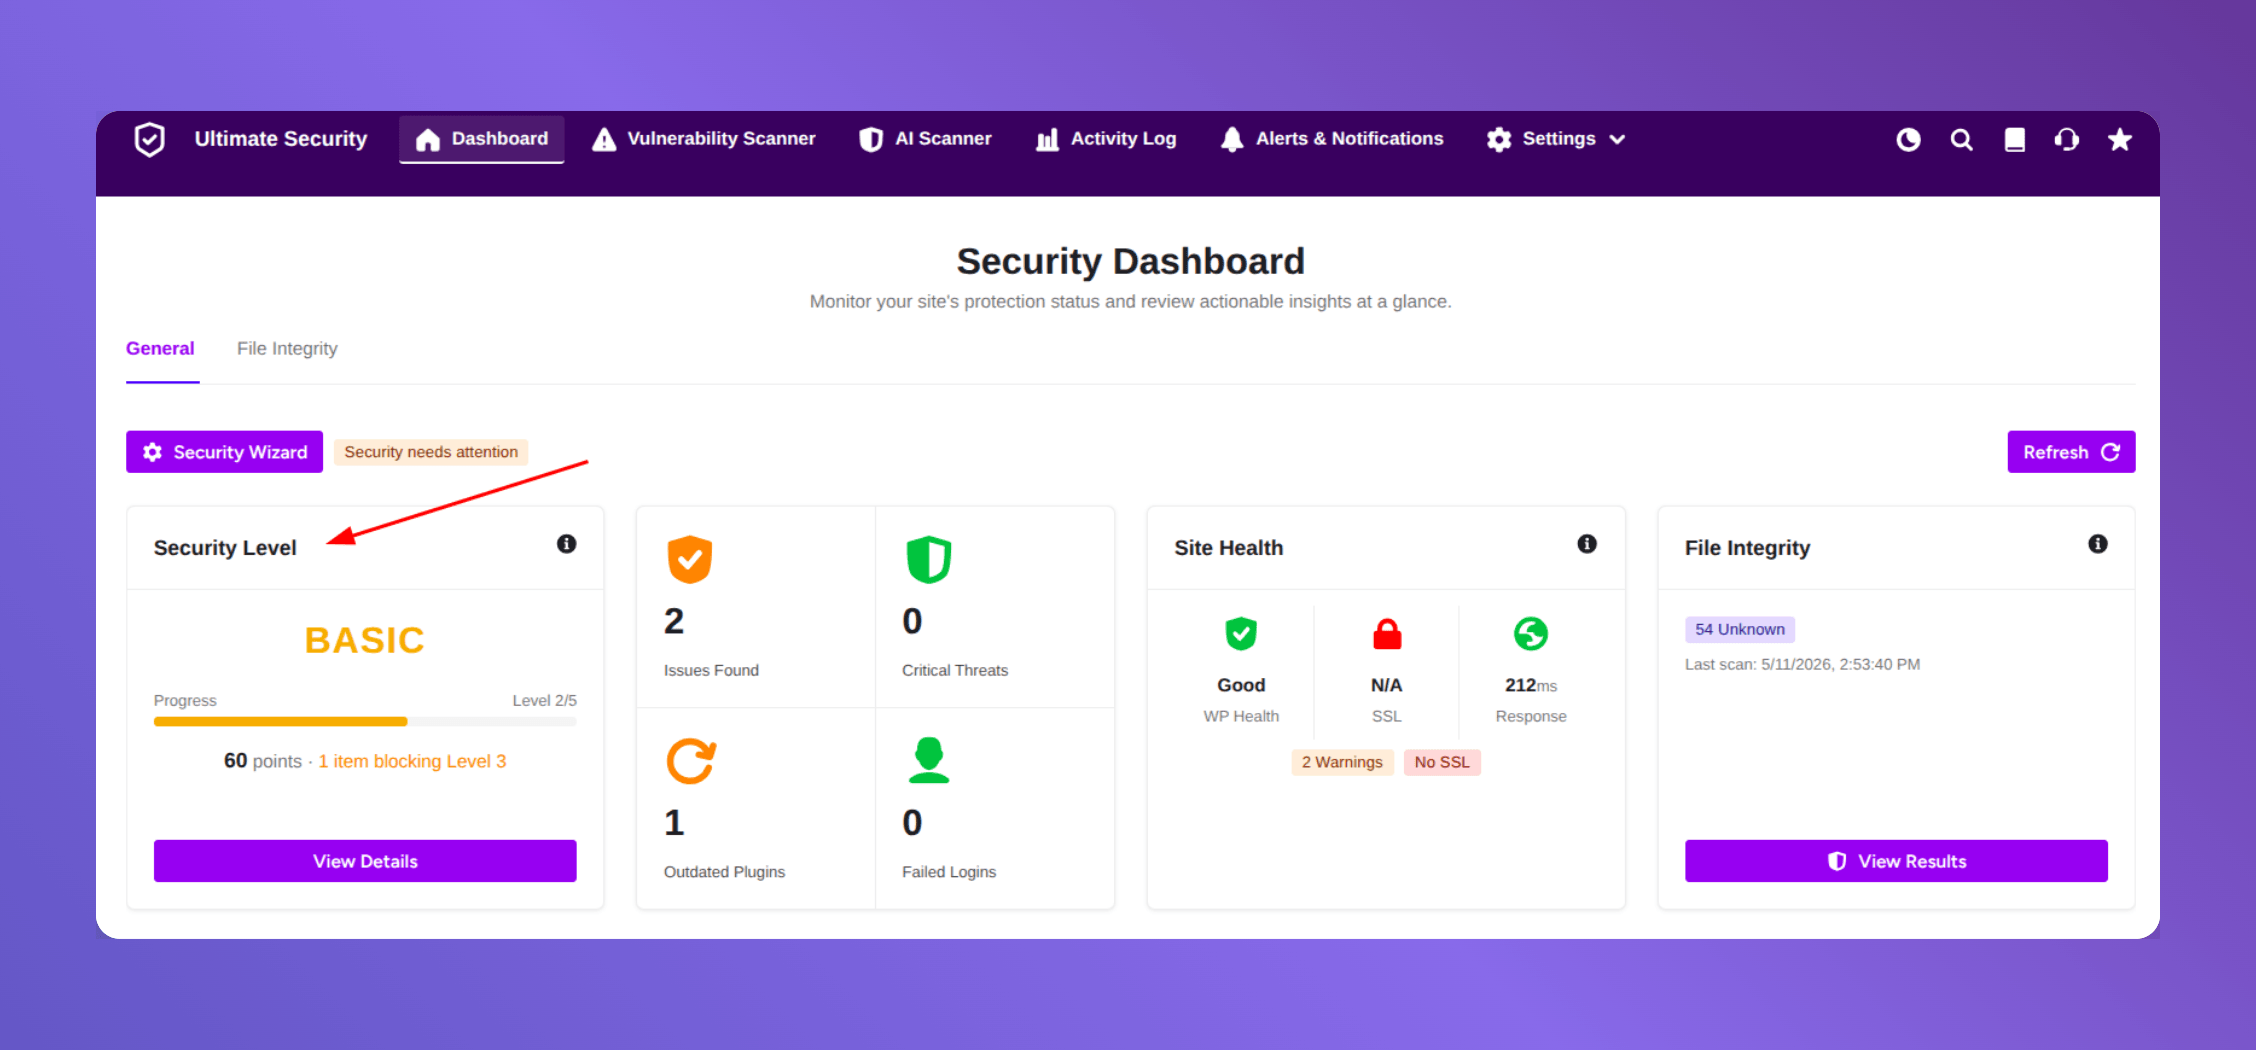
- Whether your site is PROTECTED or needs attention
- Your current security level and overall progress
- Your security points (think of it like a score)
What the Score Actually Means
Click the “View Details” button to see a full breakdown. The plugin scores your site based on four priority levels. These settings from the four collaspe menu carry the most weight because they directly stop attackers:
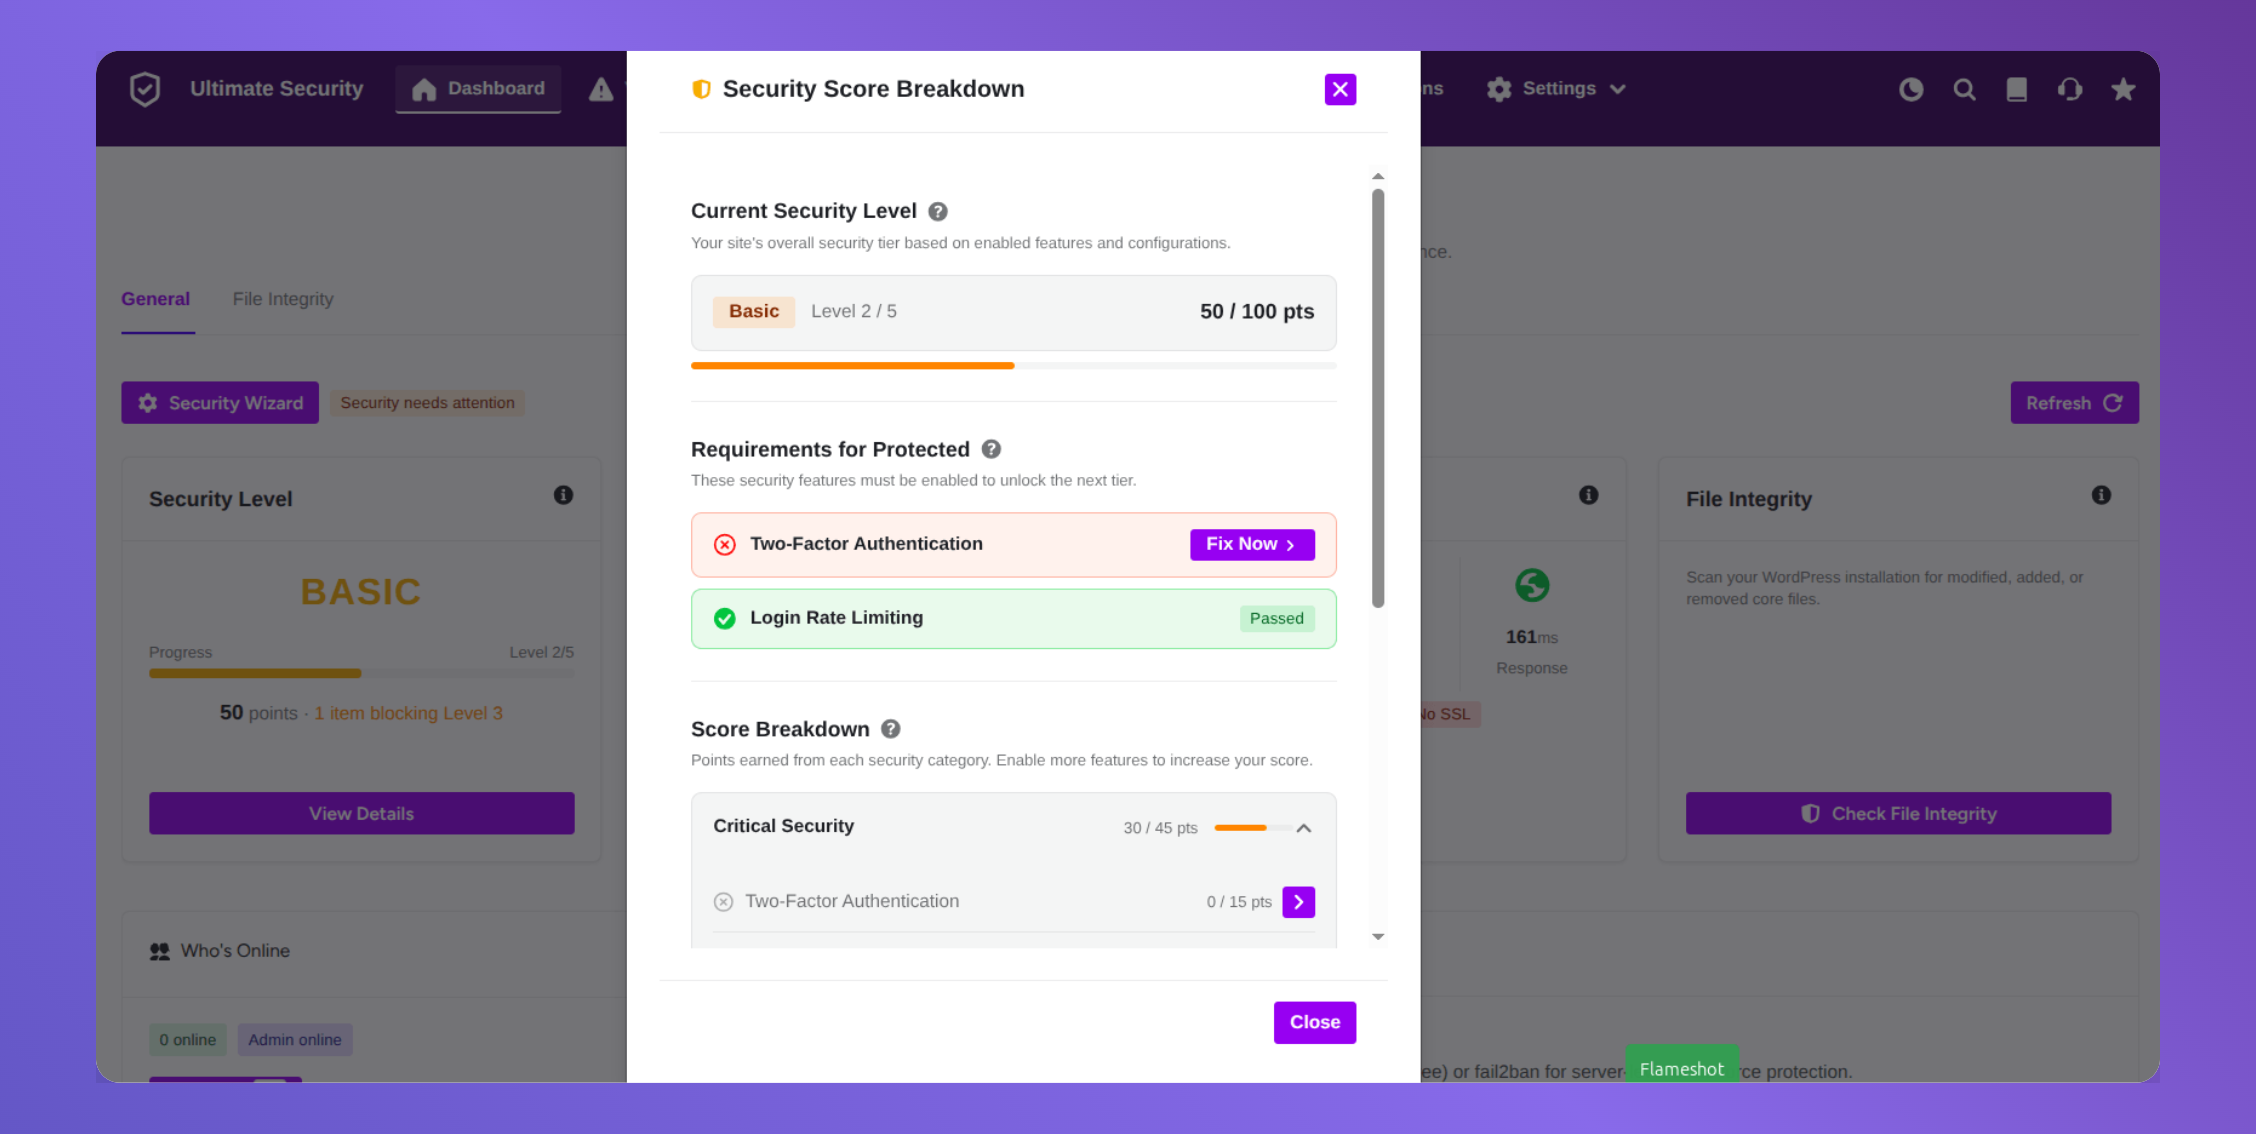
1. Critical Security: Urgent Fix to do at first
- Two-Factor Authentication
- SSL/HTTPS
- Login Rate Limiting
2. High Priority: Important features that most sites should have turned on:
- CAPTCHA Protection
- Password Policy
- WordPress Core Updated
3. Medium Priority: Not urgent, but they add meaningful protection over time:
- All Plugins Updated
- Audit Logs
- File Integrity Monitoring
4. Additional Hardening: Optional features that lock down your site further:
- Hide Login URL
- Disable File Editing
- API Privacy
- Content Protection
- Custom Login Consent
The higher your score, the harder your site is to hack. Use this breakdown as your checklist starts with the 45-point items first.
Issue Counters and Critical Threats
Just next to the Security Level card, you’ll see four number counters. These are your early warning system.
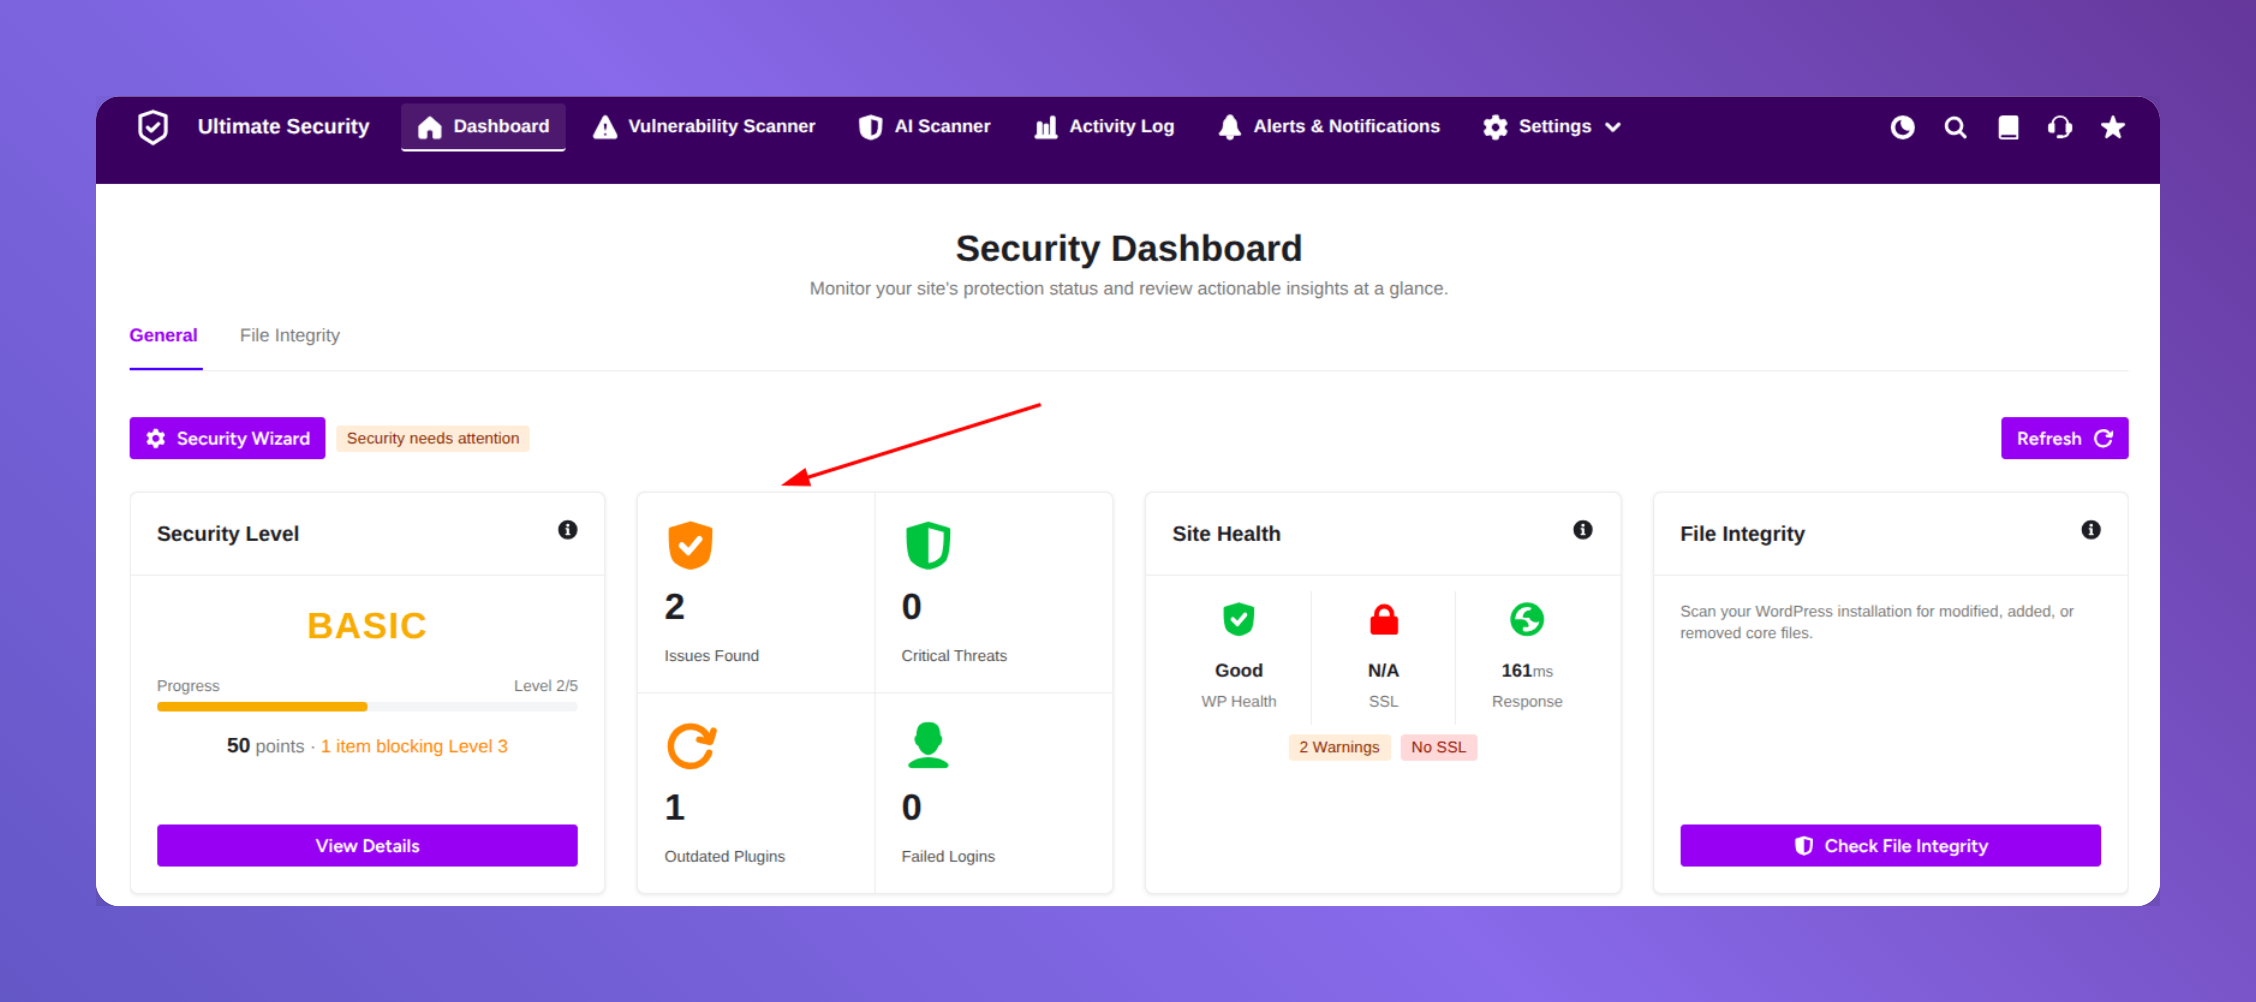
- Issues Found: Things that aren’t active threats yet, but could become problems if you ignore them. Think of these as security gaps.
- Critical Threats: Active, high-risk dangers detected on your site right now. These need your attention first.
- Outdated Plugins: The number of plugins on your site running old versions. Outdated plugins are one of the most common ways hackers get in.
- Failed Logins: How many times someone tried to log into your site recently and failed. A sudden spike in this number is a red flag.
Check these four numbers every time you open your dashboard. They’ll tell you immediately whether something needs fixing.
Site Health
This section gives you a quick read on your site’s technical condition.
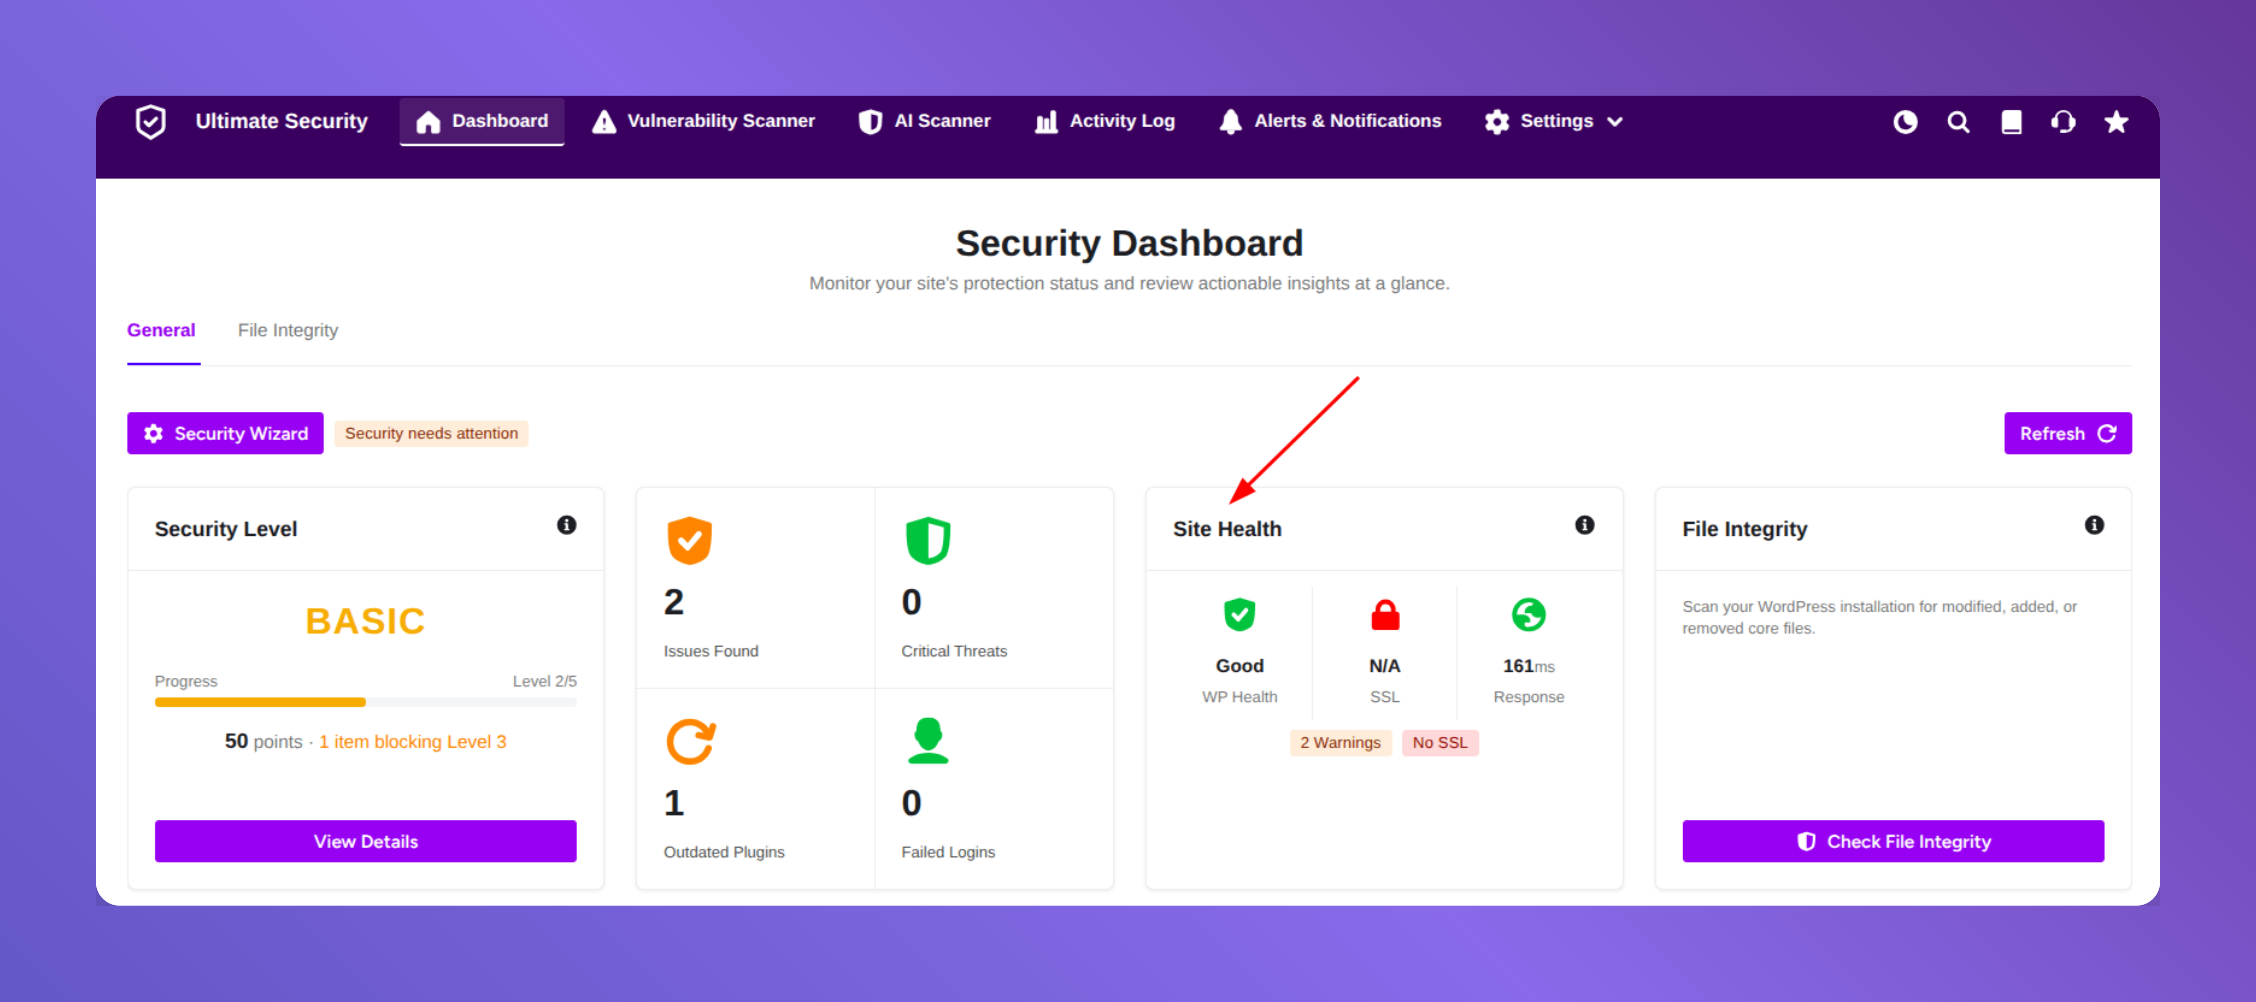
WP Health: It checks your PHP version, security scans, and overall system configuration. If something is misconfigured, it shows up here.
SSL: It confirms whether your site has a valid security certificate. If SSL is missing or expired, your visitors will see a “Not Secure” warning in their browser and Google will rank you lower.
Response: This tracks how fast your site starts loading. A slow site frustrates visitors and hurts your SEO rankings.
All three of these affect both security and performance. Keep an eye on them regularly.
File Integrity
This section works like a security guard watching over your WordPress core files. WordPress has a set of original, clean files. If anyone or anything changes those files, it could mean your site has been compromised. The File Integrity section monitors for exactly that.
What the Scan Report Shows
Click the purple “View Results” button to see a detailed scan report. At the top of the report, you’ll see a Scan Summary:
- Modified: Files that have been changed from their original state
- Missing: Files that should be there but aren’t
- Unknown: Files that don’t belong to the original WordPress installation
- Total Issues: The combined count of all the above
Important: Not every modified file is dangerous. Plugins and themes sometimes change core files during legitimate updates. The key is to check the Unknown files. If you don’t recognize what a file belongs to, investigate it before you delete it.
Actions You Can Take
At the bottom of the screen, you have three options:
- Export Report: Download the full scan report for your records
- Rescan: Run a fresh scan after you’ve fixed or deleted problem files
- Close: Return to the main dashboard
Server Protection
This section highlights two tools that block threats before they even reach your WordPress site. These work at the server level, not the application level which makes them a powerful extra layer of defense.
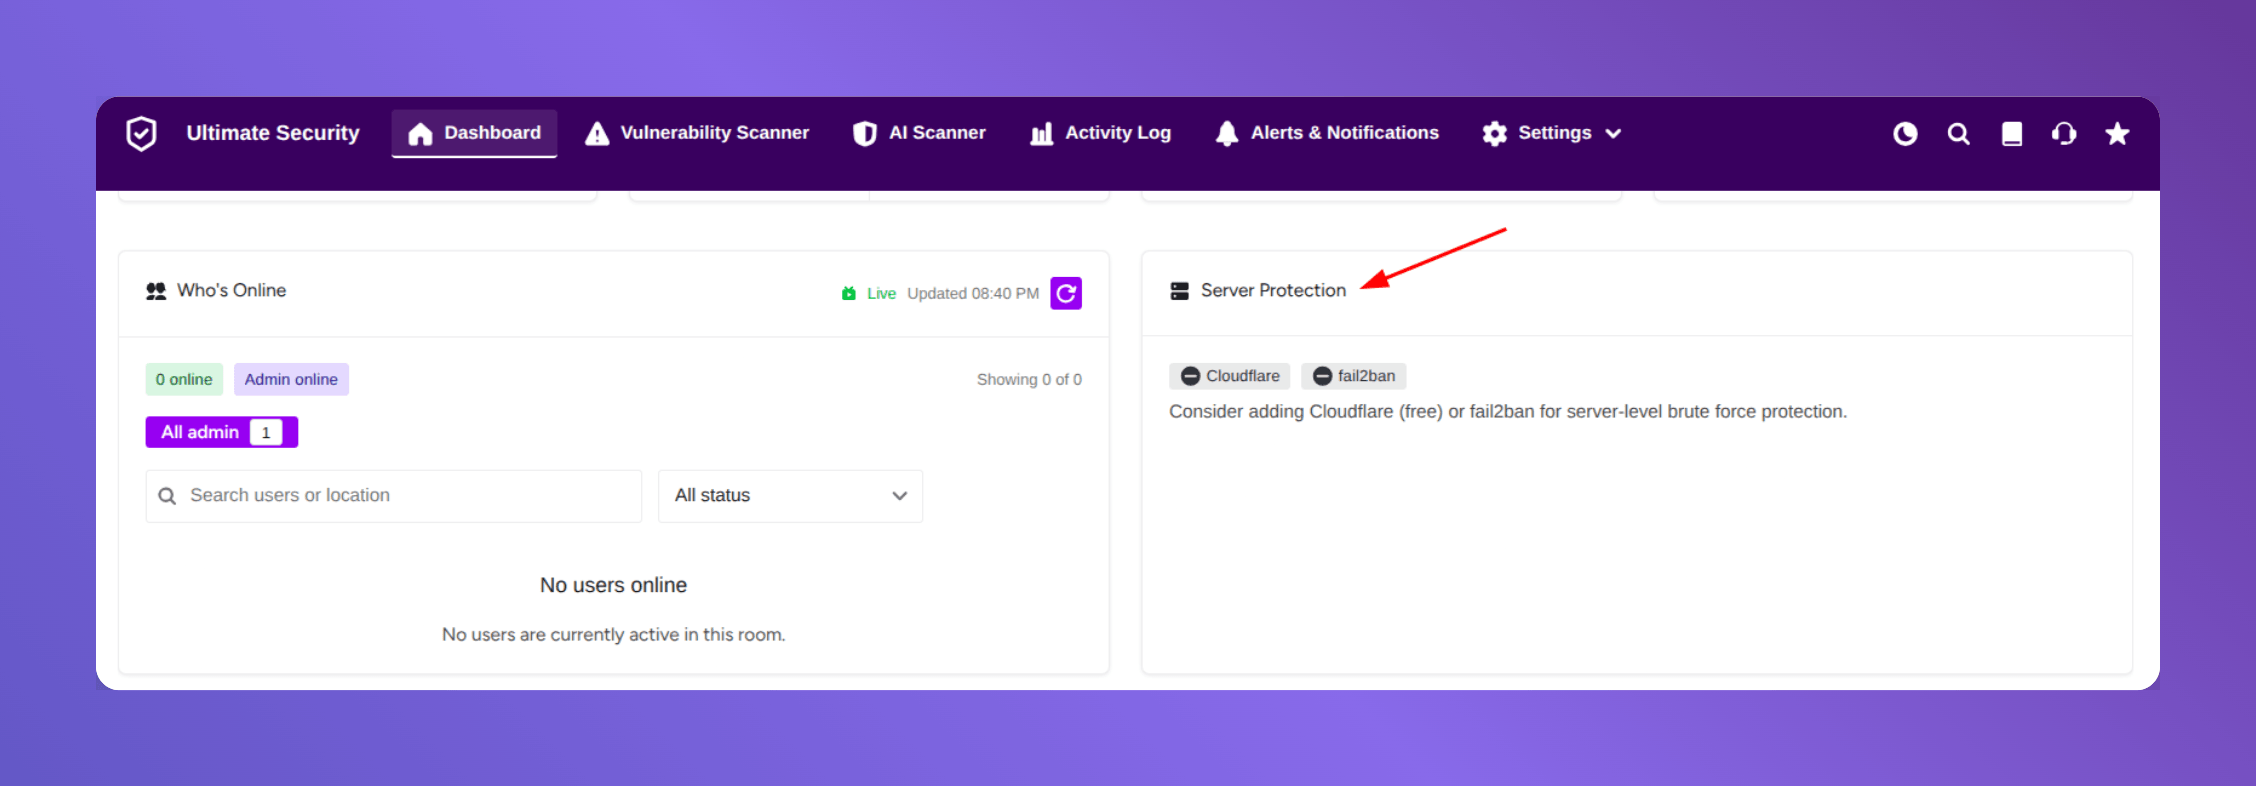
Cloudflare: A free service that filters out malicious traffic before it hits your server. If an IP address is known for attacks, Cloudflare blocks it at the door.
Fail2ban: A server-side tool that automatically bans IP addresses after too many failed login attempts. No manual work needed; it handles the banning for you.
Both of these work independently of WordPress. Even if your site files were somehow compromised, these tools would still be running. We recommend Cloudflare for server level protection. We have the Web Application Firewall rules setting in Ultimate Security. In the Feature you can directly deploy Cloudflare server rules.
Who’s Online
This feature shows you every person currently logged into your WordPress site in real time. This might not sound important at first, but it’s one of the most useful security tools on the dashboard.
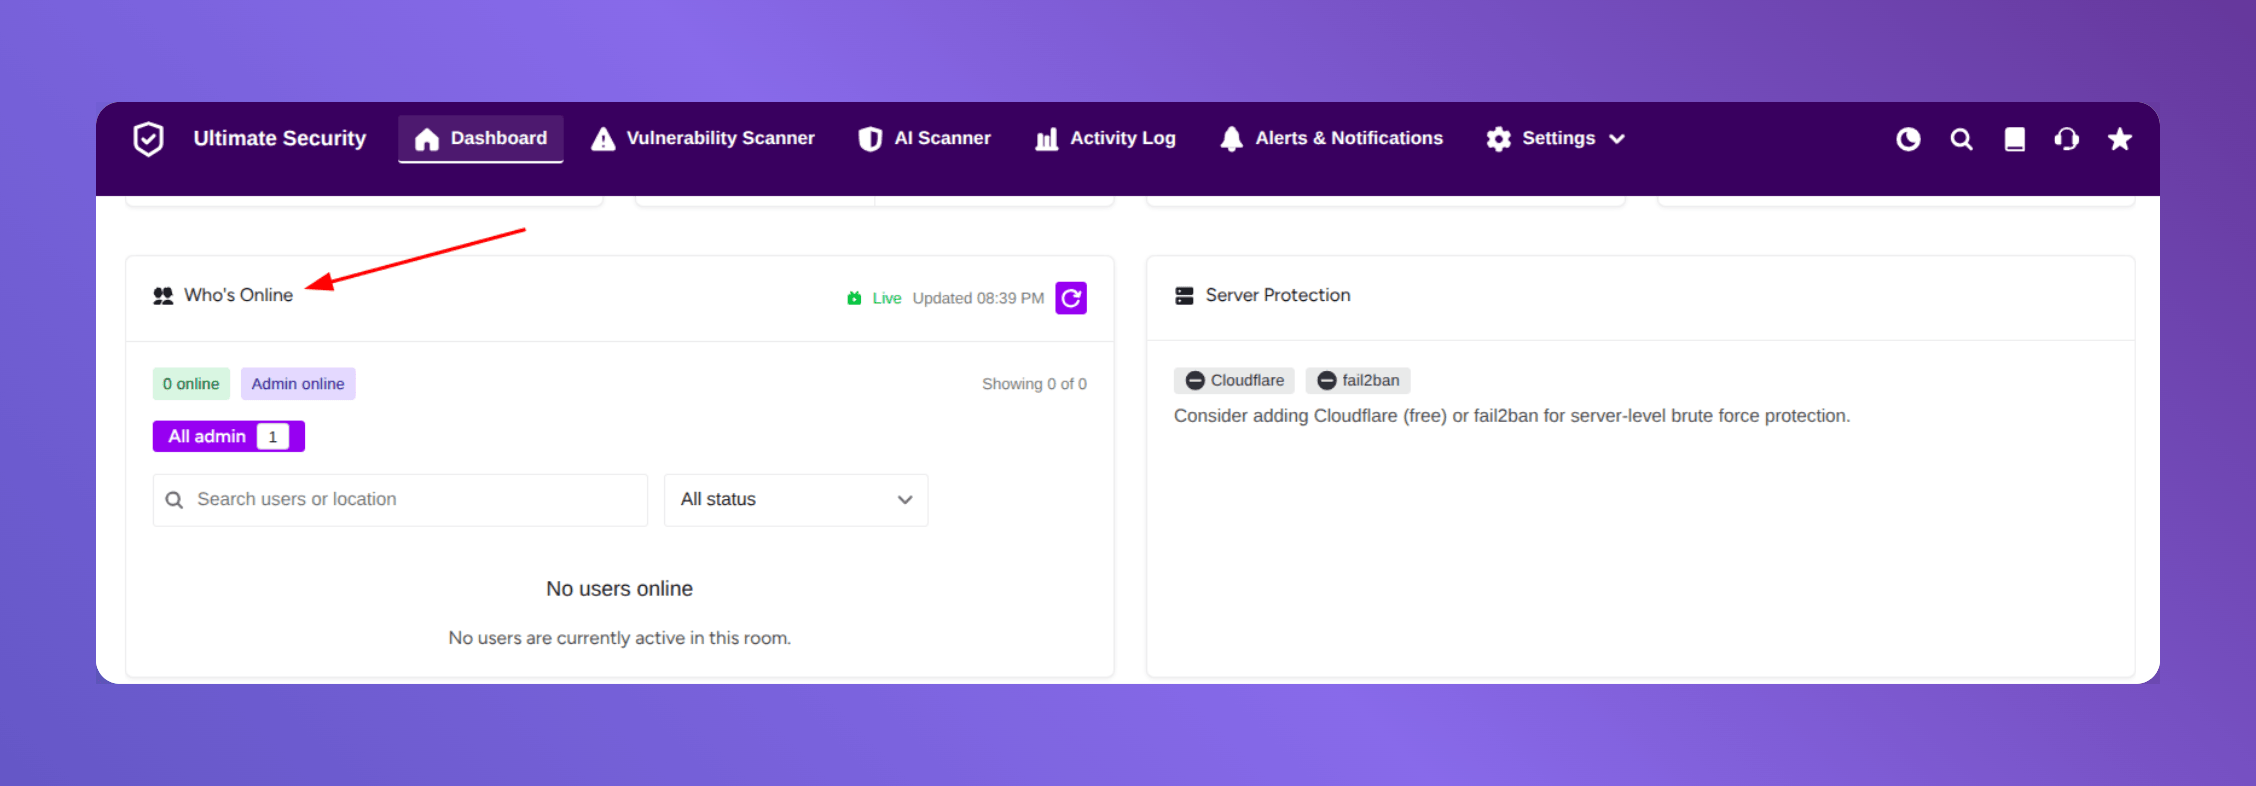
Note: This feature requires WordPress 7.0 or higher. If you see an “Upgrade Required” message, update your WordPress core first.
What You Can See
- Live indicator: Confirms the list is updating automatically
- Active User Count: How many people are logged in right now
- Search & Filter: Find a specific user quickly
- Status Dropdown: Filter by user activity status
- User Cards: Each user’s name, current status, where they are on your site, and when their last activity was recorded
How to Use It for Security
- Monitor team activity. If you have multiple editors or admins, you can see who’s making changes and when. This prevents two people from editing the same thing at the same time.
- Audit admin accounts. Use the “All Admin” filter regularly. If you see an administrator account logged in that shouldn’t be active, it could mean someone’s account has been compromised.
- Check login locations. The location data lets you see where users are logging in from. If an admin is logging in from a country your team doesn’t operate in, that’s worth investigating.
Bottom Cards
At the bottom of the dashboard, you’ll find four more cards that cover login activity and plugin updates.
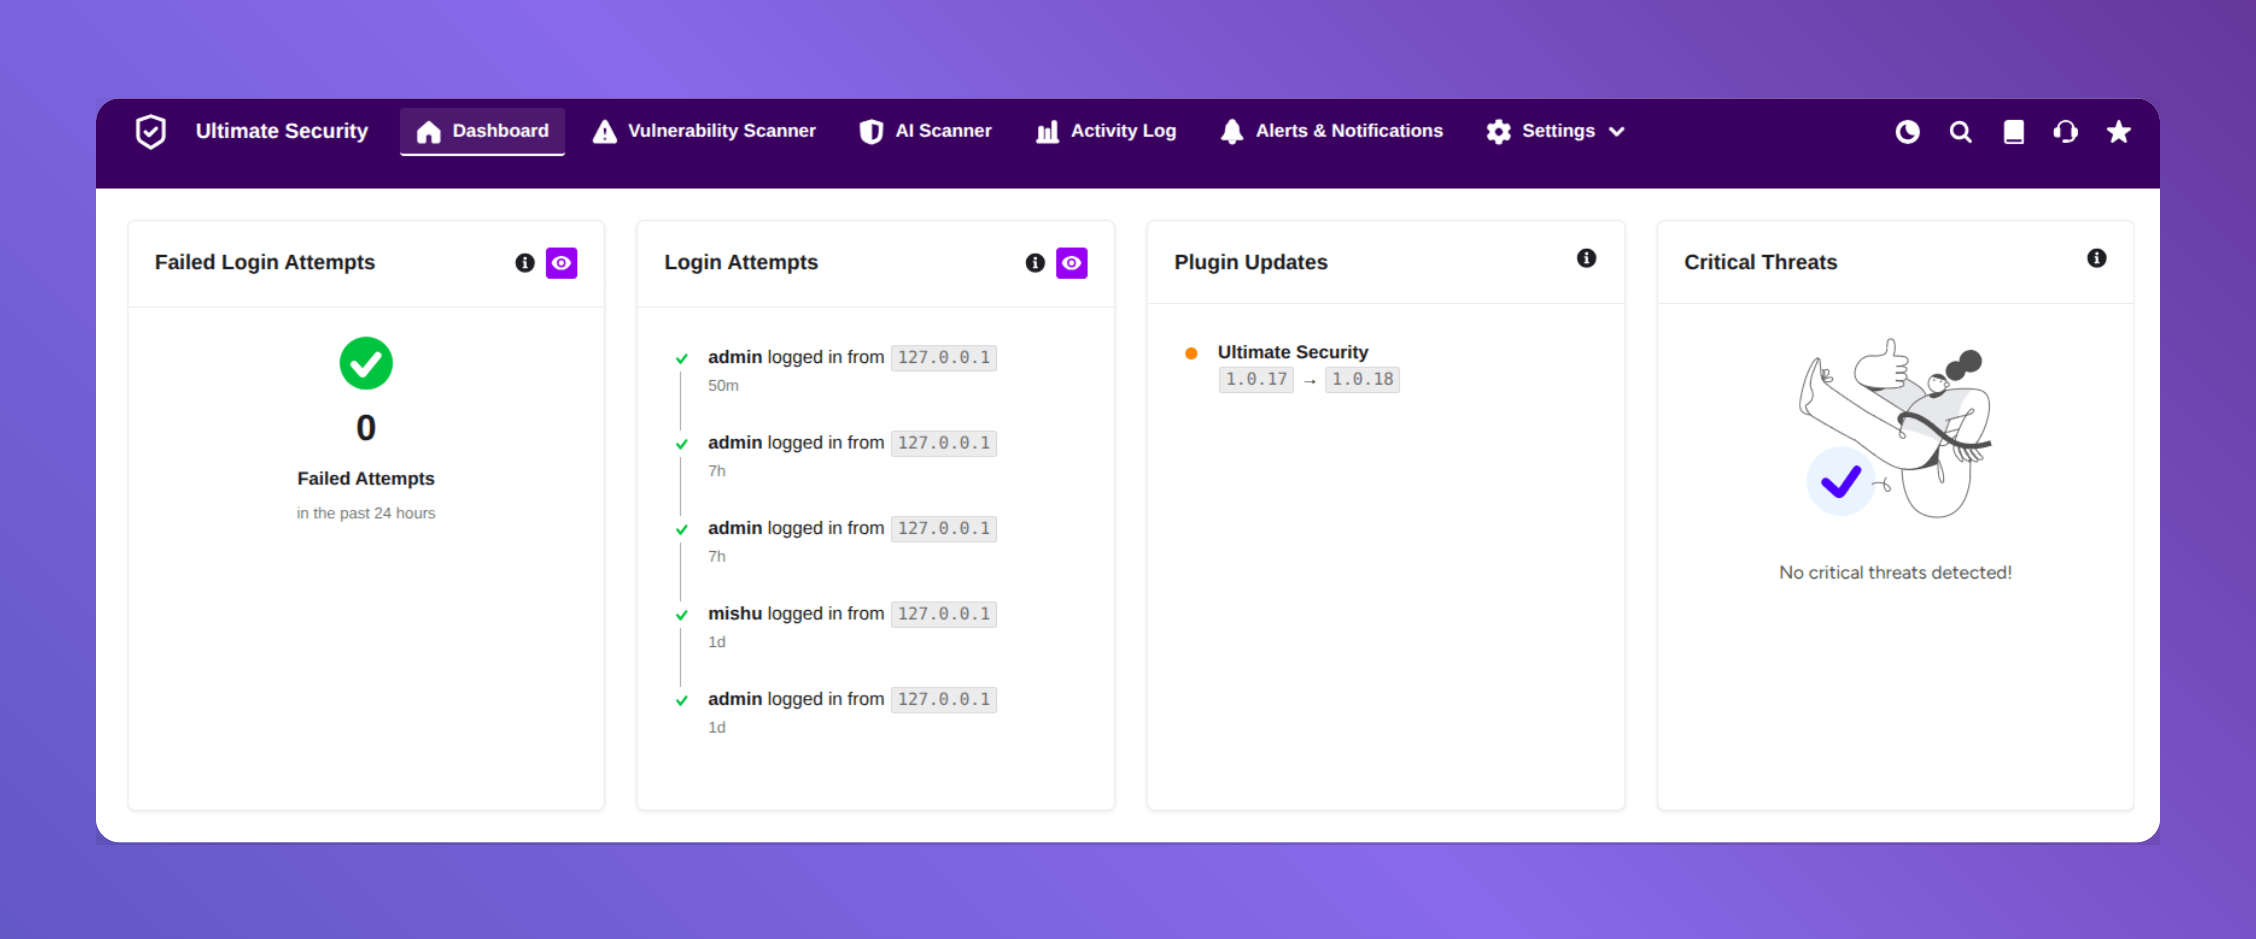
Failed Login Attempts
This counter shows how many times wrong login credentials were entered in the last 24 hours.
Click the “Review” button to open a detailed popup with every failed attempt. You can search by:
- Username: See if a specific account is being targeted
- IP Address: Check if the same location keeps trying to break in
- User Agent: Identify if a specific bot or browser is behind the attempts
Each entry in the list shows a red “Failed” badge, the username tried, the IP address, the exact time of the attempt, and the device or software used. If you see hundreds of failed attempts from one IP address in a short window, that’s a brute force attack. Enable brute force protection immediately (covered in the Quick Action section below).
Login Attempts
This card tracks all login activity both successful and failed. It’s a broader view than the failed-only card above.
Click the eye icon to open the review window. You can filter by:
- All: Every login attempt
- Successful: Only logins that went through
- Failed: Only the ones that were blocked
Each record shows a green “Successful” or red “Failed” badge, the username, IP address, time, and browser/device details. Use this to verify that your legitimate users are logging in normally and to catch anything that looks out of place.
Plugin Updates
This card shows which of your installed plugins have updates available. Keeping plugins updated is one of the simplest things you can do to keep your site secure. Old plugins are a favorite entry point for attackers.
Critical Threats
This card surfaces the most urgent security issues found on your site. These are things that need your attention now, not later.
Quick Action
The Quick Action section puts the six most important security features right at your fingertips. Each one has a “Configure” button that takes you directly to the settings page for that feature.
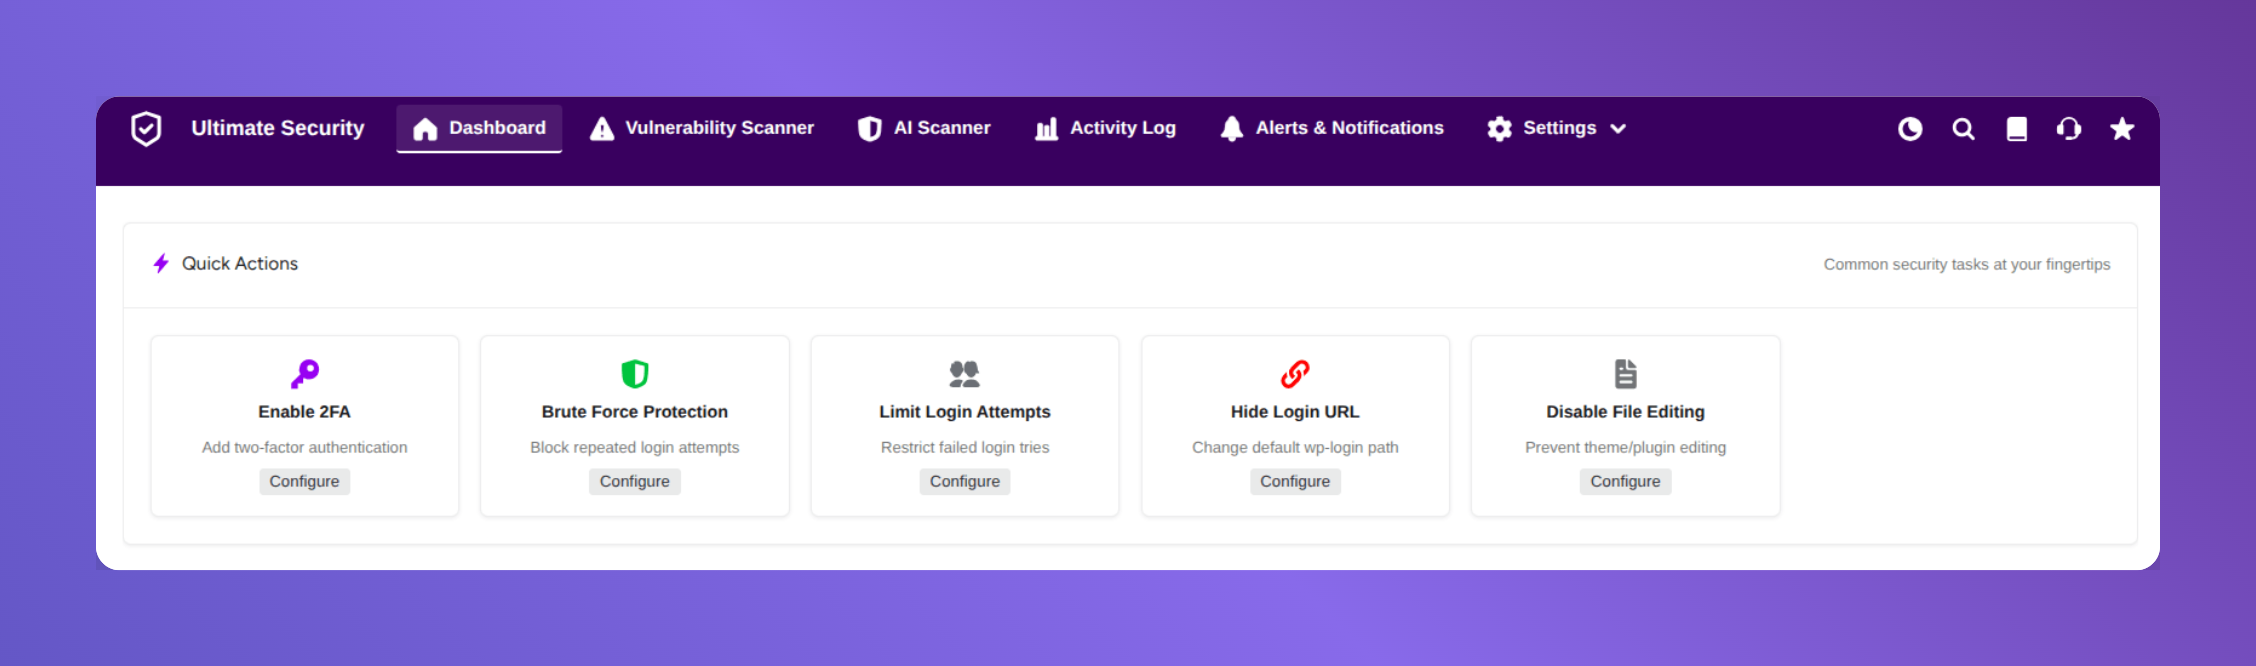
- Enable 2FA: Two-Factor Authentication adds a second step to your login process. Even if someone steals your password, they still can’t get in without the second verification.
- Brute Force Protection: Blocks repeated login attempts from suspicious sources. It stops automated programs from guessing your password thousands of times.
- Limit Login Attempts: Sets a maximum number of failed login tries before an IP gets locked out. This works hand-in-hand with brute force protection.
- Hide Login URL: Changes your login page from the default wp-login.php address to something custom. Most automated attacks target the default URL, so hiding it stops them before they even try.
- Disable File Editing: Prevents anyone including logged-in admins from editing theme and plugin files directly through WordPress. If an attacker gets admin access, this stops them from injecting malicious code into your files.
If you’re just getting started with the plugin, enable these five features first. They cover the most common attack vectors and take less than five minutes to set up.
Security Recommendations
This section is the plugin’s way of telling you what it thinks you should fix next. Ultimate Security scans your current setup and generates a list of recommended actions.
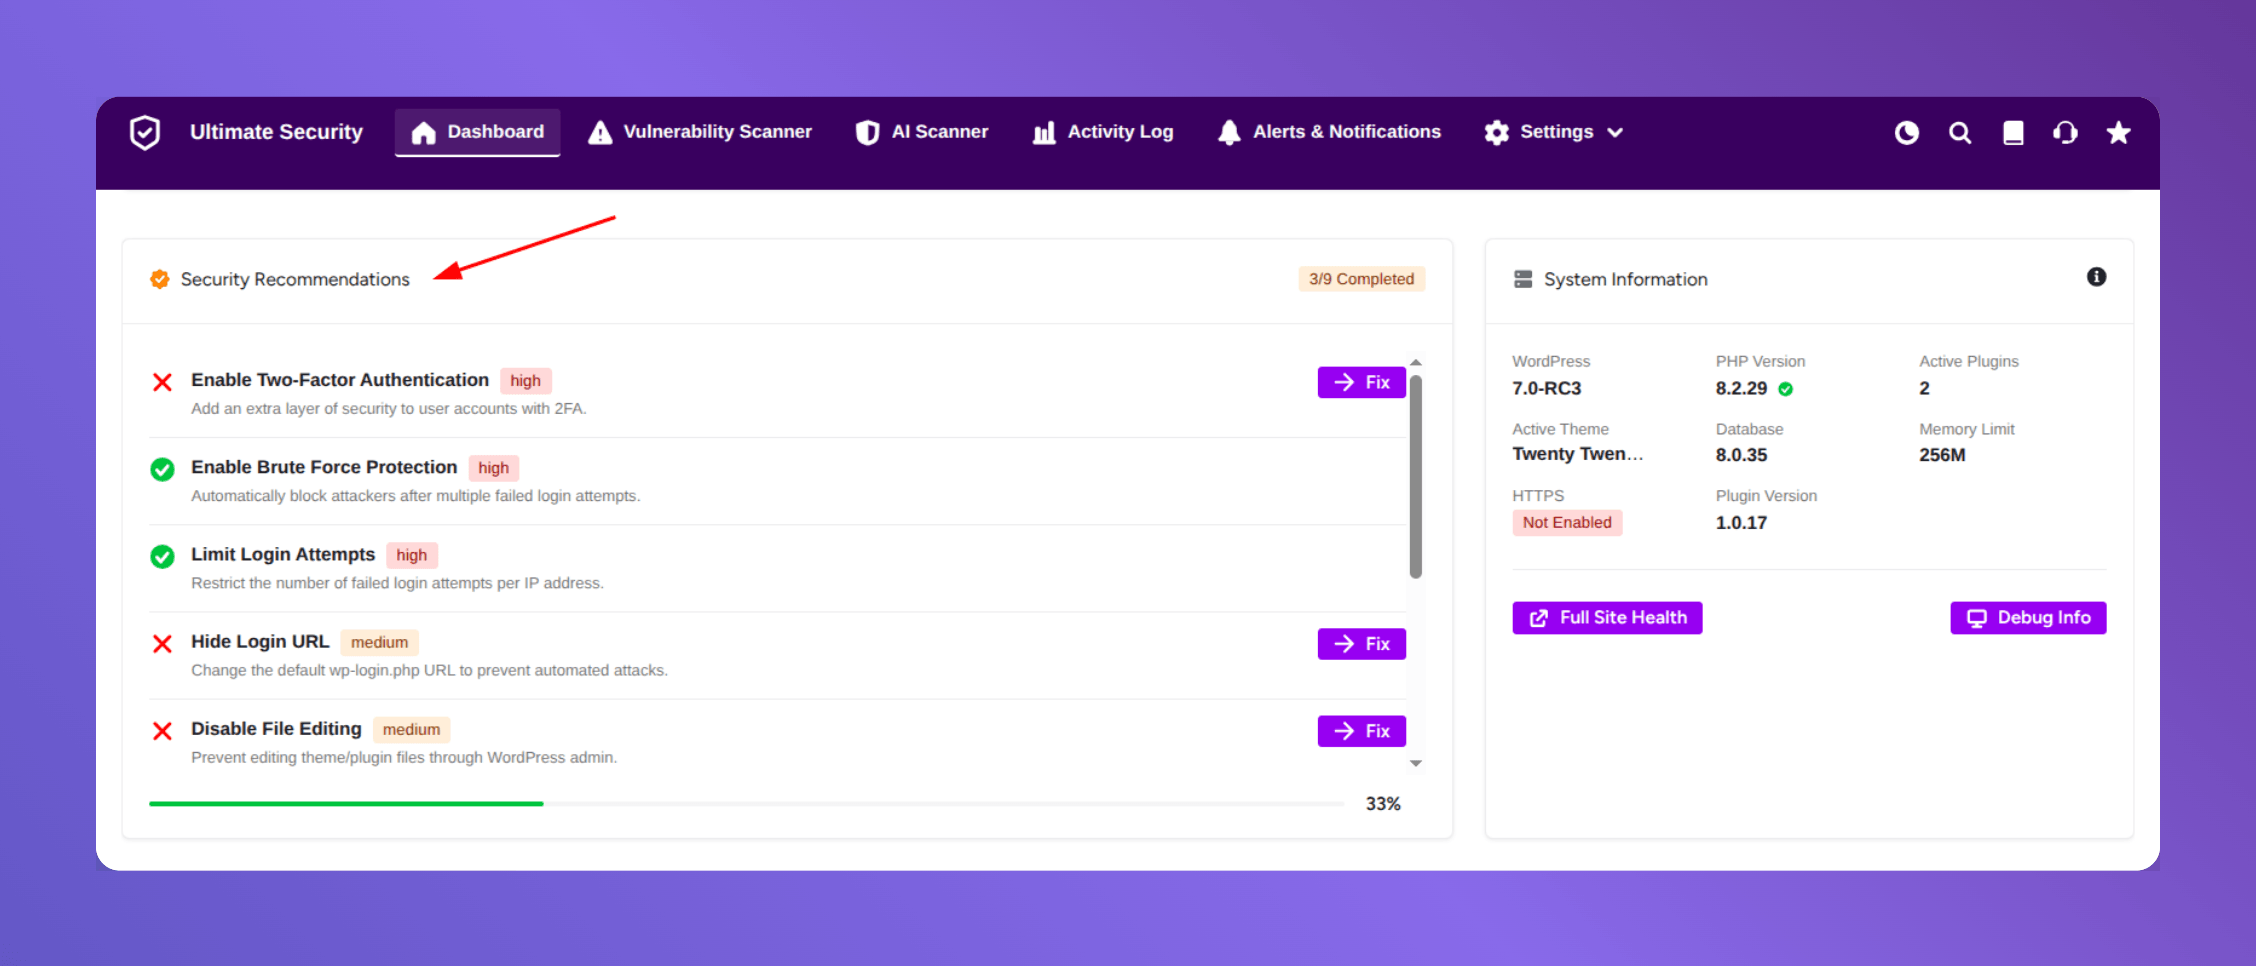
These aren’t random suggestions they’re based on what’s actually missing or misconfigured on your specific site. Work through these recommendations from the top down. The most important ones are listed first.
System Information
The System Information card is your quick-reference panel for everything technical about your WordPress environment.
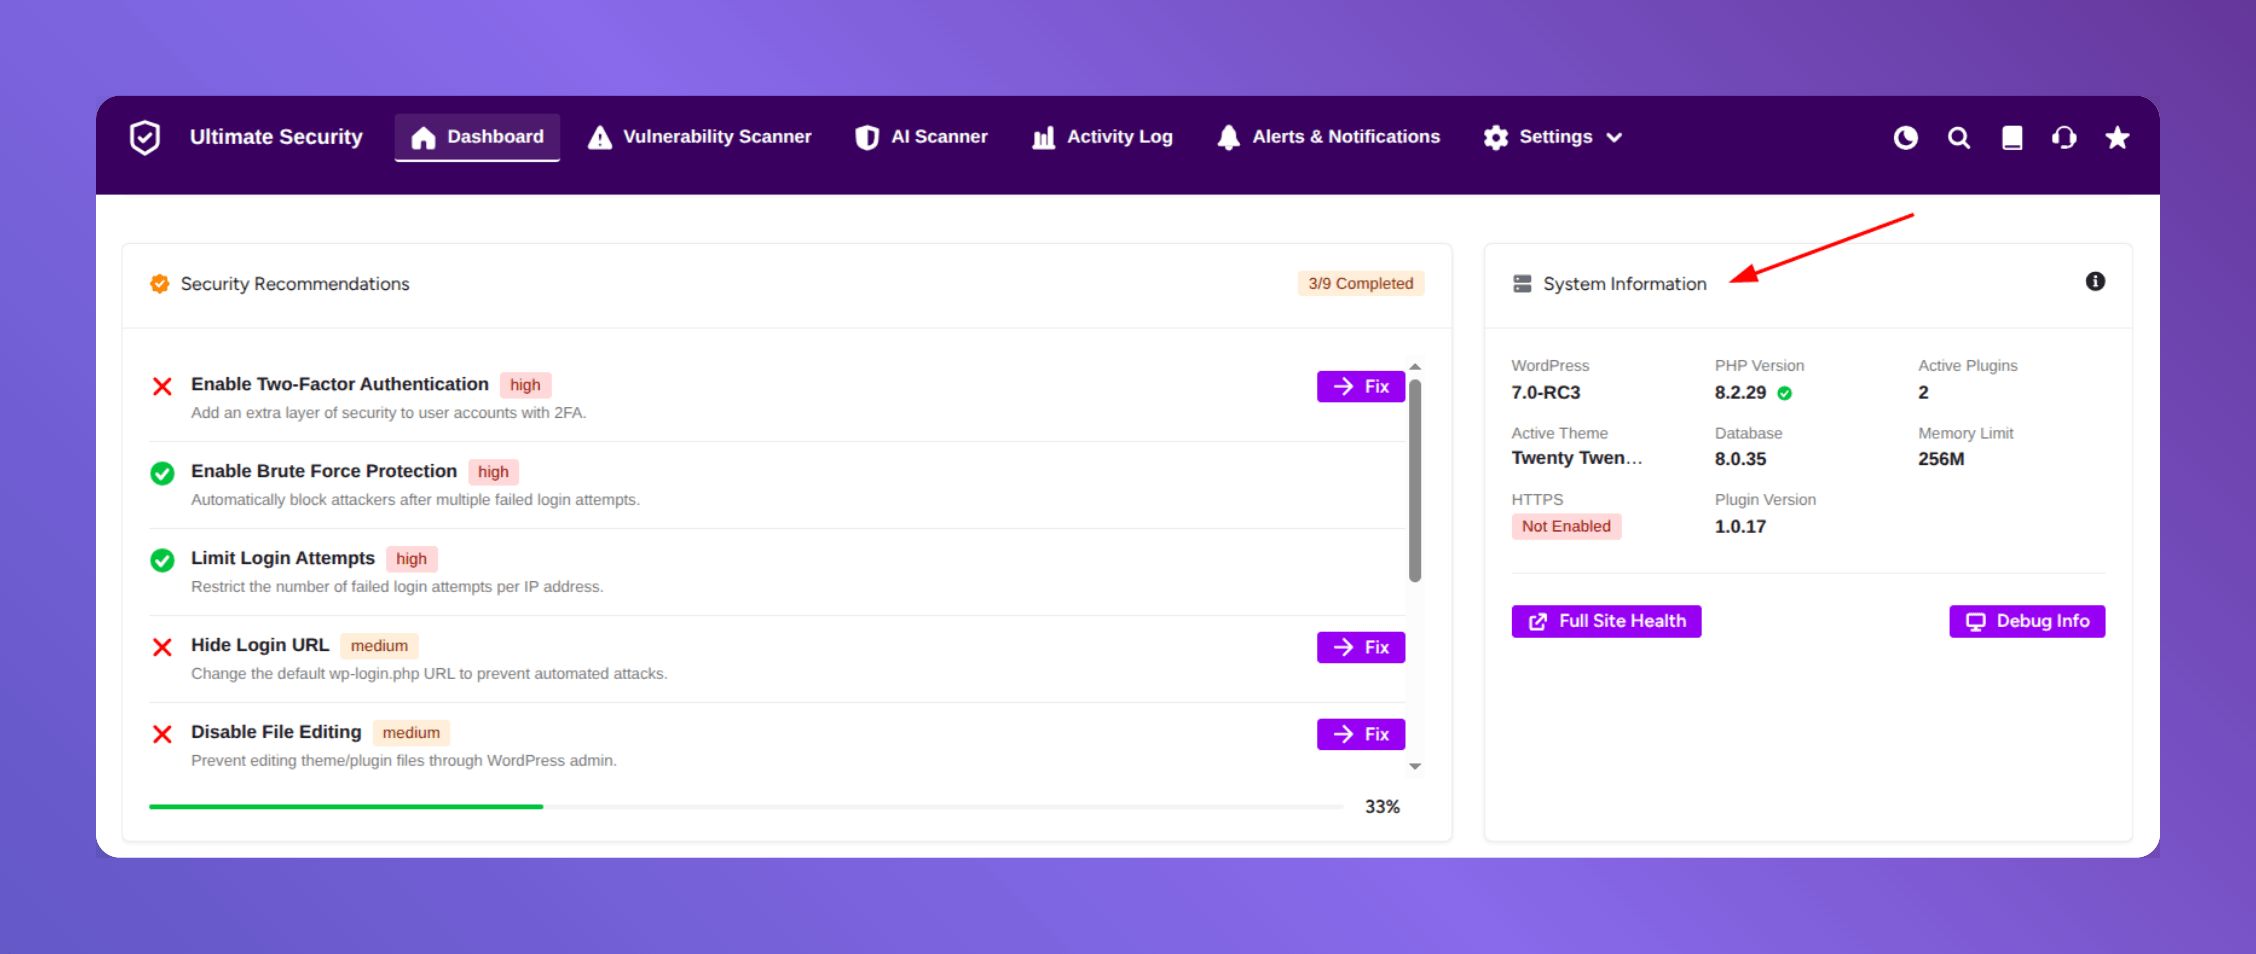
At a glance, you can see:
- WordPress Version
- PHP Version
- Number of Active Plugins
- Active Theme
- Database Version
- Memory Limit
- HTTPS Status
- Ultimate Security Plugin Version
This is especially useful when something breaks. Before you contact support or post in a forum, check this card first most support teams will ask for exactly this information.
Two Action Buttons
- Full Site Health: Opens WordPress’s built-in health report page for a deeper look at your site’s technical condition.
- Debug Info: Shows detailed diagnostic information specific to the Ultimate Security plugin. Use this when troubleshooting plugin-related issues.
Why Choose Ultimate Security for The Best Dashboard?
Most site owners multiple security plugins to cover login security, malware scanning, file monitoring, and bot blocking. They don’t always play well together, and you’re constantly switching between dashboards to check what’s happening.
You save real time. One best WordPress security dashboard to check your security status, to act on threats, to review login activity. You’re not jumping between plugins or re-learning three different interfaces.
You get full coverage in one place. Login protection, two-factor authentication, brute force blocking, AI-powered malware scanning, file integrity monitoring, vulnerability scanning, activity logs, bot protection, and site hardening all managed from a single dashboard. No plugin conflicts. No gaps in coverage. You get features like two factor authentication, bot protection, custom login change, AI malware detection, and content protection and more on.
Where do I find the Ultimate Security dashboard after installing the plugin?
Once you activate the plugin, go to your WordPress admin panel. You’ll see a new menu item called “Ultimate Security” in the left sidebar. Click on it and you’ll land on the dashboard.
How often should I check the dashboard?
Check the four Issue Counters (Issues Found, Critical Threats, Outdated Plugins, Failed Logins) at least once a week. If you run a busy site with multiple users or an online store, check it every day. The dashboard refreshes in real time, so the data you see is always current.
I see a lot of failed login attempts. Should I be worried?
A few failed logins are normal. Bots constantly probe WordPress sites. But if you see a sudden spike, especially from the same IP address, that’s a brute force attack. Enable Brute Force Protection and Limit Login Attempts from the Quick Action section immediately. You can also block the specific IP from the Failed Login Attempts review popup.
What is the emergency URL I saw during setup?
The emergency URL is a special link that deactivates the Ultimate Security plugin instantly without needing to log into your WordPress admin. Save it somewhere safe, like a notes app or password manager, right after you set up the plugin.
I enabled all the Quick Action features. Is my site fully protected now?
You’re in much better shape, but “fully protected” isn’t a one-time achievement. Security is an ongoing process. Keep your plugins and WordPress core updated, run regular file integrity scans, review your login activity, and work through the Security Recommendations list. The dashboard score will guide you on what’s still left to do.
Ready to Get The Best WordPress Security Dashboard
The Ultimate Security Dashboard offers a compelling blend of comprehensive features, user-friendly design. By centralizing vital security functions, simplifying complex configurations, and providing continuous vigilance, it empowers WordPress site owners to confidently navigate the online landscape without succumbing to the constant worry of cyber threats. Embrace proactive protection and ensure your WordPress site remains a secure and thriving online presence.