
Every WordPress site, from a personal blog to a seven-figure WooCommerce store, shares one thing in common: a login page that bots already know how to find. WordPress login security is the first thing attackers test. Bots run automated brute force attacks and hammer the login page with thousands of credential combinations. This post covers two things specifically: how to harden your login page so attackers can’t even get a foothold, and how to add two-factor authentication so that even a stolen password becomes useless.
Table of Contents
Why Your WordPress Login Page Is a Prime Target
The default WordPress login page lives at /wp-login.php. It’s a publicly documented URL that hasn’t changed in over a decade.
Botnets don’t need to be smart. They need to be persistent. They hit your login page hundreds or thousands of times per day, cycling through lists of common usernames like “admin,” “administrator,” and “editor” paired with leaked password databases from other breaches. This is called a WordPress brute force attack, and WordPress by default does absolutely nothing to stop it.
The good news is that none of this is complicated to fix. WordPress login security hardening for beginners doesn’t require server-level configurations or hiring a developer. A well-built plugin with the right features handles everything. The rest of this guide shows you exactly how.
The Tool Doing the Heavy Lifting in This Guide
Before getting into settings and configurations, you need to know what you’re working with.
Every step in this guide is built around one plugin: Ultimate Security by “wpultimatesecurity“. Not because it’s the only option, but because it handles everything covered here from a single, clean dashboard without adding unnecessary weight to your site. That matters more than most people realize. It’s been built from the ground up to address one specific question: how do you protect a WordPress site’s login page and authentication system without turning your dashboard into a security operations center?
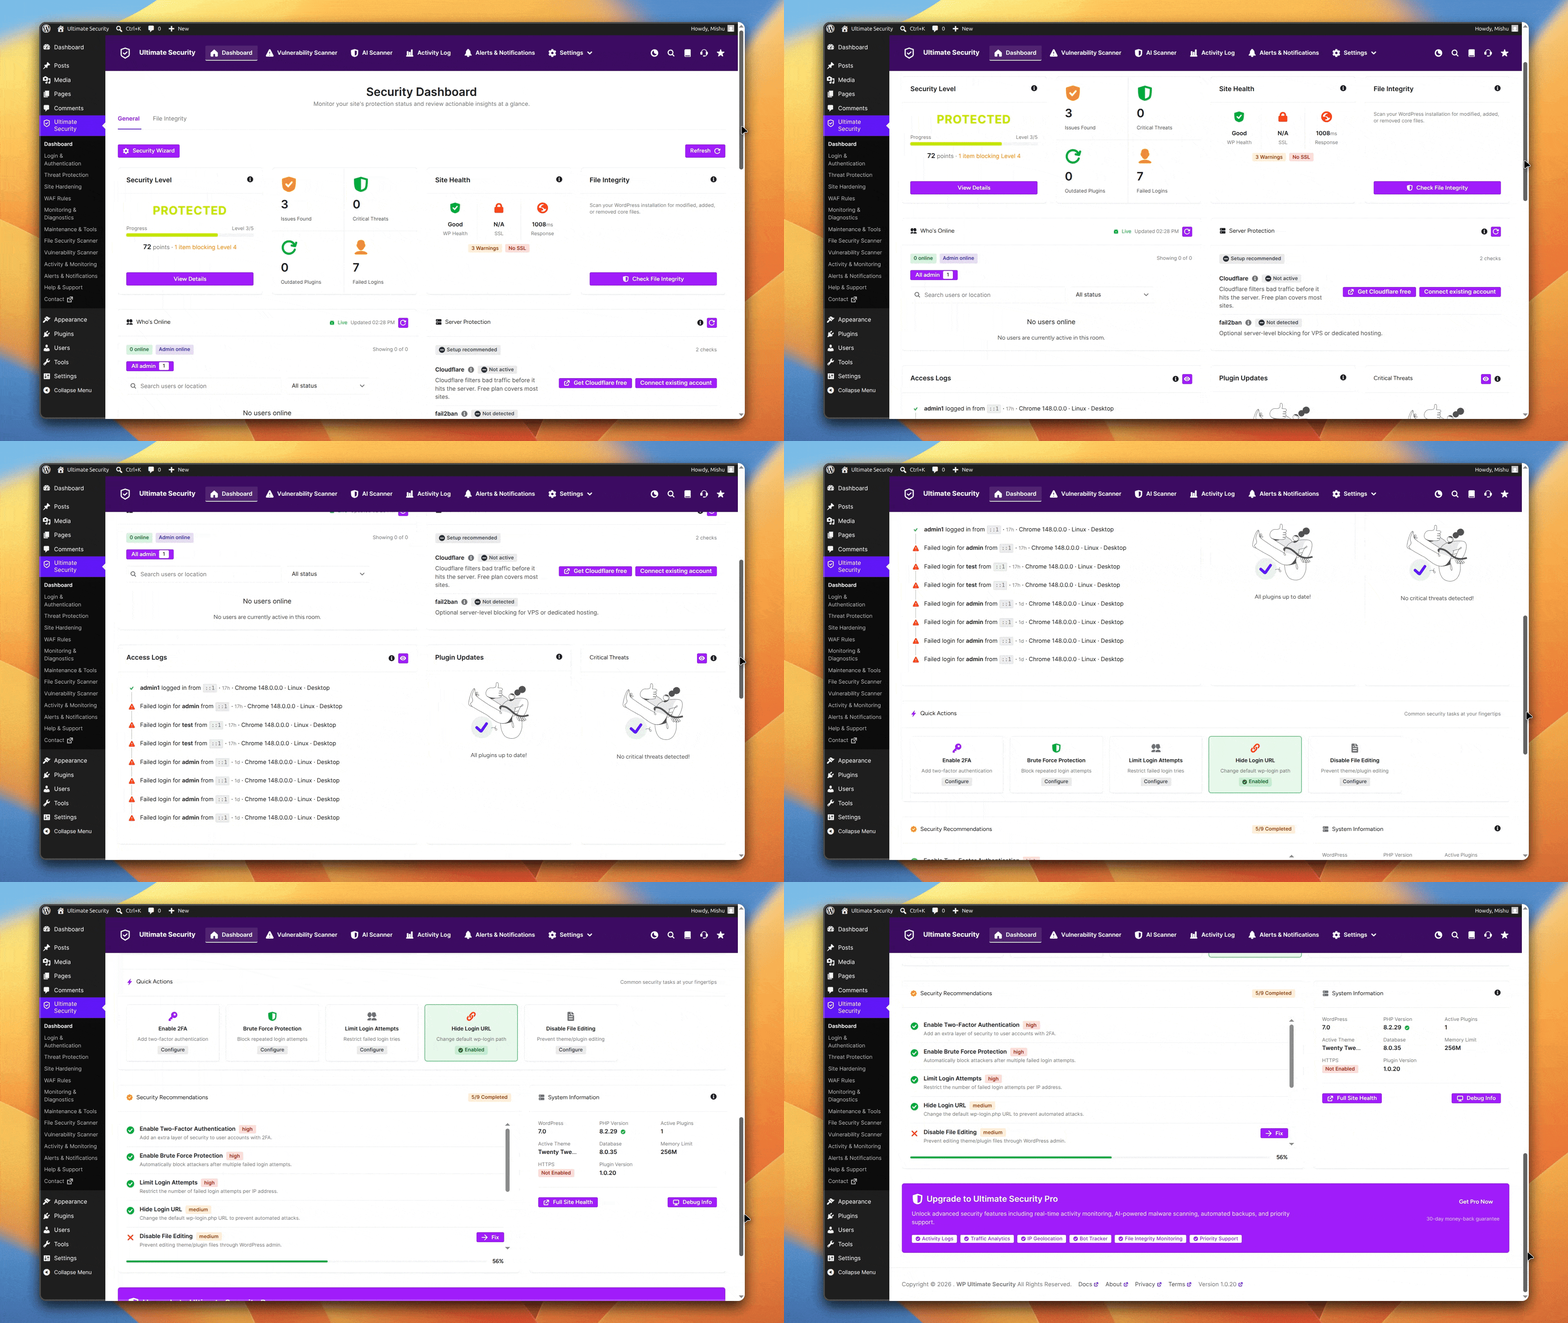
Getting Ultimate Security running on your site takes under two minutes. Head to your WordPress Dashboard, go to Plugins > Add New, and search for “wpultimatesecurity.” Click Install Now, then Activate. Once active, the plugin will appear in your left sidebar menu where the setup wizard will guide you through your first configuration. You can follow the full step-by-step installation guide here.
WordPress Login Security Hardening
WordPress login security means making your login page harder to find, harder to brute-force, and harder to abuse, before a single attacker ever gets close to a real account. Ultimate Security gives you four distinct tools for this.
1. Limit Login Attempts (Brute Force Protection)
This is the single most impactful setting you can enable. By default, WordPress allows unlimited login attempts from any IP address. There is no cap, no cooldown, no consequence for failure. Limiting login attempts ends that immediately.
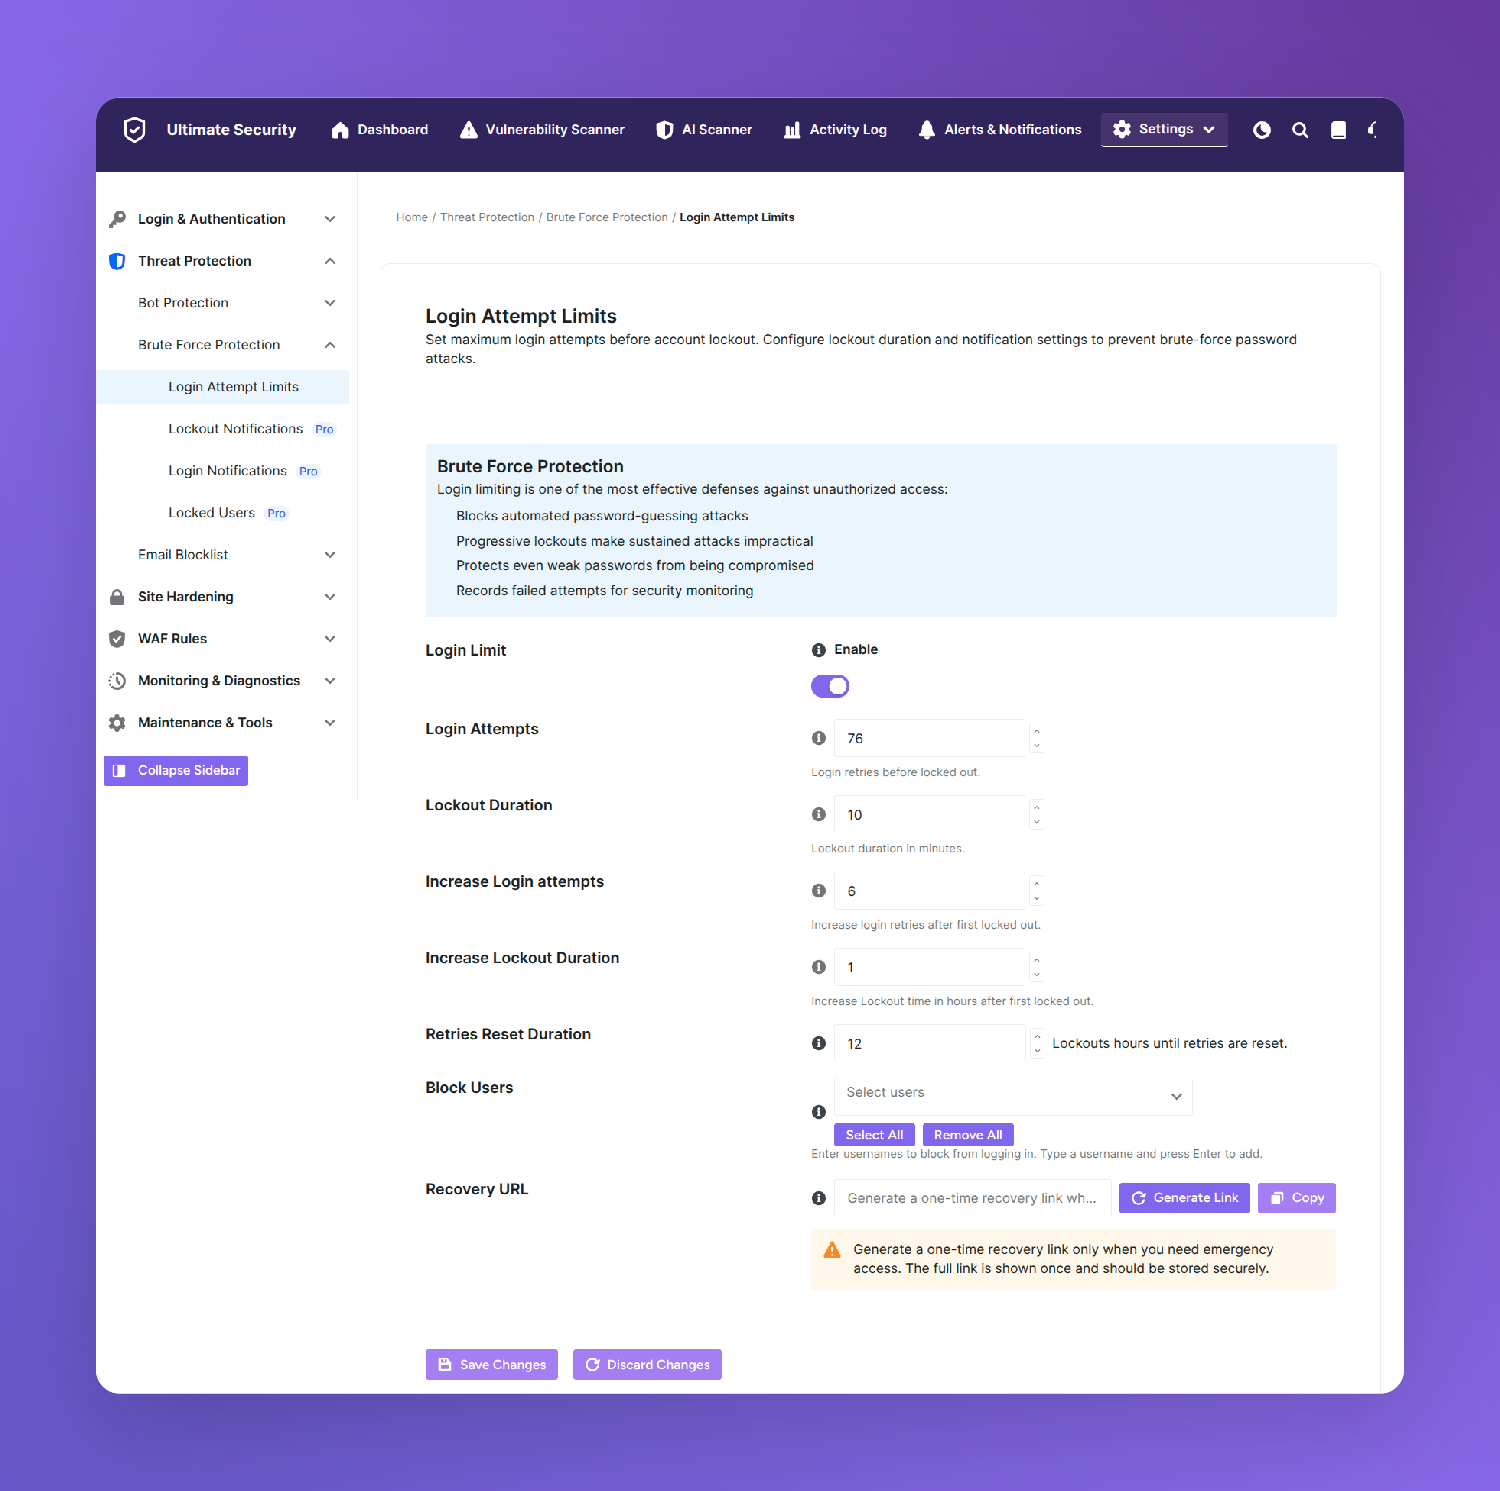
Inside Ultimate Security, navigate to the Brute Force Protection section from Settings and find Login Attempts. Here’s what each setting controls and what you should actually care about:
Login Limit (Master Switch): This activates the entire feature. Toggle it on first.
Login Attempts: This sets how many wrong passwords someone gets before being blocked. That’s a reasonable starting point. Legitimate users who forget their password might try two or three times. Anyone beyond that is likely automated.
Lockout Duration: After the attempt limit is hit, the plugin puts that IP in timeout for however long you specify. Set this to at least 15 to 30 minutes. Short enough that a real user can come back later, long enough to make brute-force attacks impractical.
Increase Login Attempts. This is where the plugin gets smarter. If the same IP keeps getting locked out repeatedly within a few hours, the plugin recognizes it as a serious, persistent threat and escalates the response.
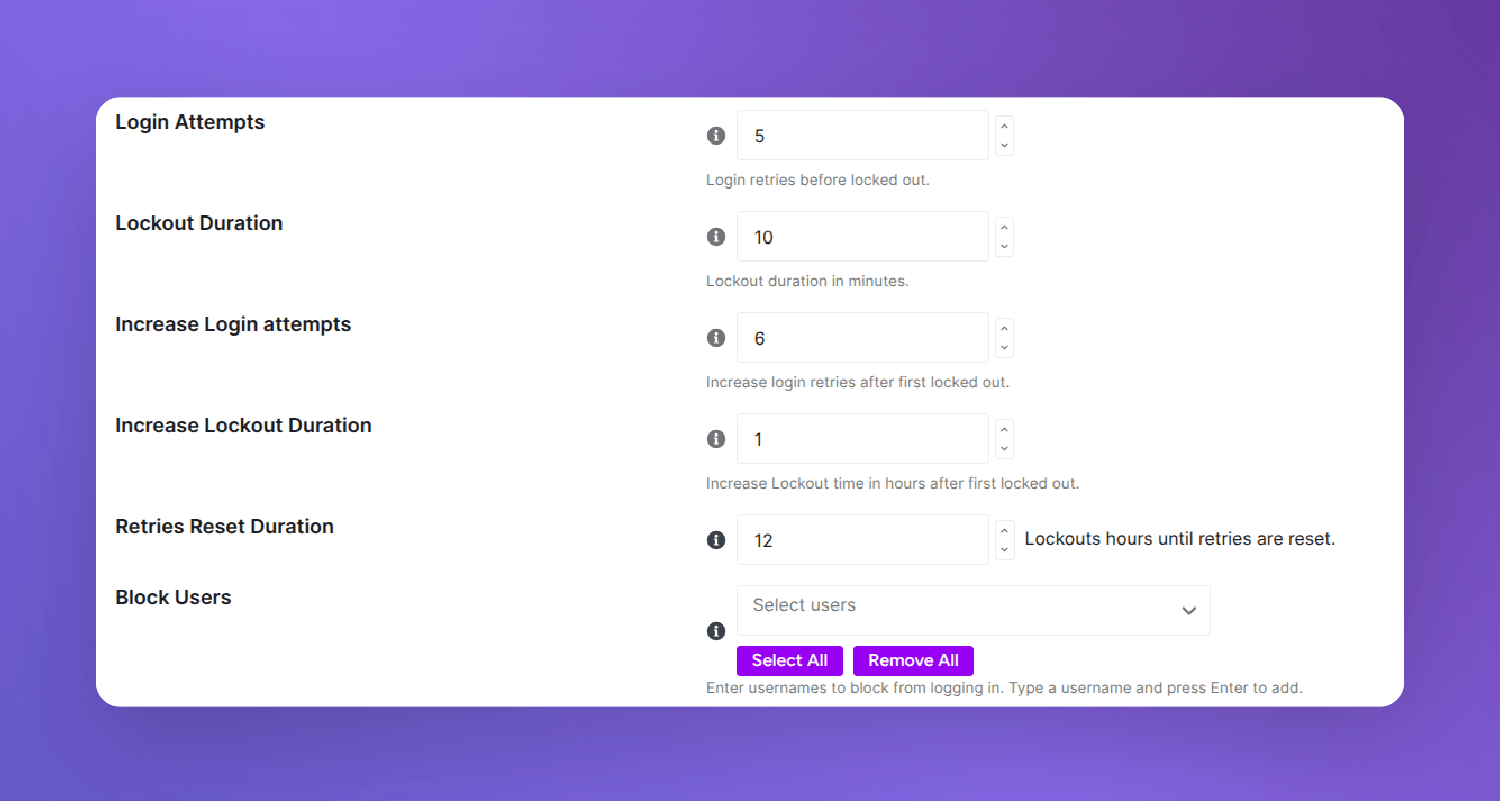
Increase Lockout Duration: Paired with the setting above, once an IP is flagged as a serious threat, the lockout window grows significantly. A bot that keeps trying will find itself blocked for hours instead of minutes.
Retries Reset Duration: This one is often overlooked. If someone makes two failed attempts but then doesn’t try again for several hours, they’re probably just a forgetful user. This setting tells the plugin to wipe their slate clean after a defined period of inactivity, so legitimate users aren’t permanently penalized for honest mistakes.
Block Users: Beyond IP-based blocks, you can also block specific WordPress usernames entirely. If you know a username is being targeted or is no longer valid, add it here. The Select All and Remove All buttons let you manage the list efficiently.
Recovery URL: Before you save any of these settings, generate your Recovery URL.
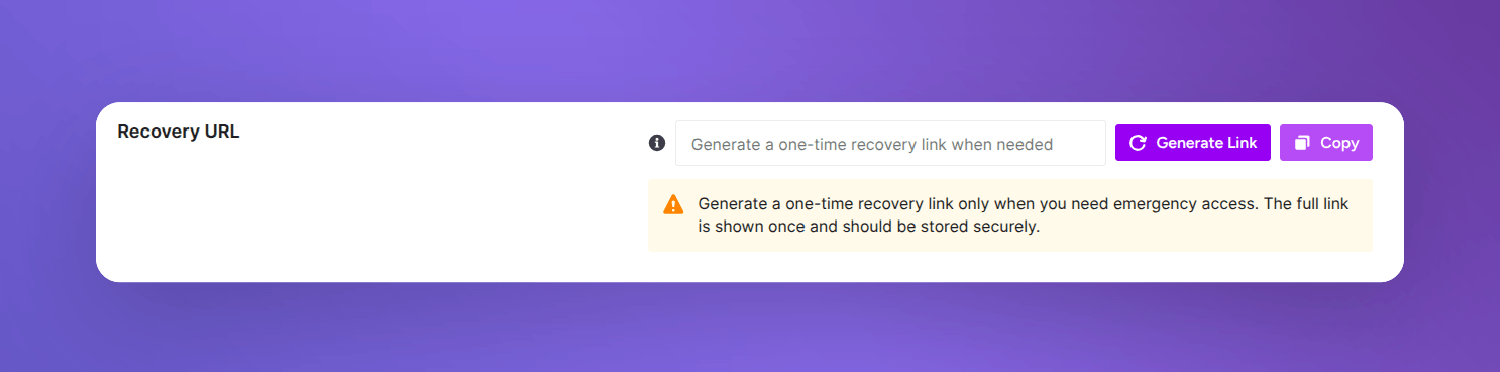
This is a private, secret link that bypasses the lockout entirely. If you misconfigure your attempt limit and lock yourself out, this is your escape hatch.
Learn more about login limit attempts from the user documentation:
2. Change Your Login URL
Hiding your login page doesn’t make your site impenetrable. But it does eliminate an enormous percentage of automated bot traffic overnight, because most bots are dumb. They hit the default URL, get a 404, and move on to easier targets.
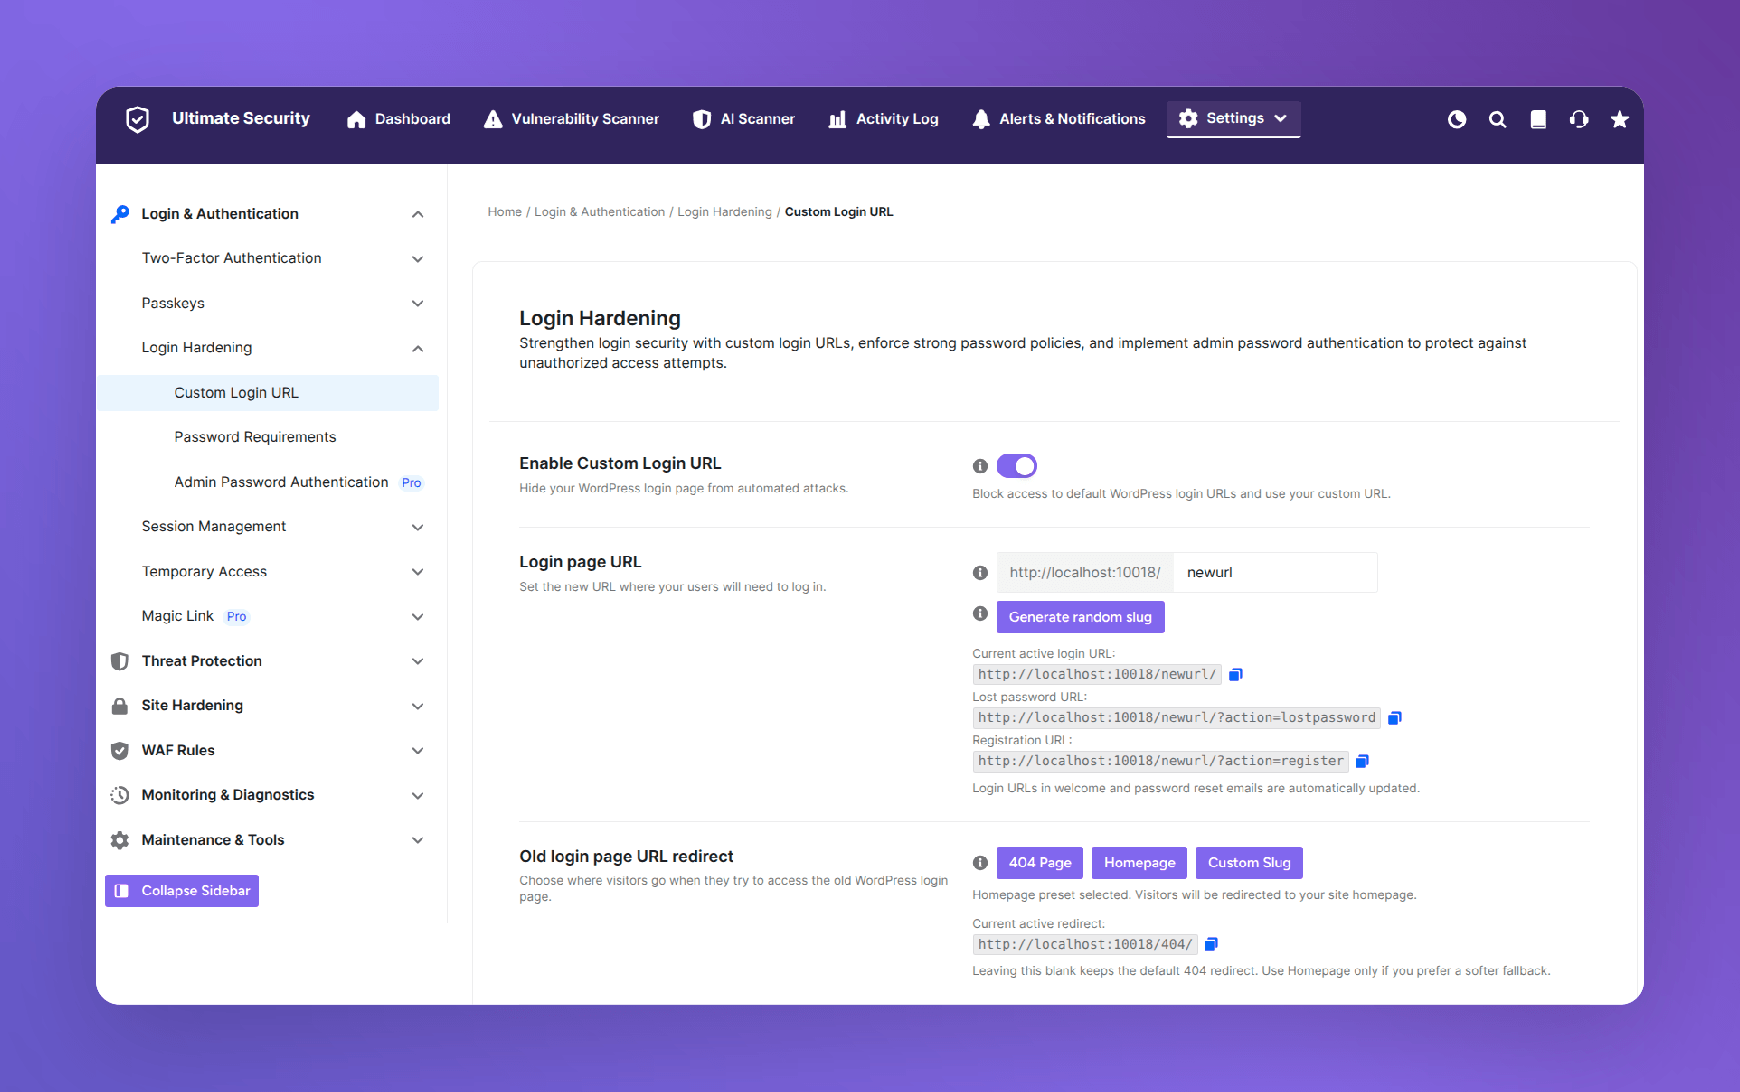
Inside Ultimate Security, go to Login Authentication and open Custom Login URL.
Setting Your New Login Page URL: You’ll see a field showing your current login path. Replace it with something that isn’t guessable. Avoid obvious choices like /secure-login or /admin-login. Pick something specific to your site or use a random string. Once saved, your old /wp-login.php address will stop working.
Old Login Page Redirect: This is what visitors and bots see when they hit the old default URL. The default setting is a 404 Not Found error, which is exactly what you want. It gives nothing away. The page simply doesn’t exist, as far as anyone can tell.
You can also set a custom redirect URL here if you’d prefer to send old login traffic somewhere specific, though 404 is the cleaner choice for security.
Show a Consent Message: This option lets you display a custom message on your new login form. It’s optional, but useful for sites with multiple users or contributors. You can add a welcome note, a reminder about password policies, or a legal notice depending on your site’s needs.
Before You Save: A Critical Warning
Changing your login URL is one of the settings that can lock you out if you’re not careful. Before clicking save, do three things:
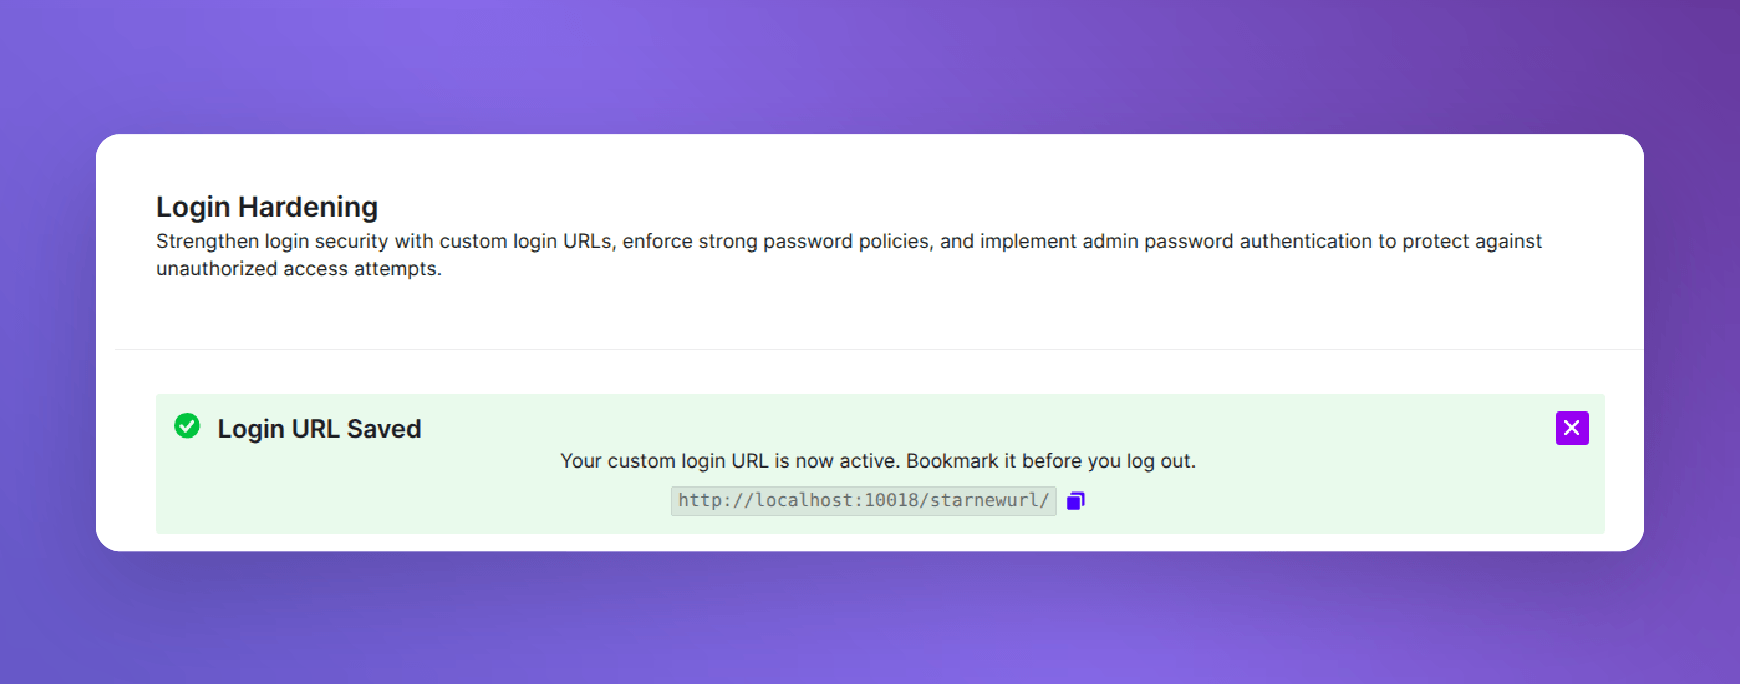
First, bookmark the new login URL in your browser. Second, copy the Plugin Deactivation URL from Settings and store it somewhere safe. Third, test the new URL in a private/incognito browser window before logging out of your current session. If it loads the login form correctly, you’re good. If something went wrong, you still have your current session to fix it.
Learn more about the Custom login URL from the user documentation
3. Enforce Strong Password Requirements
WordPress has a built-in password strength indicator, but it doesn’t enforce anything. A user can click “confirm use of weak password” and set their password as 123456 without any obstacle. That’s a problem on any site with multiple users. Ultimate Security’s Password Requirements feature changes this. You define the rules. Users must comply, whether they like it or not.
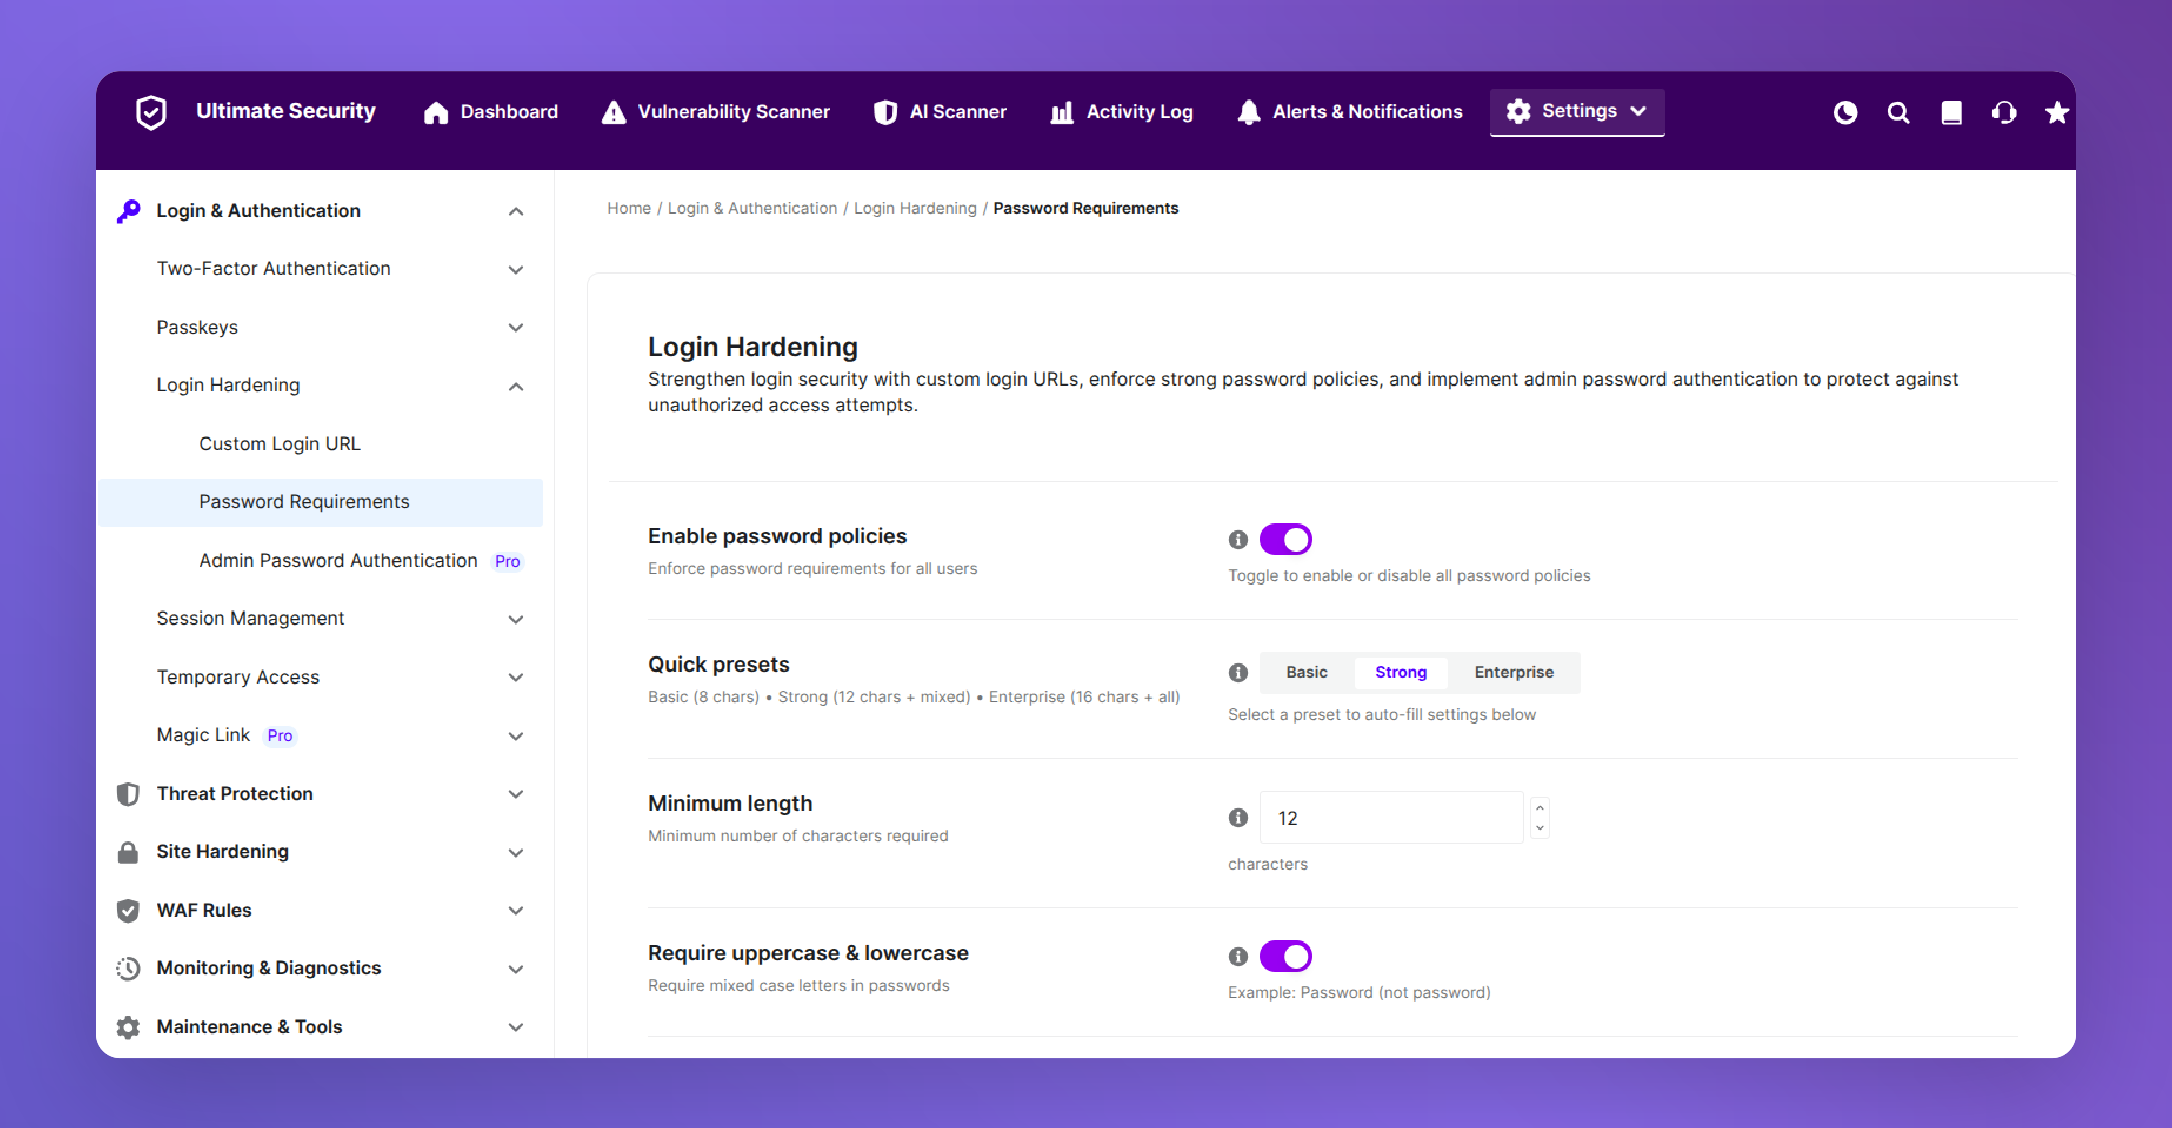
Navigate to Login Authentication from Settings and open Password Requirements. Toggle on Enable Password Policies to activate the feature.
Quick Presets
If you want a fast starting point, the Quick Presets tabs are genuinely useful. Three tiers are available:
- Basic: Minimum requirements for general-purpose sites. Good for blogs or portfolio sites.
- Strong: Enforces stricter character requirements. Suitable for most business sites, membership sites, or anything handling user data.
- Enterprise: Maximum restrictions. Built for environments where compliance matters or where a breach would carry serious consequences.
Clicking any preset automatically populates all the settings below it. You can then fine-tune from there.
Individual Requirements
Beyond presets, you control each rule independently:
Minimum Length: Set the minimum number of characters. 12 is a reasonable floor. 16 is better. Short passwords are statistically much easier to crack regardless of complexity.
Require Uppercase and Lowercase: Forces mixed-case passwords. Eliminates simple all-lowercase or all-caps passwords instantly.
Require Numbers: At least one digit must appear. Combined with case requirements, this significantly expands the password search space for any attacker.
Require Special Characters: Forces users to include symbols like (!, @, #, or $) You can also exclude specific characters using the Exclude Characters field, which is useful for avoiding symbols that cause issues in certain server environments or form processors.
Password History
Set to 1 by default, this prevents users from reusing their most recent password.
Increase it to 5 or more on high-security sites to prevent users from cycling between two or three familiar passwords every time they’re forced to reset.
Expiration Period
This forces periodic password changes. Setting it to 0 means passwords never expire. For most sites, a 90-day or 180-day expiration is a practical balance between security and user friction. The Warning Days setting sends users an advance notice before their password expires, and the Grace Period gives them a few extra login attempts after expiration before full lockout kicks in.
Email Notification
Enable this to have the plugin automatically notify users about upcoming password expirations. It removes the burden from you as an admin and ensures users aren’t caught off guard.
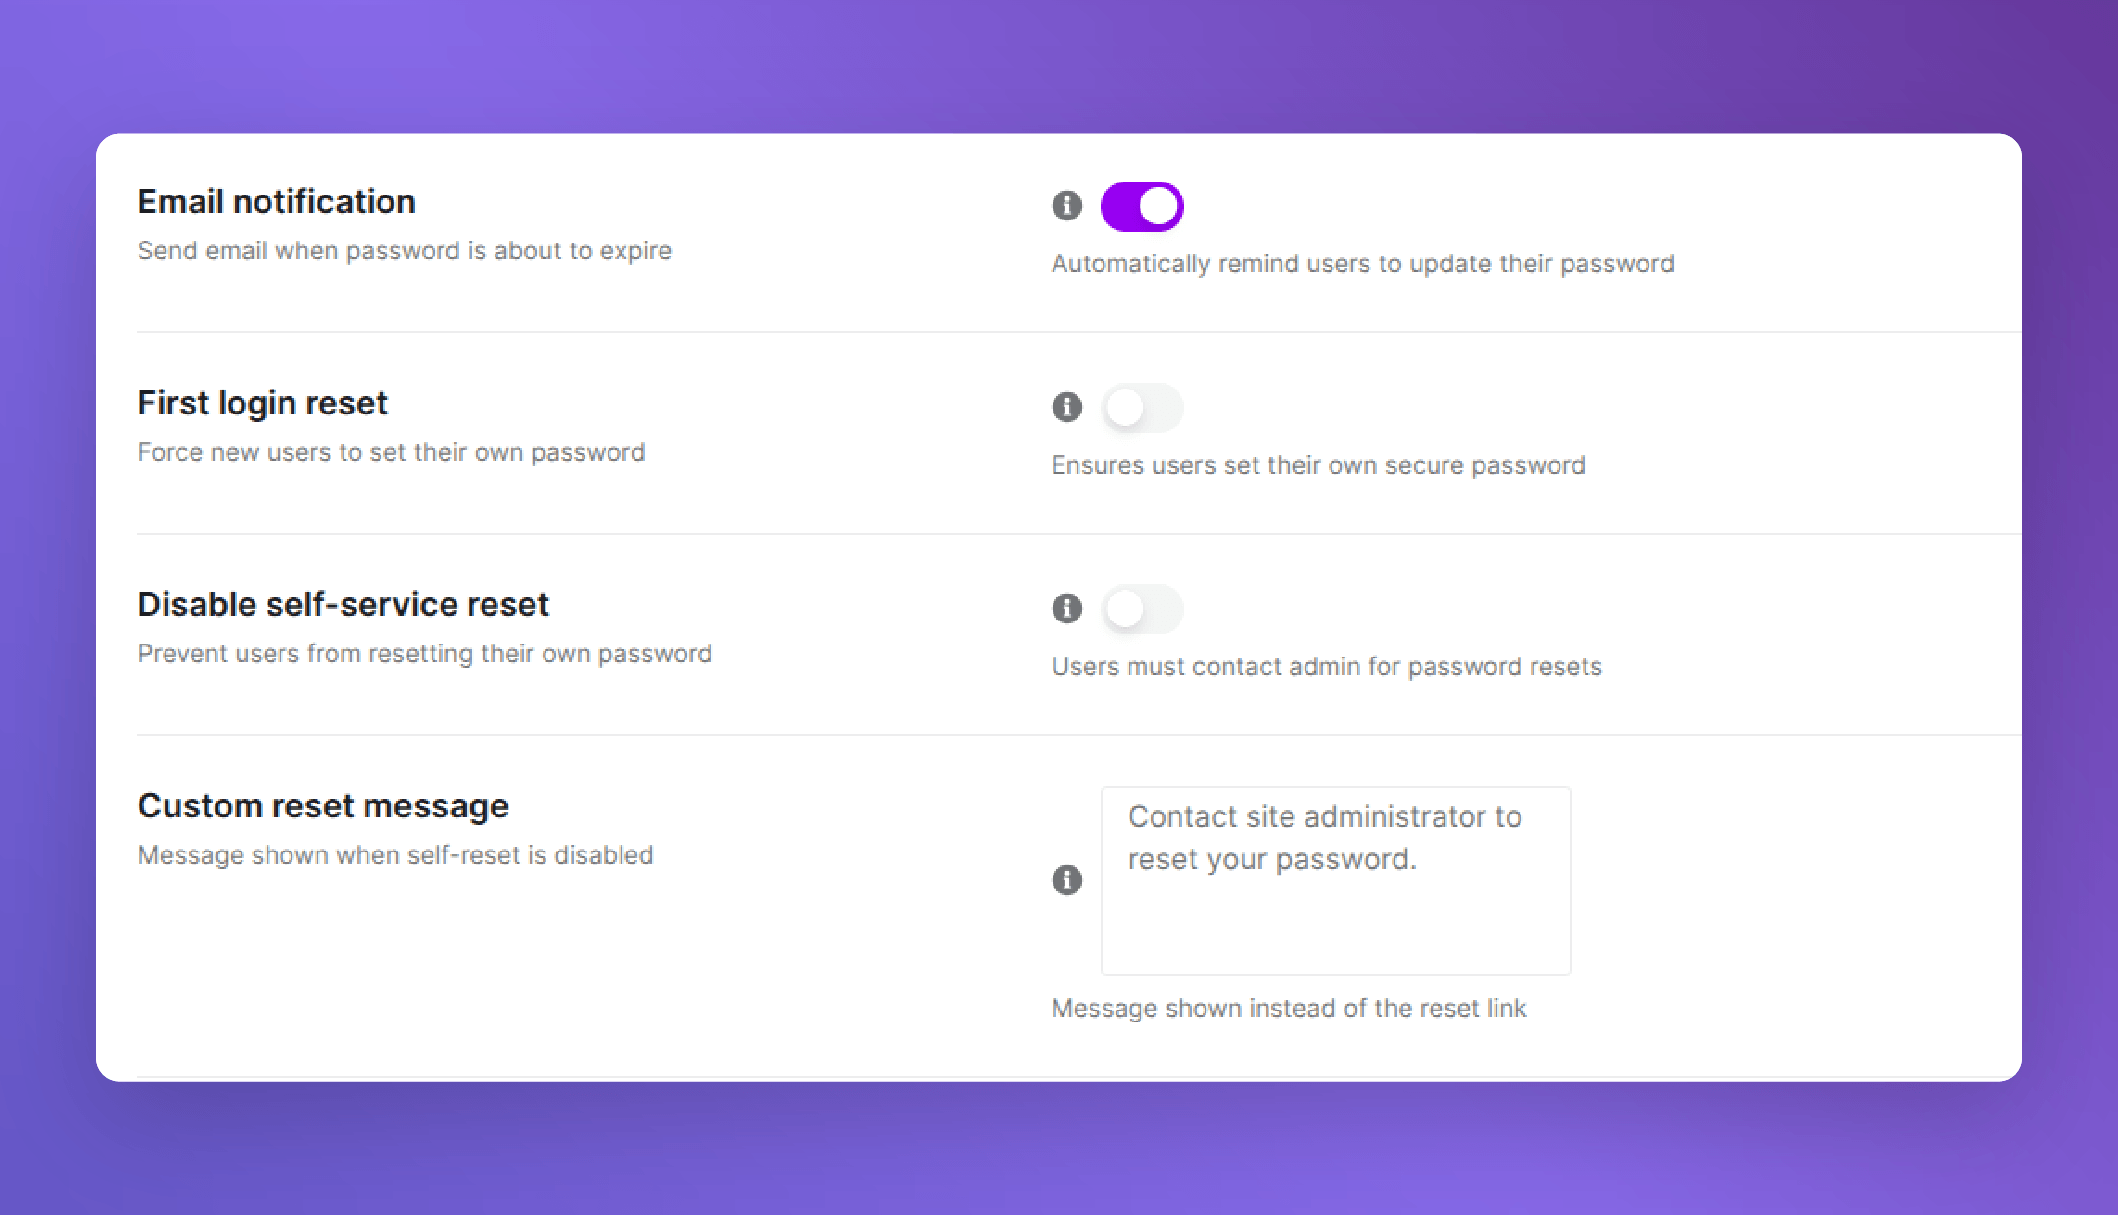
First Login Reset
This is one of the most underused but genuinely smart settings on this page. When you create a new user account, the admin typically sets a temporary password. With First Login Reset enabled, users are forced to change that password the moment they log in for the first time. Only the actual user will know their real password. The admin never has lingering access.
Disable Self-Service Reset
On high-security or regulated sites, you may want to control who can request a password reset. Enabling this toggle removes the standard “Lost your password?” link from the login form entirely. The Custom Reset Message field lets you tell users what to do instead, typically, contact the site administrator. You can also add a Custom Reset URL that points to a form or helpdesk page for handling reset requests.
Refuse Compromised Passwords
This setting cross-checks every password against the Have I Been Pwned database, a publicly maintained repository of billions of credentials leaked in real-world data breaches. If a user tries to set a password that has appeared in any known breach, the plugin blocks it immediately and prompts them to choose something else.
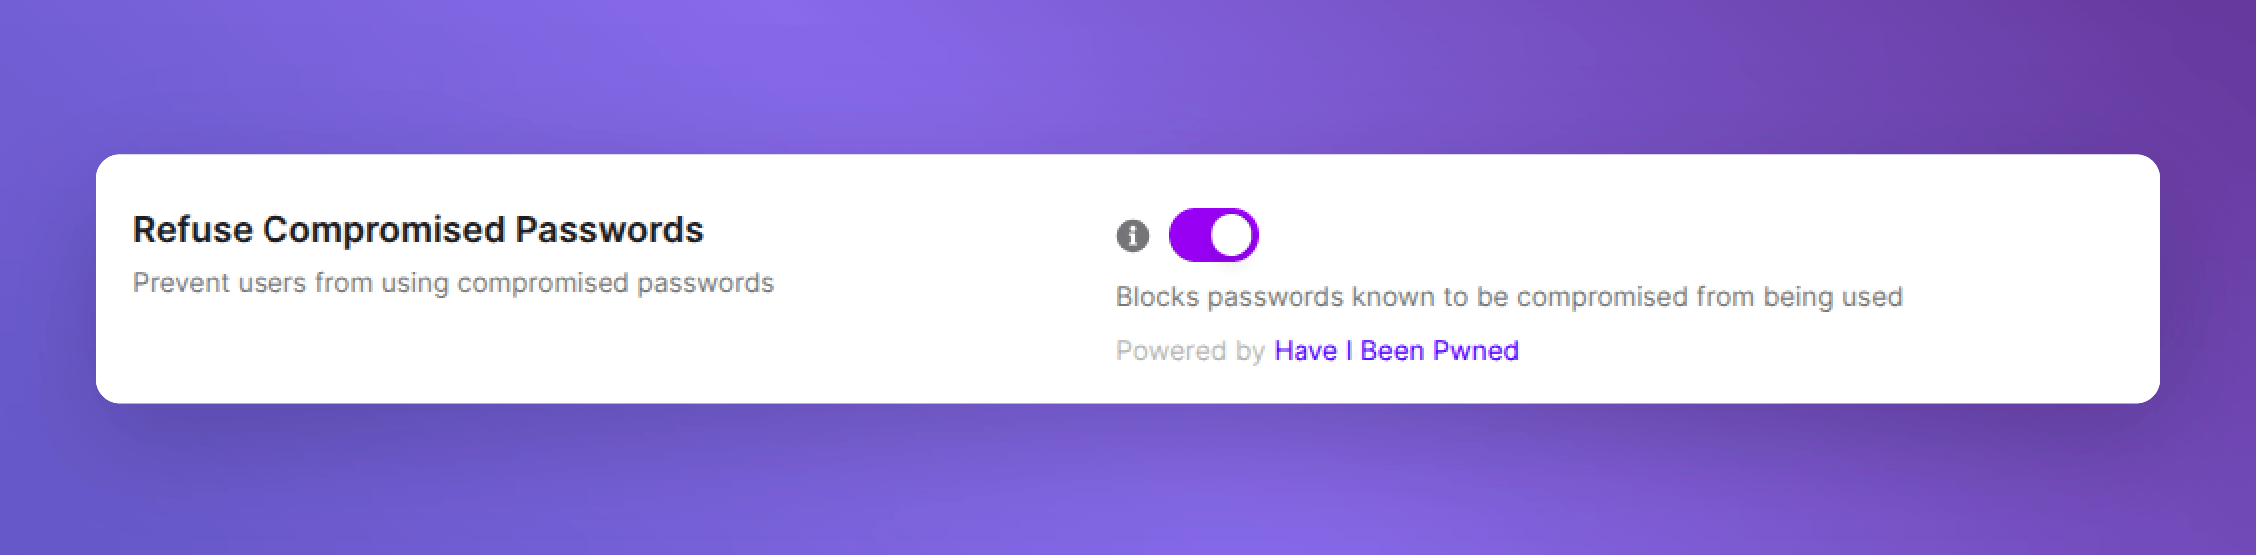
It’s a small toggle with a significant impact. A password can be long, complex, and technically meet every policy requirement you’ve set, and still be compromised if it was used somewhere else that got breached. This setting catches exactly that gap, without any extra configuration on your end.
Learn more about the password policy from the user documentation
4. Block Bots with CAPTCHA (Cloudflare Turnstile and Google reCAPTCHA)
Login attempt limits stop brute-force attacks after a certain number of failures. But CAPTCHA stops them before the first attempt even registers. It forces every login form submission to prove it’s coming from a human, not a script.
Ultimate Security supports two CAPTCHA systems, and they approach the problem differently.
Cloudflare Turnstile
Turnstile is Cloudflare’s answer to the frustrating, privacy-invasive experience that traditional CAPTCHAs deliver. There are no distorted text puzzles. No “click all the traffic lights” grids. In most cases, Turnstile verifies users completely invisibly, running a set of browser-based signals in the background to determine if the visitor is human.
When it can’t make that determination automatically, it presents a simple checkbox, not a puzzle. The result is a verification experience that doesn’t punish real users for existing.
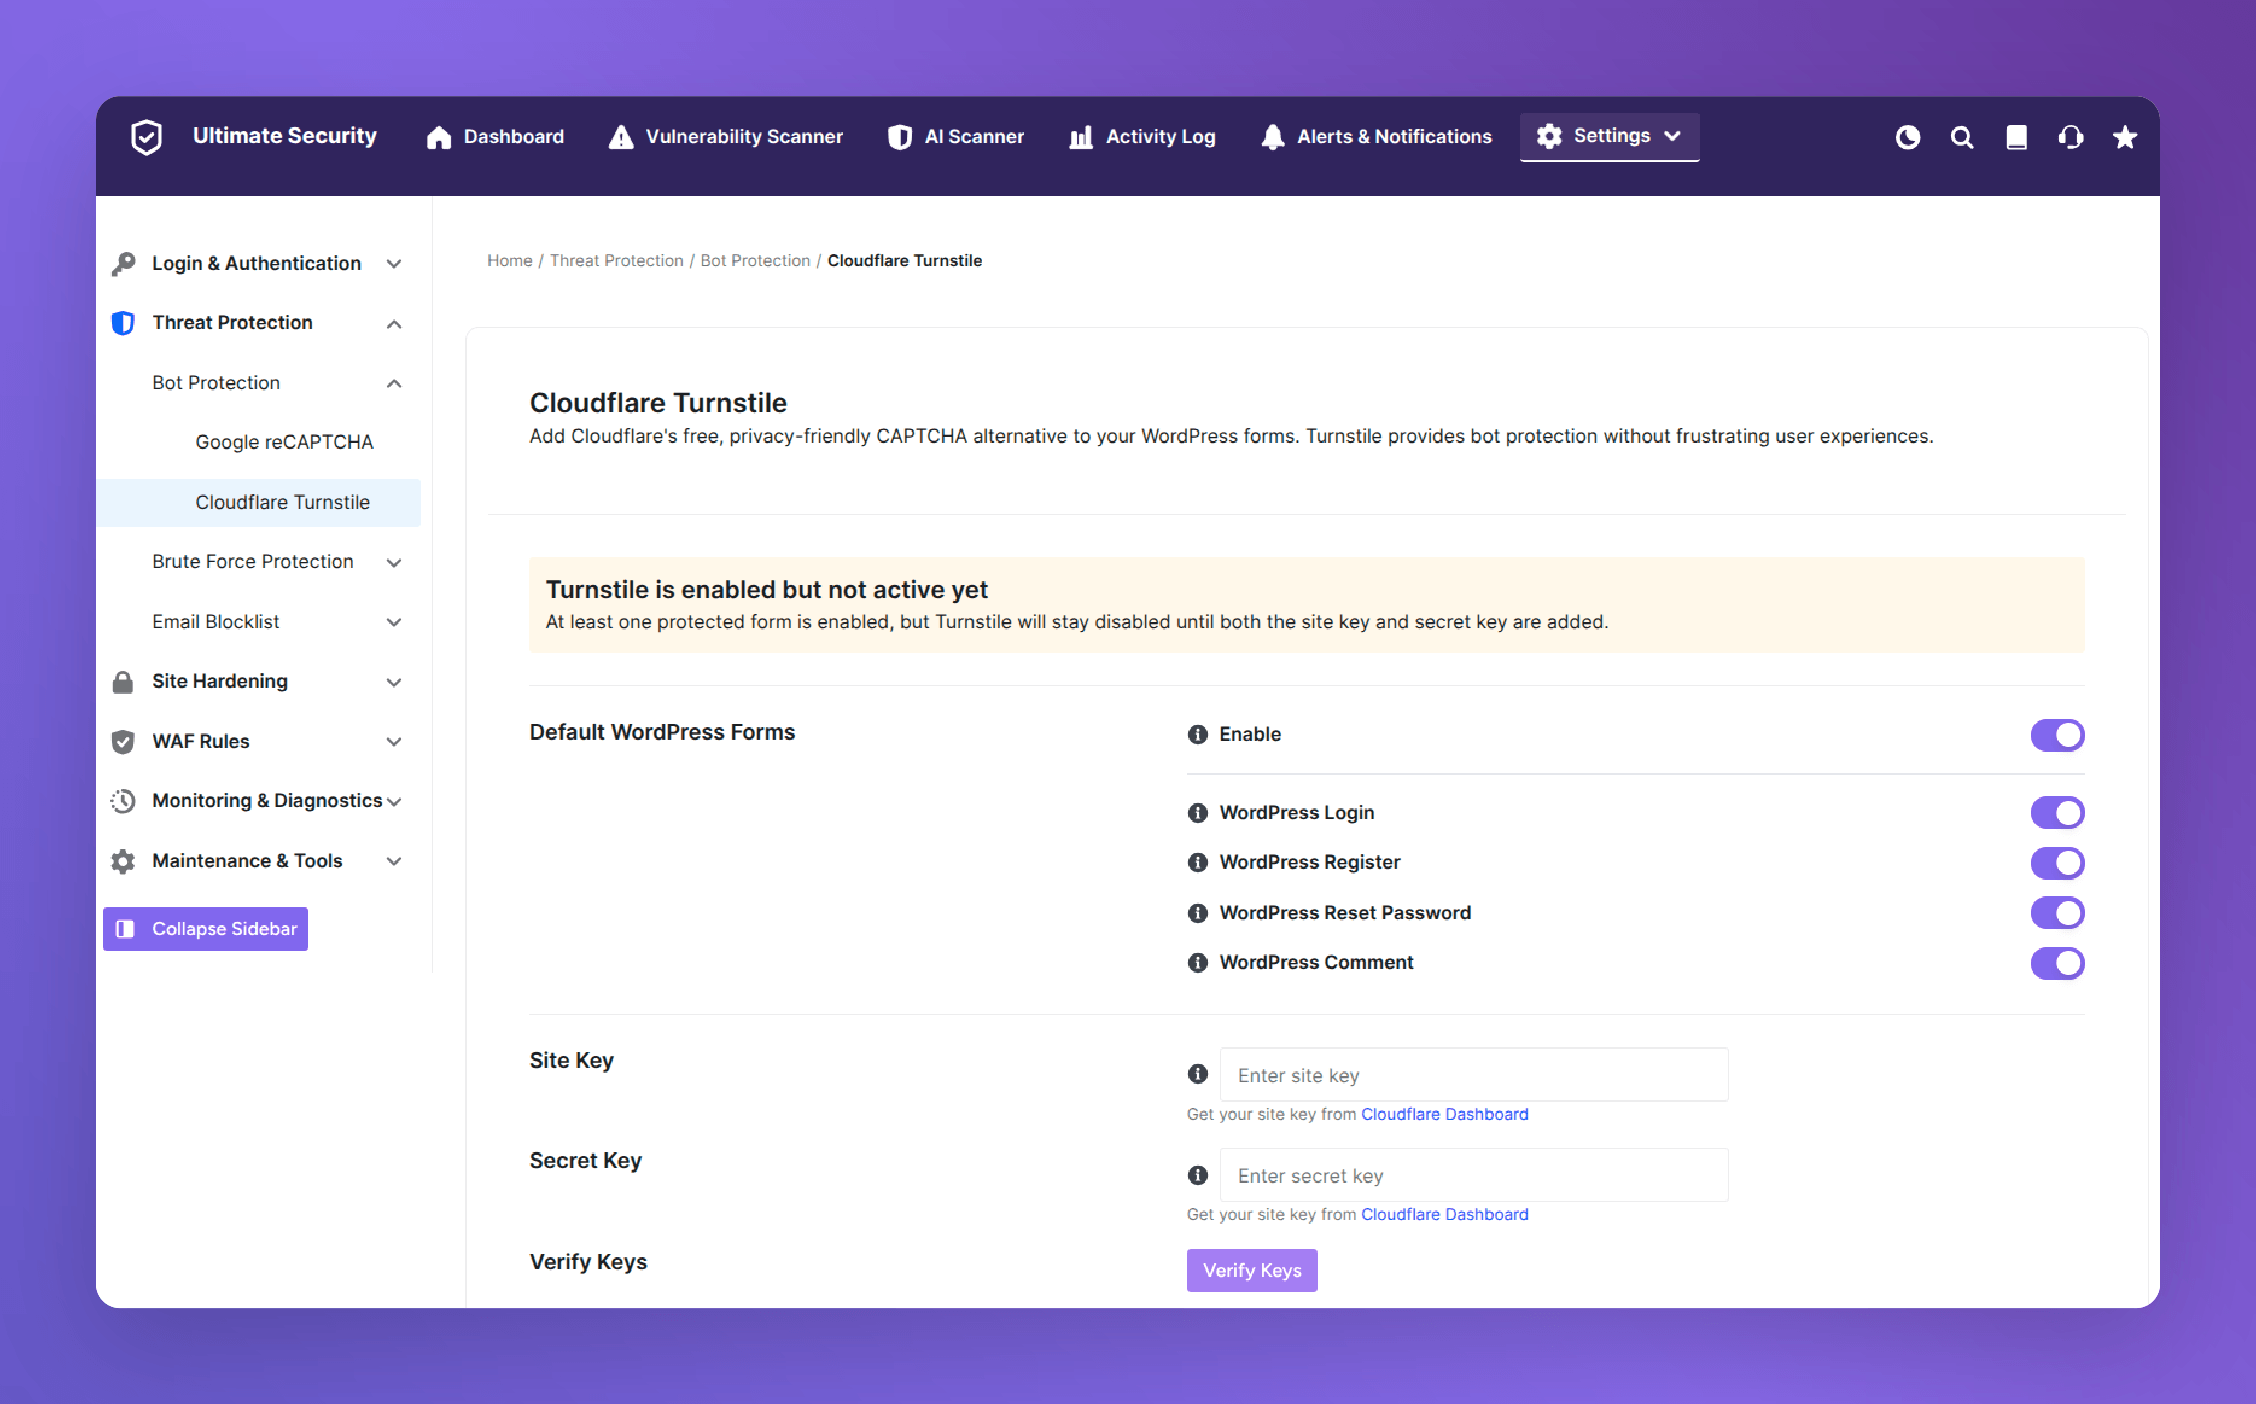
To set it up inside Ultimate Security, go to Bot Protection and open Cloudflare Turnstile. You’ll need a free Cloudflare account to generate your Site Key and Secret Key from the Cloudflare Dashboard. Paste them into the corresponding fields in the plugin.
Where Turnstile applies: You can enable it on WordPress login, registration, password reset, and comment forms. Toggle each form on or off independently, depending on where you want the protection.
Theme and Language: Turnstile supports Light and Dark themes to match your site’s design. Language can be auto-detected or set manually.
Disable Submit Button: Keeps the form submit button inactive until the Turnstile check passes. This is a good default to leave enabled. It prevents any form submission from going through before verification completes.
Whitelist Settings: You can exempt logged-in users from seeing the Turnstile widget, which reduces friction for your regular team or contributors. Specific IP addresses and user agent strings can also be whitelisted if you have trusted automated systems that need to submit forms.
Turnstile Logs: Enable logging if you want a record of when the security check runs and what it returns. Useful for troubleshooting if something doesn’t behave as expected.
Learn more about Cloudflare Turnstile from the user documentation
Google reCAPTCHA
If you prefer Google’s system or need compatibility with a specific setup, Ultimate Security also integrates reCAPTCHA. Navigate to Bot Protection and open Google reCAPTCHA.
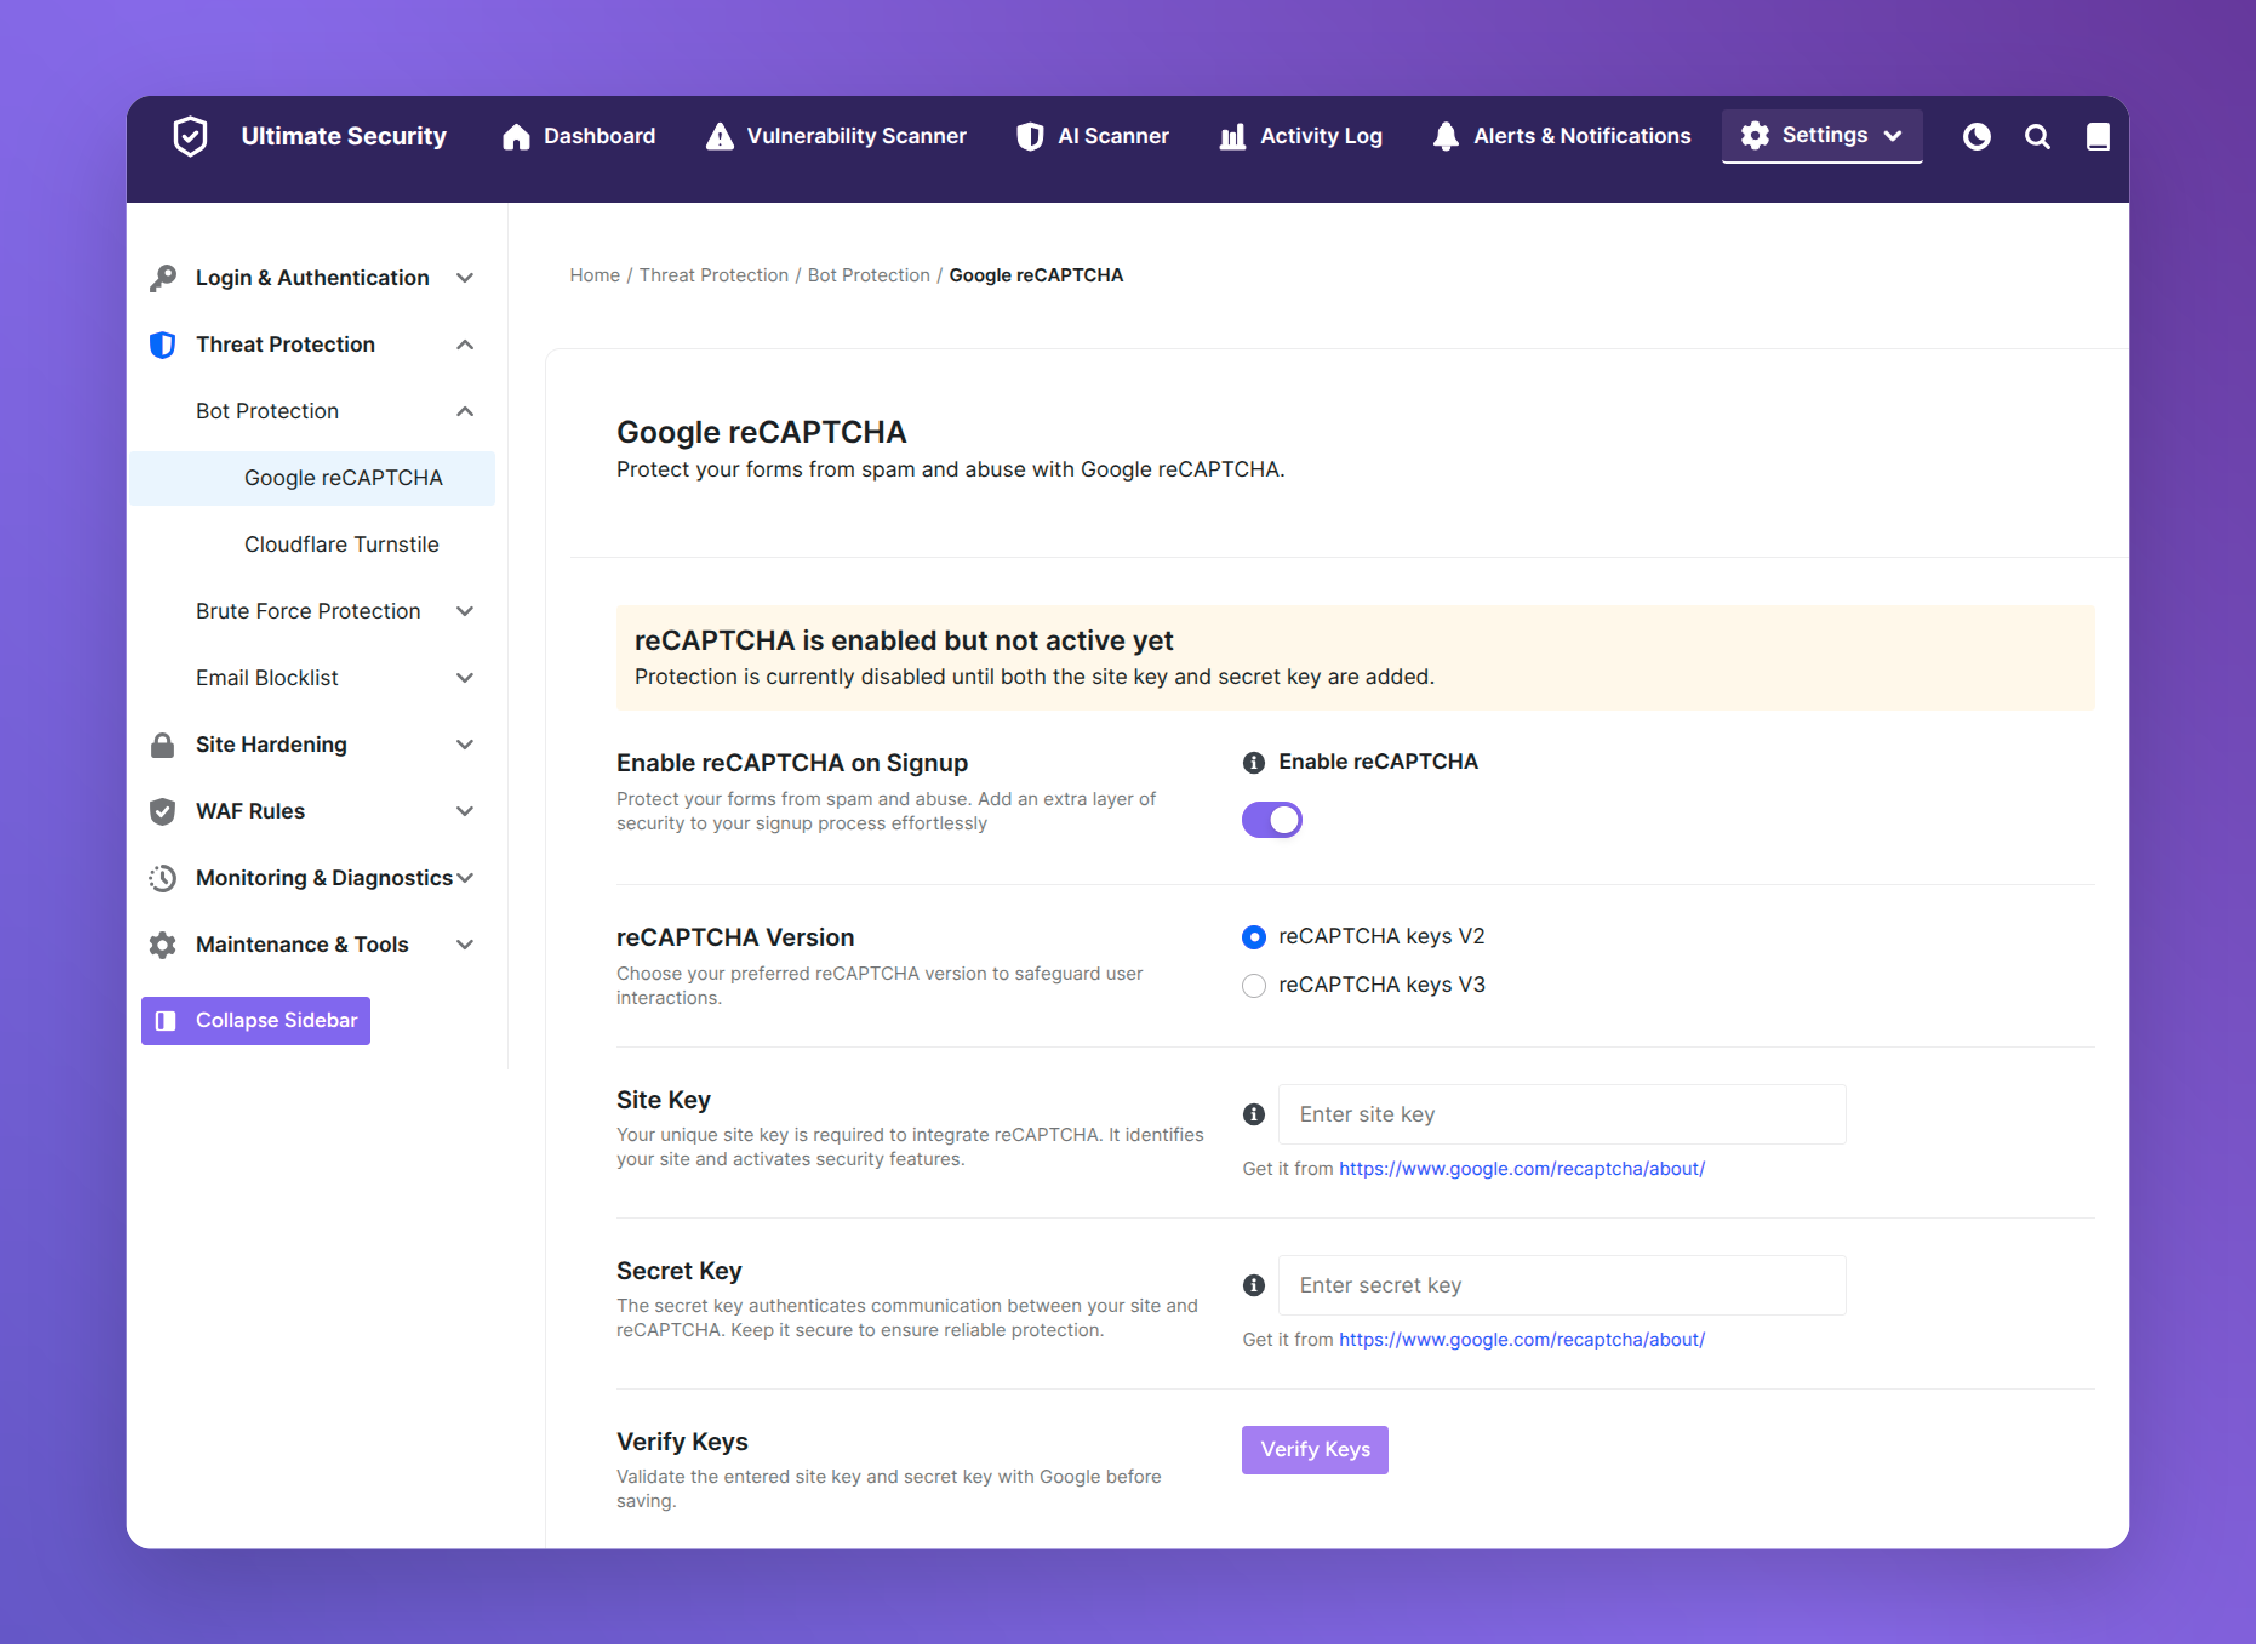
You get two versions to choose from:
reCAPTCHA v2: The classic “I’m not a robot” checkbox. It’s visible, straightforward, and familiar to most users. When the system suspects a bot, it escalates to a visual challenge. Works well on sites where a visible security indicator builds trust with visitors.
reCAPTCHA v3: Runs entirely in the background. It assigns every user interaction a score from 0.0 (bot) to 1.0 (human) based on behavior signals. No checkbox. No challenge. Users who score too low are blocked without ever being prompted. This is the smoother experience for most modern sites.
To enable either version, you’ll need a free API key pair from Google reCAPTCHA Admin Console. Paste the Site Key into the first field and the Secret Key into the second.
Additional reCAPTCHA controls inside Ultimate Security:
reCAPTCHA Field Title: Customize the label that appears above the checkbox on v2 forms. The default is fine but editable.
Theme: Choose Light or Dark to match your site.
Size: Normal or Compact. Compact is useful on tight form layouts where space is limited.
No-Conflict Mode: If another plugin or theme is already loading reCAPTCHA scripts and you’re seeing conflicts, enable this. It prevents the plugin from interfering with other implementations.
WooCommerce Registration: Enable this to protect your customer registration form during checkout. Automated scripts creating fake accounts or fraudulent orders are a real problem on commerce sites, and this stops them cleanly.
Learn more about Google reCAPTCHA from the user documentation
Setting Up Two-Factor Authentication (2FA)
Login hardening makes your login page harder to reach and harder to abuse. Two-factor authentication makes it irrelevant whether an attacker has your password. Even with the correct credentials in hand, they still can’t get in without the second factor, which only the legitimate user has.
That distinction matters. Passwords get leaked. They get phished. They get reused across sites that eventually get breached. 2FA closes that gap entirely.
Authenticator App — The Strongest 2FA Method
This is the gold standard for WordPress two-factor authentication. An authenticator app on your phone generates a six-digit code that refreshes every 30 seconds. That code is required at login in addition to your password. Without it, access is denied, no matter what credentials someone has.
The reason this method is considered the strongest option is straightforward: the codes are generated offline, directly on your device.
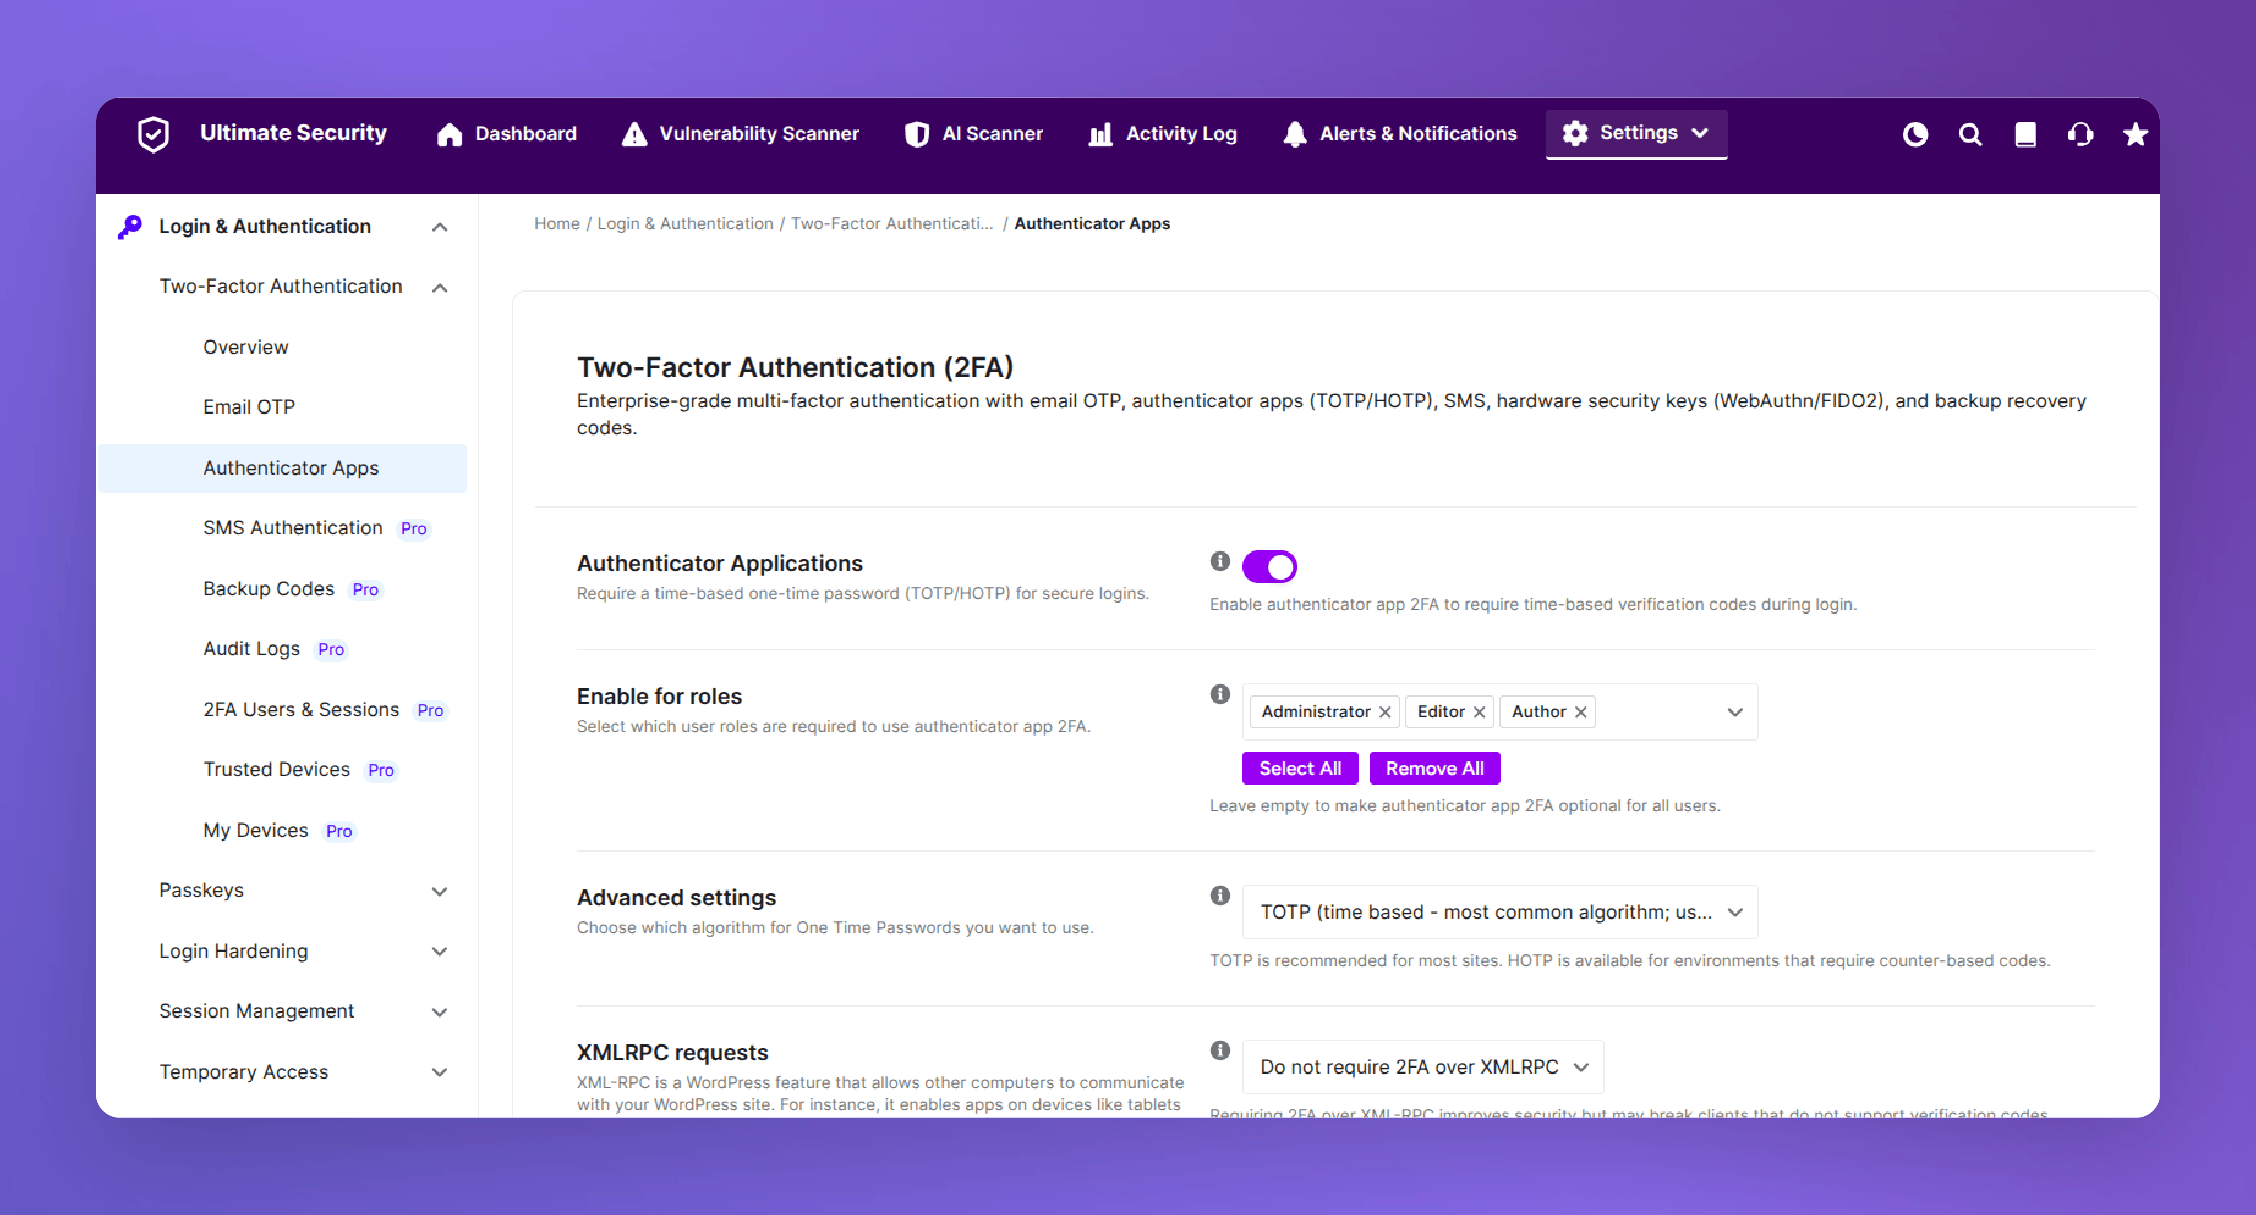
Inside Ultimate Security, go to Login Authentication and open Authentication Apps.
Enabling the Feature
The main toggle switch activates or deactivates the authenticator app 2FA across your site. Turning it on doesn’t immediately force every user into setup mode. The Enable for Roles setting controls which user groups are required to use this method.
Administrators and editors should almost certainly have 2FA enforced. For subscriber-level users on a membership site, the decision depends on how sensitive the data is that they can access.
Understanding TOTP vs HOTP
Inside the Advanced Settings section, you choose the algorithm your OTP uses:
TOTP (Time-Based One-Time Password): This is the standard. Codes are generated based on the current time and refresh every 30 seconds. All major authenticator apps use this by default. Unless you have a specific reason to use something else, TOTP is the right choice.
HOTP (Event-Based One-Time Password): Codes are generated based on a counter that increments with each login event rather than the clock. Less common in practice. Use this only if you have a specific integration requirement that calls for it.
XML-RPC and 2FA
XML-RPC is a WordPress feature that lets external applications communicate with your site remotely. Tools like mobile WordPress apps and certain third-party integrations use it. The plugin gives you two options for handling 2FA over XML-RPC:
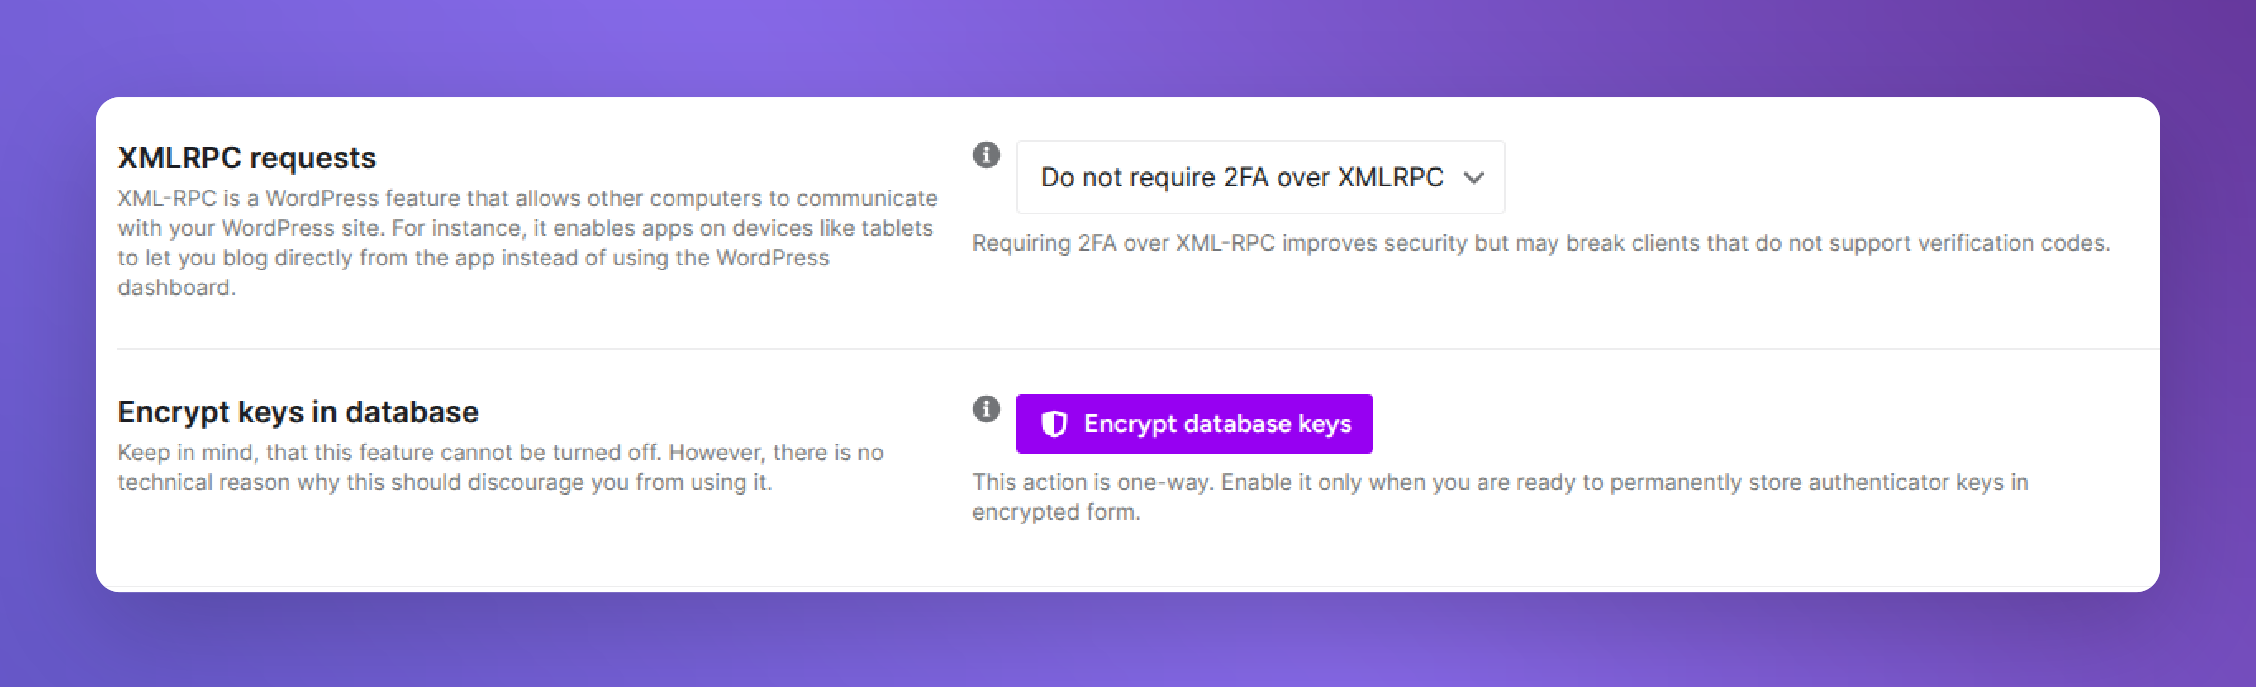
The default setting does not require 2FA over XML-RPC. External tools connect with just a username and password. This maintains compatibility with apps that don’t support 2FA prompts.
The second option enforces 2FA over XML-RPC as well. Every connection attempt, including those from external apps, must include a valid authentication code. Only enable this if you’re certain your external tools support 2FA, or if you’ve disabled XML-RPC entirely and this setting is moot.
Encrypt Keys in Database
This feature encrypts your 2FA secret keys inside the WordPress database. If an attacker ever gains database access, they cannot read or steal the keys. The plugin notes clearly that once enabled, this cannot be disabled. That’s intentional. There’s no practical reason to turn it off once it’s on, and the added protection is worth having.
How to Activate 2FA from the WordPress Profile
Once the feature is enabled at the plugin level, each user activates it from their own WordPress profile. Here’s the exact process:
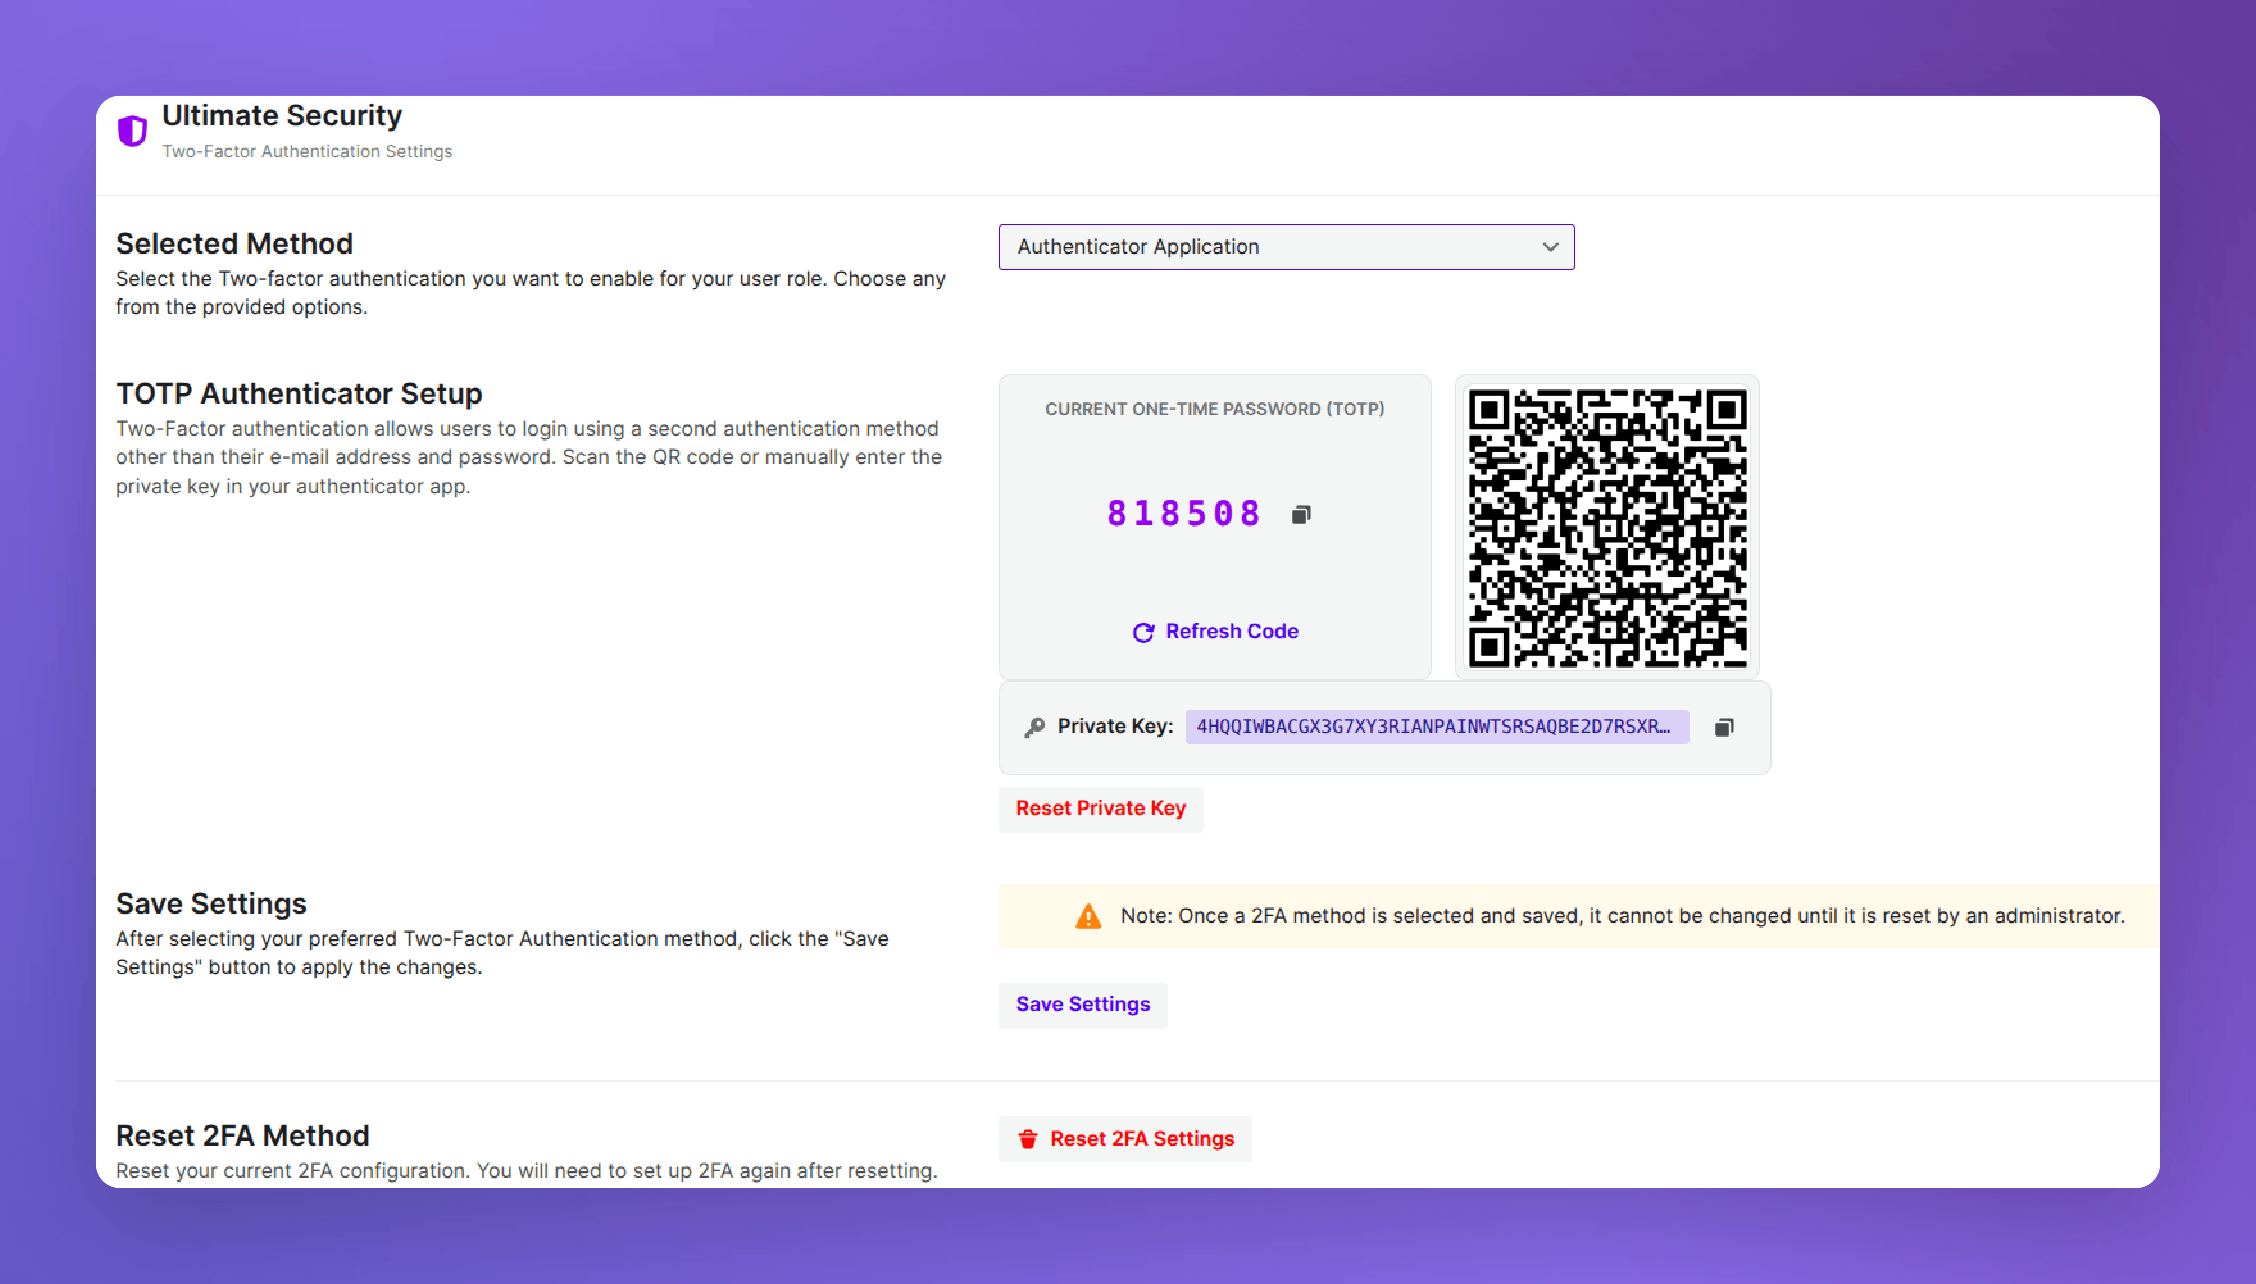
- Go to WordPress Dashboard and navigate to Users, then Profile.
- Scroll down to find the Ultimate Security section.
- Select Authenticator Application as the method.
- Click Setup.
- A QR code appears on screen. Open your authenticator app and scan it.
- The site is now linked to your app.
Using the Private Key Instead of the QR Code
Scanning a QR code is the fastest method, but it isn’t always possible. If you’re setting up on a different device, or if your camera isn’t cooperating, the plugin provides a text-based private key as an alternative.
Click the copy icon next to the private key field, open your authenticator app, select the option to add an account manually, and paste or type the key. The setup completes the same way.
Resetting the Private Key
If you accidentally share your private key, suspect it’s been compromised, or simply need to reconfigure your authenticator app, click Reset Private Key. This immediately invalidates the old key, generates a new one, and updates the QR code. You’ll need to re-scan or re-enter the new key in your app before logging in again.
This is also worth knowing for site administrators managing multiple users. If a user loses access to their authenticator app, resetting their private key from the backend is the recovery path.
Learn more about two factor app authentication from the user documentation
Email OTP — A Simpler Alternative
Email OTP works on the same principle as authenticator apps. After entering a username and password, users receive a one-time code via email and must enter it to complete login. The code expires quickly, making it useless to anyone who intercepts it after the fact.
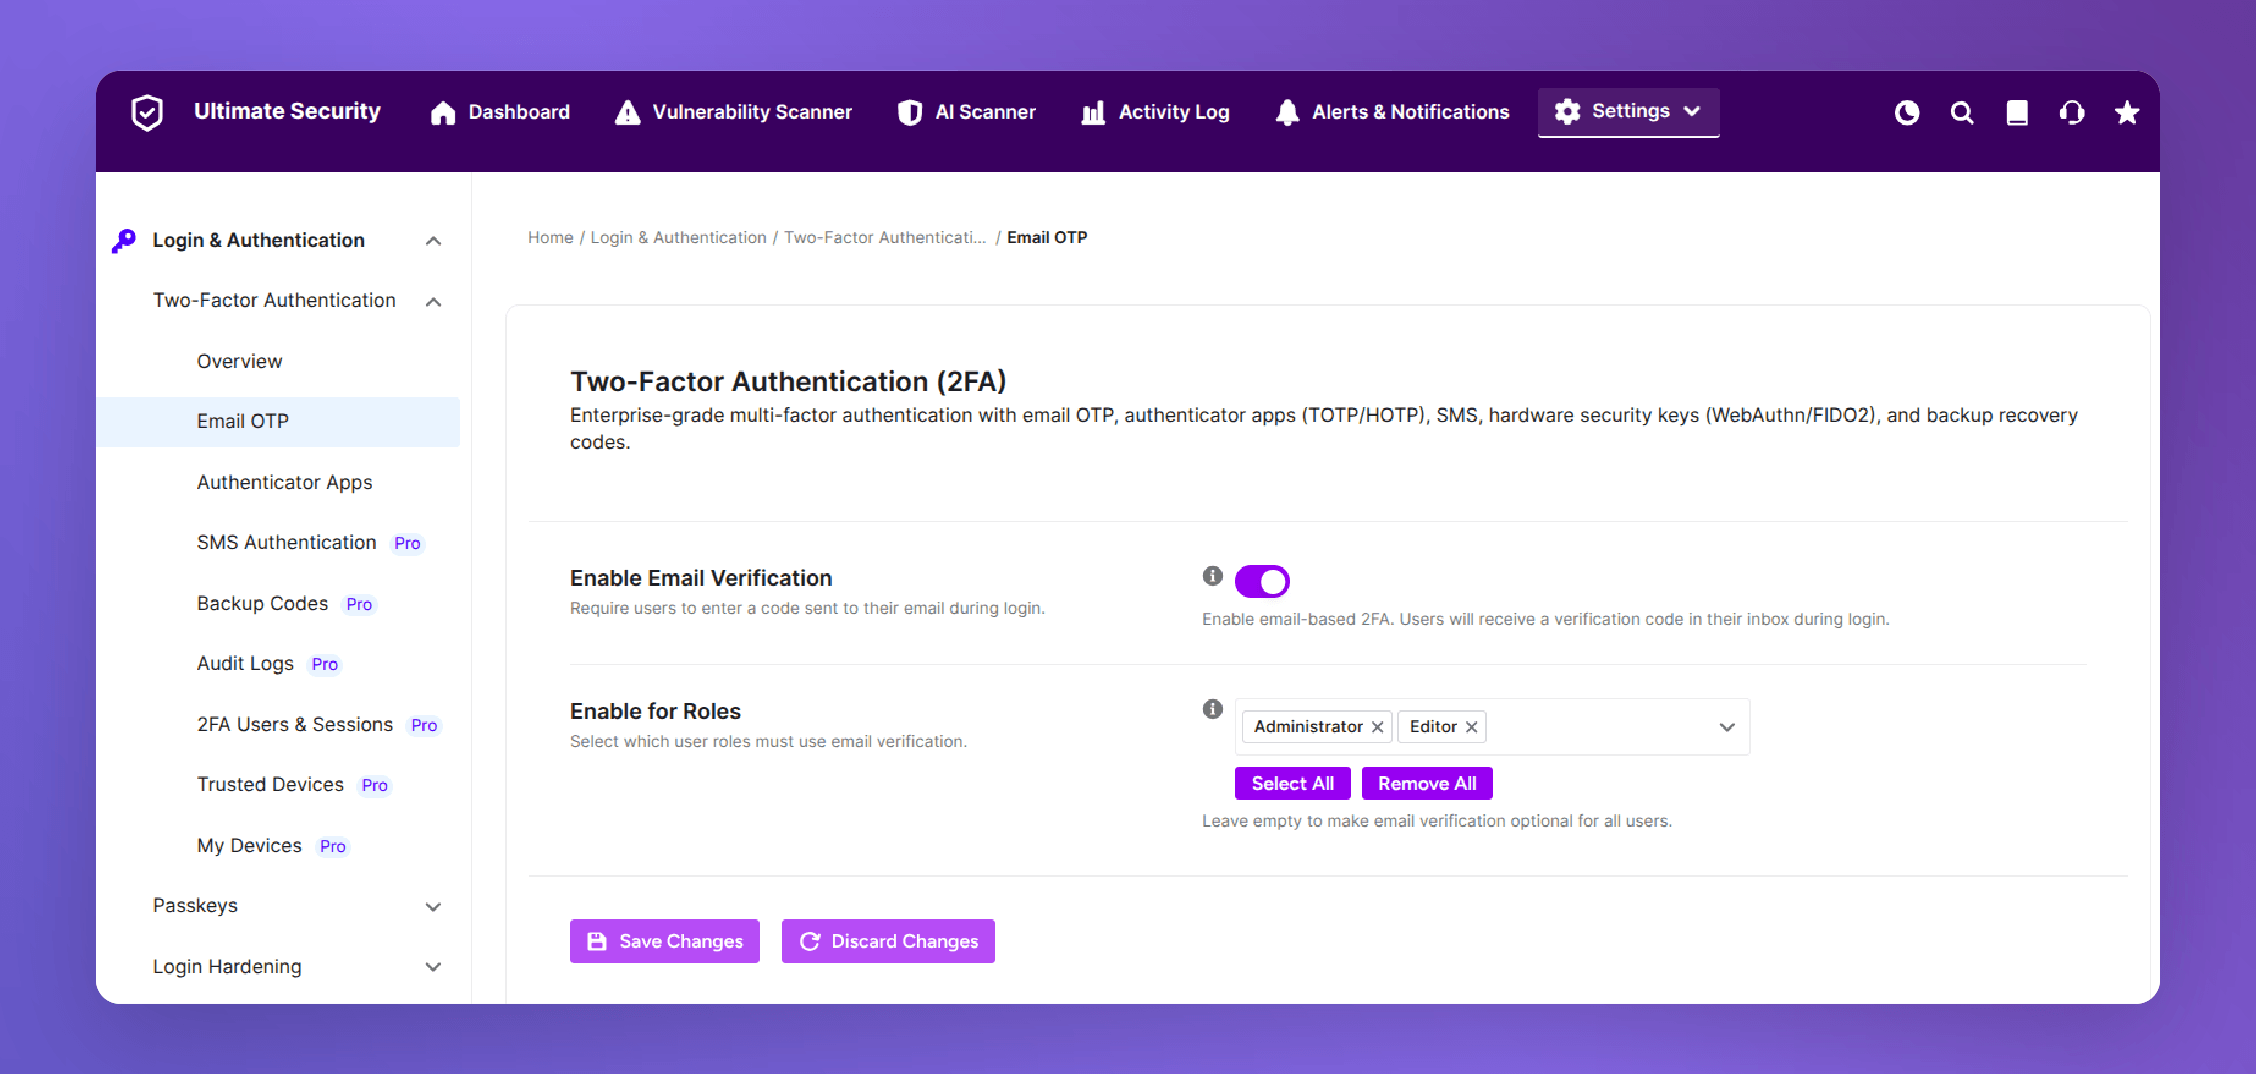
The setup is minimal. Navigate to Login Authentication and open Email OTP. Toggle on Enable Email Verification, then use Enable for Roles to choose which user groups are required to use it.
That’s genuinely most of the configuration. There’s no API key, no third-party service, no QR code. If your site already sends email reliably, Email OTP is up and running in under two minutes.
When Email OTP Makes Sense
For site administrators and anyone with elevated access, the authenticator app method is the better choice without question. But Email OTP has its place.
If you run a membership site with a large base of subscriber-level users who aren’t particularly technical, forcing them through an authenticator app setup creates real friction. Some users will abandon the process. Some will contact support repeatedly. Email OTP gives those users a 2FA experience they already understand intuitively. Check your email, copy the code, and continue. No app download required.
It’s also a reasonable fallback option for users who don’t own a smartphone or are working in environments where installing third-party apps isn’t permitted.
Setup Steps for Users
Once Email OTP is enabled at the plugin level, users activate it from their profile:
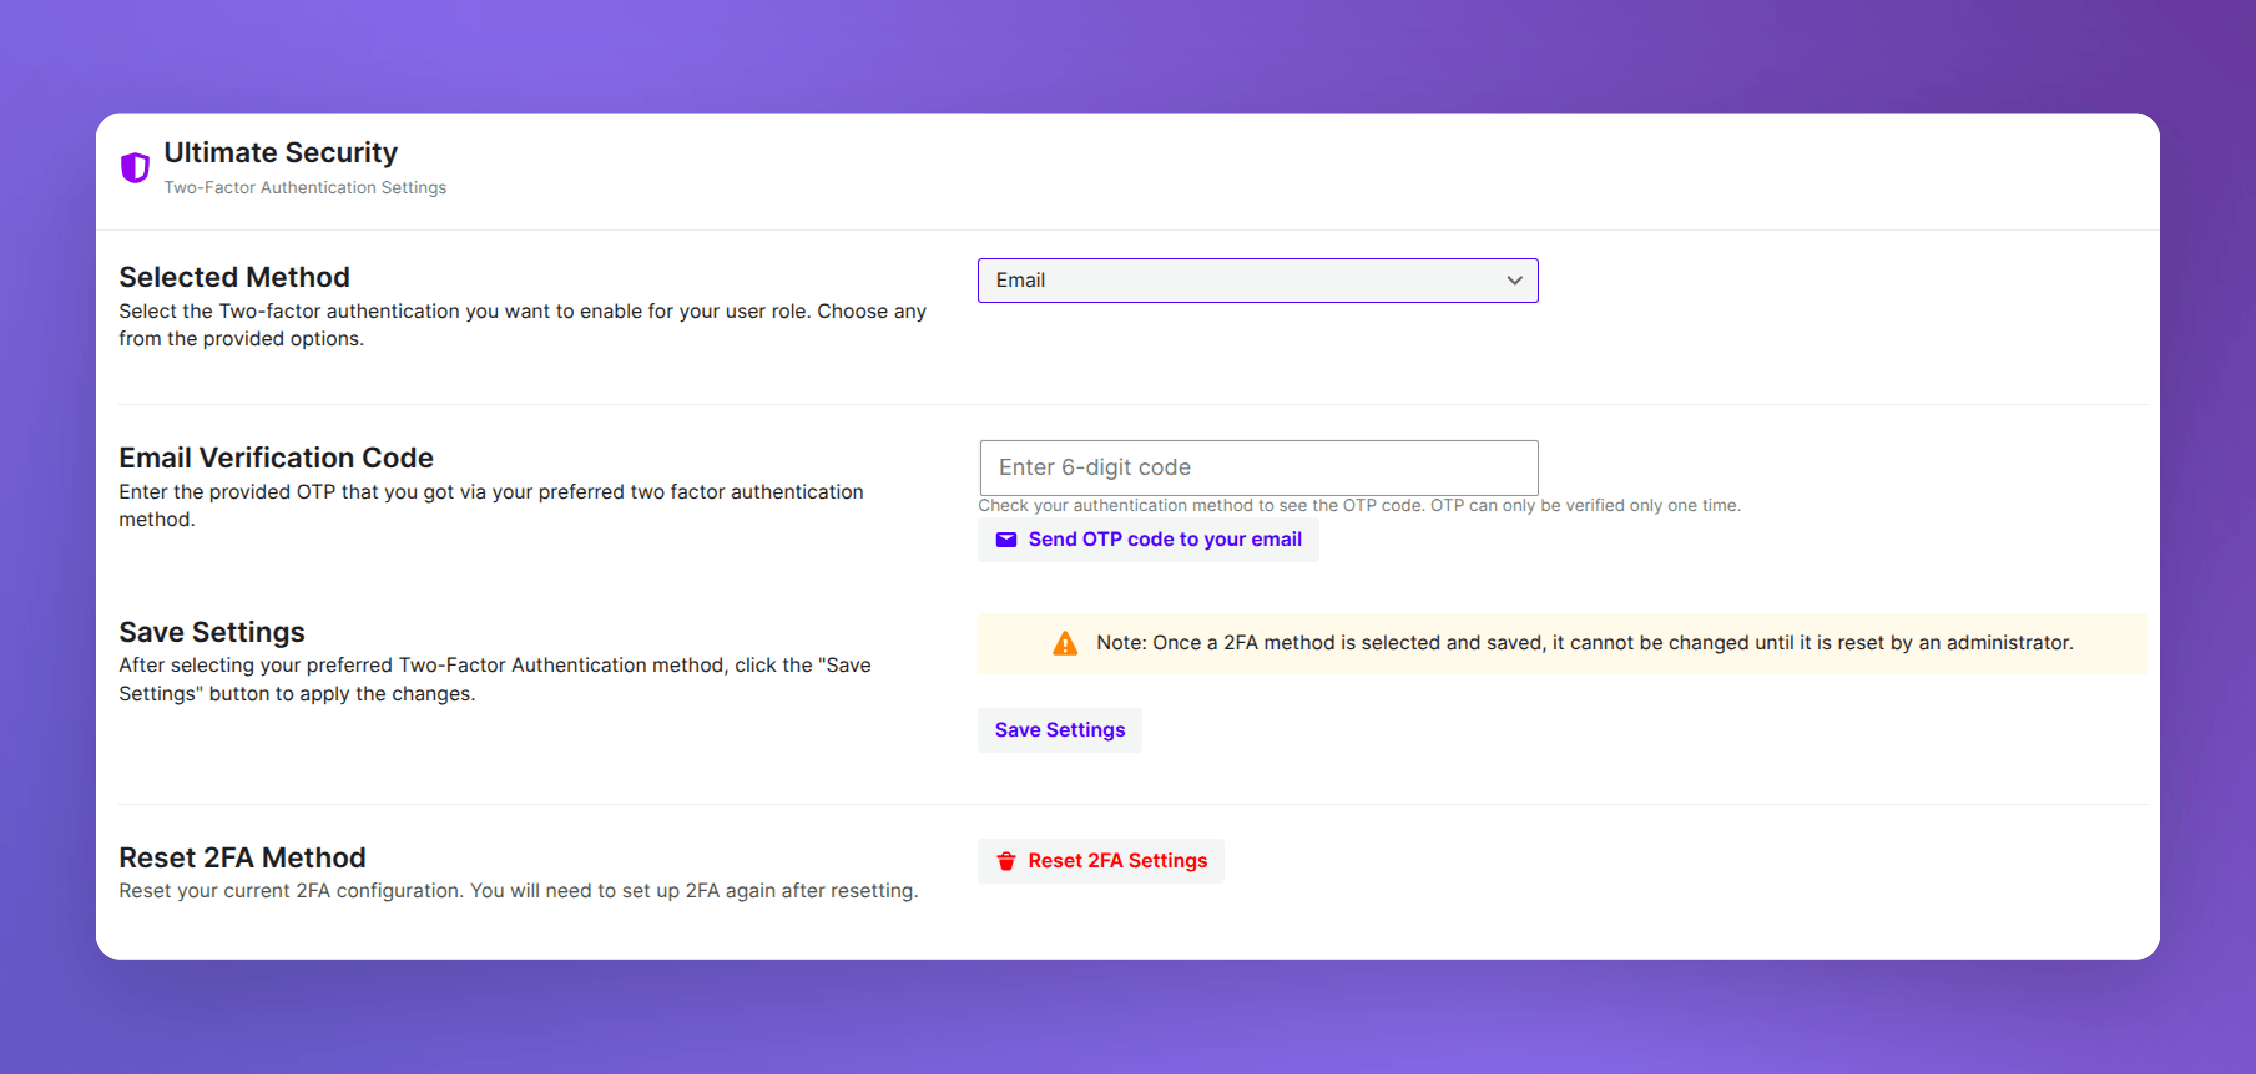
- Go to WordPress Dashboard, then Users, then Profile.
- Scroll to the Ultimate Security section.
- Select Email as the 2FA method.
- Enter the OTP sent to your email address to verify.
- Click Save Settings.
From that point forward, every login will require a code delivered to their registered email address.
A Critical Prerequisite: SMTP
Email OTP only works if your WordPress site actually sends email reliably. Before enabling Email OTP for your users, set up an SMTP service.
Without proper SMTP configuration, users will not receive codes at all. Neither outcome is acceptable for a security feature.
Learn more about two factor email authentication from the user documentation
WordPress Security Hardening for Beginners Checklist
Everything covered in this guide adds up to a layered defense. Here’s the complete checklist condensed into action items you can work through right now.
Login Hardening
- Enable Login Attempt Limits in Ultimate Security with a maximum of 4 to 5 attempts before lockout
- Set Lockout Duration to at least 15 to 30 minutes with escalating penalties for repeat offenders
- Generate and save your Recovery URL offline before saving any brute force settings
- Change your WordPress login URL from the default /wp-login.php to a custom, non-guessable path
- Set the old login URL redirect to 404 so bots and unauthorized visitors see nothing
- Test your new login URL in a private browser window before logging out of your current session
- Enable Password Policies with a minimum 12-character minimum length, uppercase and lowercase requirements, numbers, and at least one special character
- Enable First Login Reset for all new user accounts
- Enable Cloudflare Turnstile or Google reCAPTCHA on your login, registration, and comment forms
- Whitelist trusted IPs in your CAPTCHA settings if your team logs in from fixed locations
Two-Factor Authentication:
- Enable Authenticator App 2FA for all administrator and editor roles
- Encrypt 2FA keys in the database via the plugin’s Database Encryption setting
- Have each admin user set up their authenticator app (Google Authenticator, Microsoft Authenticator, or 2FAS) via their WordPress profile
- For subscriber-level users on membership sites, consider enabling Email OTP as a lower-friction 2FA option
- Verify your site sends email reliably via SMTP before enabling Email OTP for any user
Frequently Asked Questions
Does changing the WordPress login URL fully protect my site from attacks?
No. Changing the login URL reduces automated bot traffic significantly, because most bots target the default /wp-login.php path and move on when it returns a 404. But a determined attacker who knows your custom URL can still target it. Custom Login URL works best as one layer in a stack that also includes login attempt limits, CAPTCHA, and 2FA. None of these protections are airtight in isolation.
What happens if I lock myself out after enabling these settings?
Ultimate Security provides a Recovery URL specifically for this situation. Generate it before you enable login attempt limits, and store it somewhere outside of WordPress, like a password manager, a text file on your local computer, or even a physical note. If you get locked out, opening that URL bypasses the lockout entirely.
Can I use Cloudflare Turnstile and login attempt limits at the same time?
Yes, and you should. They operate at different layers of the same defense. Turnstile intercepts bot requests before they ever register as a login attempt, filtering them out at the form submission level. Login attempt limits catch anything that gets past. Turnstile starts racking up failed credentials. Running both together means more attack vectors are covered simultaneously, with no conflict between them. Ultimate Security is built to handle both running at once.
Do I need technical knowledge to configure Ultimate Security?
No. The plugin includes a setup wizard that handles the most critical configurations in a guided sequence. You don’t need to touch any code, edit server files, or understand PHP to get solid protection in place. The settings pages are clearly labeled, and the documentation covers every option in plain language. Most site owners are fully configured within 15 to 20 minutes of installation
Will enabling 2FA affect all users on my site immediately?
Not automatically. When you enable 2FA inside Ultimate Security, you control which user roles are required to use it through the Enable for Roles setting. Roles you don’t include are unaffected. Individual users also complete their own 2FA setup from their WordPress profile page, so the process is gradual rather than a site-wide forced lockout the moment you toggle the feature on.
What happens to my site’s performance after installing Ultimate Security?
The impact is minimal. Ultimate Security is built to be lightweight and adds less than 0.1 seconds to page load time according to the plugin’s own benchmarks. The security checks run server-side and don’t load heavy scripts on your front end. For most sites, visitors will notice no difference in speed whatsoever, while the backend protection runs silently in the background.
Conclusion
Locking down your WordPress login isn’t a single switch you flip once and forget. It’s a set of deliberate decisions made in layers, each one covering what the previous one might miss. Login attempt limits stop brute force. A custom login URL cuts bot noise. Password policies ensure credentials are worth having in the first place. CAPTCHA blocks automated submissions before they start. And 2FA makes sure that even a leaked password leads nowhere.
The Ultimate Security plugin handles all of this. Install it, run the setup wizard, and work through the checklist above. You don’t need a developer, a security audit, or a complicated server configuration. You need the right settings applied in the right order. The attacks are already happening. The only question is whether your site is ready for them.