WordPress is the most used CMS in the world. Hackers are always scanning WordPress sites, looking for outdated plugins, easy passwords, and unprotected login pages. Ultimate Security gives you one dashboard to see it all and act on it. In this blog, we will tell you how to improve WordPress security.
Table of Contents
Why Your WordPress Site Needs a Security Dashboard
Reports say that WordPress is holding 61.4% of the global market share. It has become a giant in the CMS market. WordPress is secure in most aspects for simple users.
And if you are looking for advanced security, you can customize it using security plugins. Hackers and bots are using AI to find WordPress sites’ vulnerabilities. They attack in several ways. Outdated plugins and themes, and weak passwords are very common. The scary part is that most site owners don’t have a dashboard to check what’s happening on their WordPress.
How to Set Up Ultimate Security on Your WordPress Site
To install the plugin on your WordPress site follow the steps below:
- Go to your WordPress dashboard.
- Plugins → Add New.
- Search “wpultimatesecurity.”
- Click “Install Now.”
- Activate

Our comprehensive documentation walks you through every feature you need right now.
Most people just turn on the basic features and see their attacks drop instantly.
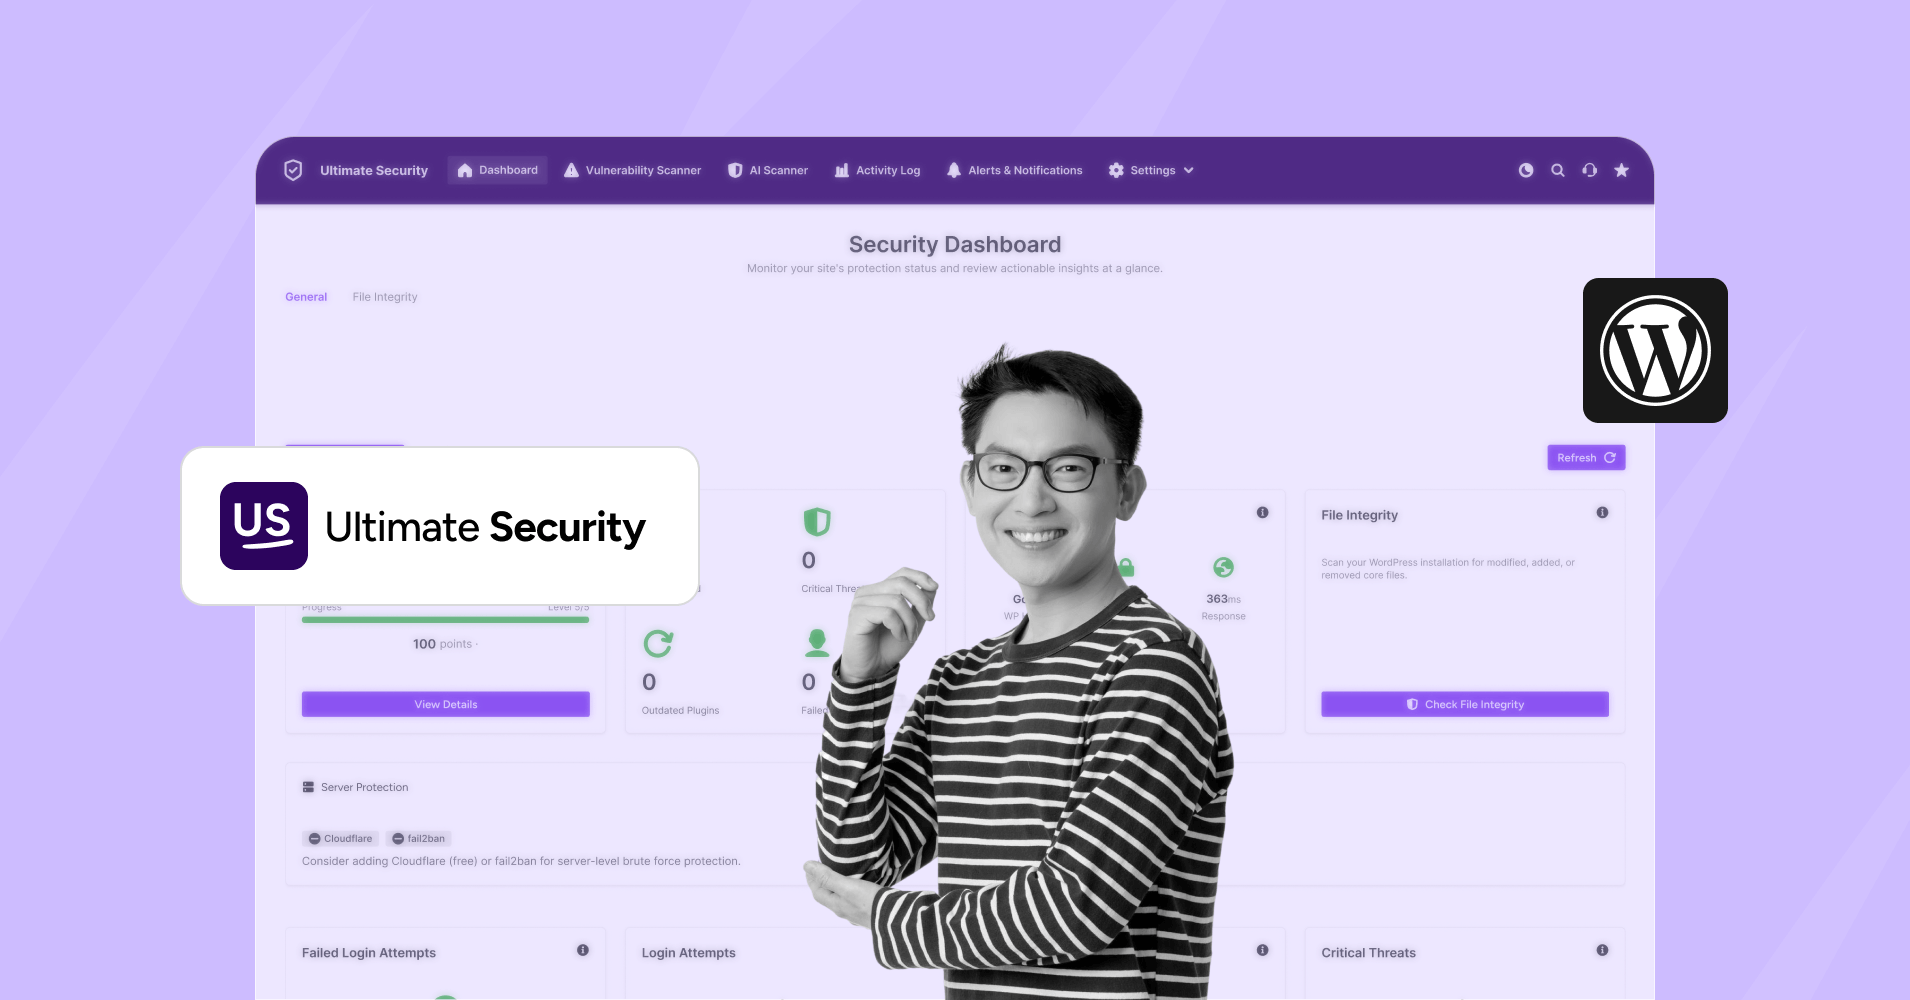
“Ultimate Security” Dashboard Introduction
“Ultimate Security” is a WordPress security plugin that gives you the dashboard you need. The dashboard is designed for everyone. It shows the visuals that help anyone understand what is happening to their site. We made the plugin’s dashboard simple for all types of users.

Once it’s installed, look for the Ultimate Security menu on the left. Click it. The dashboard appears first. You will see the UI. The dashboard shows security status at the top left. Critical and Threats, and the site health section in the middle. and right to the top, the file integrity. Many more stats and overviews are shown in the dashboard as well.
Start With Ultimate Security Within 5 Min on Your WordPress Site
Set Up Login & Authentication
This module ensures that only certain users can log in to the backend.
Two-factor authentication (2FA):
Two-factor authentication is an extra layer of identity verification. This feature provides an additional code sent to your email or authentication app.
Navigate to:
Go to Ultimate Security → Login & Authentication → Two-Factor Authentication
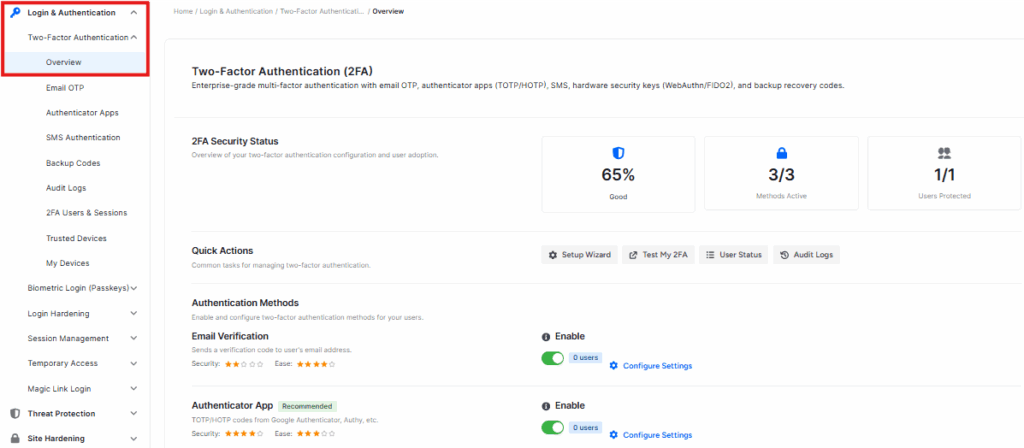
In the 2FA section you can either enable email OTP or authenticator apps based on your preference. Then select your preferred roles for 2FA. If you select email, users get a code in their email. If you select authentication apps, then they have to scan a QR code, for example, Google Authenticator.
Custom login URL:
This option lets you change your default WordPress login page. Change and set the default login page (e.g; yoursite. com/your-custom-login).
Navigate to:
Go to Ultimate Security → Login hardening → Custom login URL
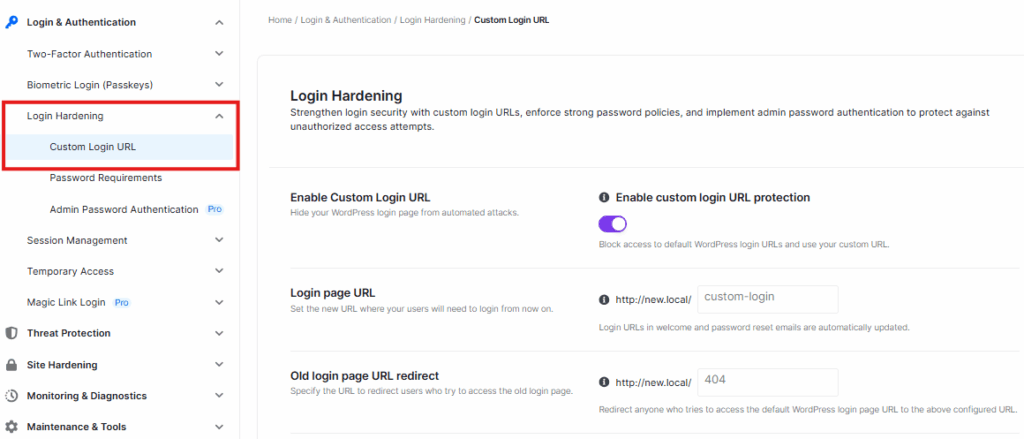
After this configuration, whenever someone tries to log in to your default login page, they won’t be able to find the login page. Also, you can redirect the old login page to 404 from the settings.
Password Requirement
This feature sets the password rules for everyone. This is one of the quickest methods to set passwords.
Navigate to:
Go to Ultimate Security → Login Hardening → Password Requirement

Turn on the password policies toggle switch on your site. Then pick a quick preset to begin. You have three options:
- Basic (Sets basic password policy)
- Strong (Sets standard password policy)
- Enterprise (Sets maximum password policy)
There are few other options that let you control the whole settings:
- Minimum Length (A minimum length for password)
- Require Uppercase & Lowercase (Add both upper and lowercase letters in your password)
- Require Numbers (Add one number in your password)
- Require Special Characters (Add special characters such as “#*@” in your password)
- Exclude characters (Specify characters that should not be required in your password)
- Password History (Set this option to prevent old password reuse)
- Expiration Period (Use this to expire passwords after a particular time)
- Warning Days (It shows a warning banner before the password expires)
- Grace period (After password expiration user can login with the same password for a certain time)
- Email Notification (Sends notification regarding password expiration)
- First Login Reset (It requires new users to change admin assigned passwords)
- Disable Self-Service Reset (User cannot use “forget password” to reset passwords. They need to contact the admin)
- Custom Reset Message (Shows a message when the “Disable password reset” option is enabled)
All the settings will make logins harder for individual users and tougher for hackers to guess passwords.
Set Up Threat Protection
Threat protection gives you the authority to block bots from spamming and decline brute force attacks.
Bot Protection
Bot protection prevents automated programs from spamming websites and reduces server loads.
Navigate to:
Ultimate Security → Threat Protection → Bot Protection
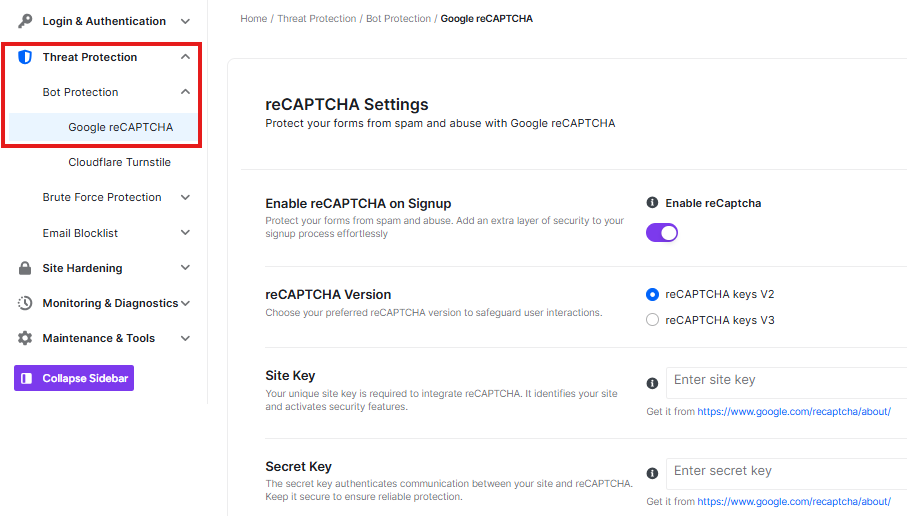
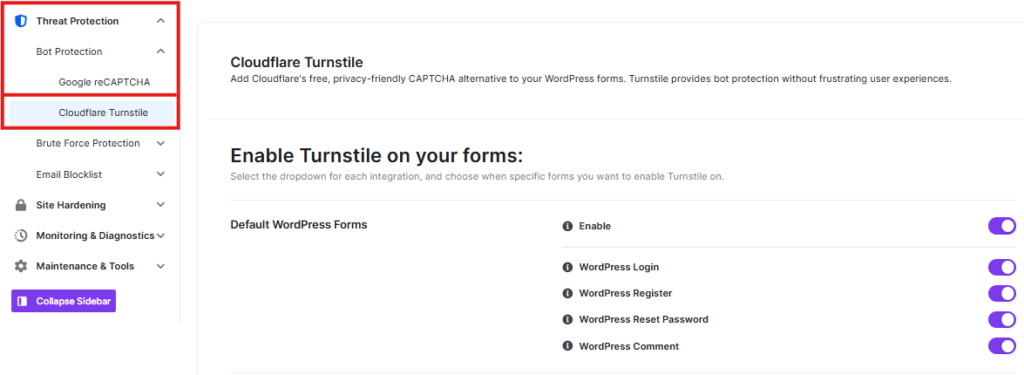
There are two options for bot protection. Turn on reCAPTCHA or Turnstile based on your preference. Both these options need site keys to run the feature. Read our bot protection documentation to find out how to get site keys.
Brute force protection:
Brute force is a process of trying possible password combinations repeatedly.
Navigate to:
Ultimate Security → Threat Protection → Brute Force Protection
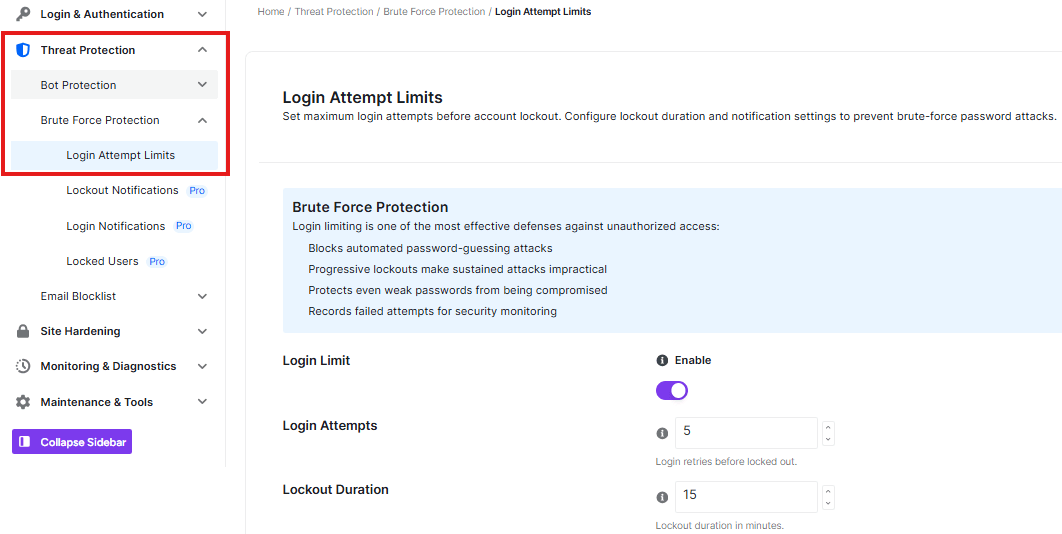
Set login attempts to a certain time before lockout. Also, adjust the lockout time and bump it up for repeat tries. This way, you can protect the login page.
Don’t forget to save the settings and monitor the logs from the main dashboard.
Frequently Asked Questions
Does Ultimate Security slow down WordPress site?
No. Ultimate security is built to be lightweight. It runs in the background without adding an extra load to your site’s performance.
Do I need technical skills to use it?
The dashboard is designed for everyone. You don’t need any technical knowledge. The setup steps are easy and the documentation walks you through anything you’re unsure about.
What’s the difference between email OTP and an authenticator app?
Email OTP sends a login code to your email address, and an authenticator app generates codes offline on your phone.
What happens if I get locked out of my own site?
There is a setting called “Recovery URL” in Brute force> Login attempts. It generates a private link when any emergency circumstances arrives. The private link will help you log in.
Can I use this plugin on a WooCommerce store?
Yes. Ultimate Security fits on WordPress sites, including WooCommerce. Go to bot protection> reCAPTCHA. You will find an option “WooCommerce reCAPTCHA.”It secures your WooCommerce signup forms by enabling reCAPTCHA. You can prevent spam and ensure only real users can register.
Do I need to check the dashboard every day?
A few times a week is enough for most sites. The dashboard shows you what’s changed on your site. You can detect any unwanted patterns quickly without spending a lot of time on it.
Conclusion
Your website is your asset. It needs constant monitoring, smart login rules, and protection against bots and brute force attacks. Ultimate Security gives you the security dashboard and settings to enable security protection. You monitor everything from the dashboard and take necessary steps, and the security options reduce security concerns.