To block bad Bots are always a good idea for WordPress sites. You didn’t need to invite them, even though you probably don’t know how long they’ve been there, and the worst part is WordPress doesn’t block any of them by default. We’ll cover what bots actually do on a WordPress site, where they usually attack, and how to block them completely free.
Table of Contents
Why Bad Bots Target WordPress Sites
WordPress holds nearly half of the internet’s websites. So, it alone makes it a target. Bots can scan thousands of sites at once. They look for common entry points like the login page, forms, and registration areas. If something responds, they keep trying. Even these bots don’t care if your site is big or small. In fact, smaller sites also get hit.
That’s why even a basic blog or small WooCommerce store starts seeing:
- random login attempts
- fake users showing up
- spam messages out of nowhere
At first may seem like genuine users signing up, but actually, the answer is no.
What Bots Actually Do on Your Site
You might think bots try to hack the sites. That’s not how it usually works. They keep trying small things until they get something vulnerable on your site.
Spam Forms and Comments
This is the most common one. You start getting:
- weird contact form messages
- comments filled with random links
- junk submissions every hour
It’s classic WordPress spam bots behavior. If there’s no proper check, they’ll keep coming.
Create Fake User Accounts
Bad bots often sign up using fake emails and random usernames. Sometimes the number of accounts exceeds hundreds in a day. On WooCommerce stores, this turns into fake customers. On the blog sites, it becomes spam users in your database.
Attack Login Page
WordPress has no built-in login limit, so bots take advantage by testing endless password combinations to access your website. You may never see:
- “too many login attempts” alerts
- unknown IPs trying to log in
- failed login logs filling up
This is one of the biggest reasons people look for ways to stop bots on WordPress. To get alerts for the causes and track every event that happens on your site, you need Ultimate Security Dashboard to monitor everything.
Send Weird Requests
This one is easy to miss. Bots hit random URLs like:
- pages that don’t exist
- old plugin paths
- strange query strings
Generally, they’re testing your site and looking for anything exposed. If you’ve ever checked with Ultimate Security logs and saw random paths you never created. That’s this.
Slow Down Server
Not all bots try to break in. Some bad ones keep hitting your site continuously. Consequently, it consumes server resources. As a result, your pages feel slow. CPU usage goes up. It makes you think, “Why is my WordPress site slow all of a sudden?”
Most of these problems look small on their own. A few spam comments. A couple of login attempts. But together, they are threats.
And many more……
How to Add Bot Protection on WordPress Forms
The direct way to stop bots is to add a security check to your WordPress forms. This check is built to detect real humans and bots.
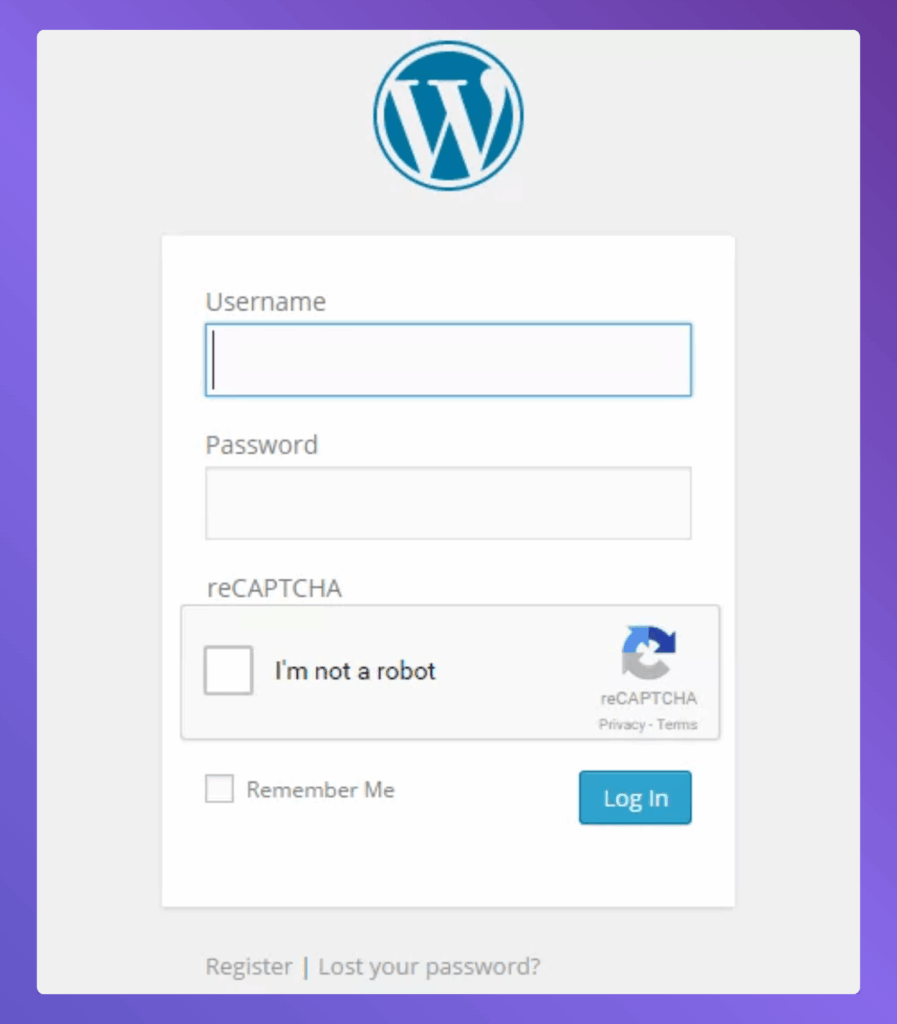
You’ve seen these kinds of checks before. Sometimes it’s a checkbox that says, I’m not a robot and puzzles to solve, and sometimes the check runs quietly in the background, and you don’t even notice it. The goal is simple, block the bots and let real users pass.
Ultimate Security is a WordPress plugin that handles this for you. It supports two of the most trusted bot-blocking tools available today.
Cloudflare Turnstile and Google reCAPTCHA. You can use either one depending on what works best for your site.
Cloudflare Turnstile
Cloudflare Turnstile is a modern bot protection tool. It’s smart, and it’s designed to stop bots without being annoying to your real visitors. Most of the time, your visitors won’t have to do anything at all. Turnstile checks user behaviour quietly in the background.
Where It Works on Your Site
With Ultimate Security, you can turn on Turnstile for the key areas where bots usually attack:

- Your WordPress login page
- Your registration form
- Your password reset page
- Your comment section
You turn on a toggle to enable it, then pick which forms you want to protect.
Setting It Up
You’ll need a free Site Key and Secret Key from Cloudflare. Here’s how to get them:

- Go to the Cloudflare Dashboard and log in (or create a free account).
- Find the Turnstile section.
- Copy your Site Key and Secret Key.
- In Ultimate Security, paste the Site Key into the “Site Key” field and the Secret Key into the “Secret Key” field.
That’s it. You’re connected. To quickly check, log out of your WordPress and see if the Cloudflare box appears. It means it works properly.

Appearance Settings
You can pick a Light or Dark theme for the Turnstile widget so it matches your website’s look. You can also set the language, either let the plugin detect it automatically or pick one yourself.
There’s also a Disable Submit Button option. When this is on, the form’s submit button stays inactive until the visitor passes the security check. It’s a smart idea to keep this enabled.
A Few Advanced Options Worth Knowing
Here are a few more settings you can do:

- Widget Size: You can make the security widget small, medium, or full-width.
- Appearance Mode: “Always” means the check always shows up. You can adjust this if needed.
- Defer Scripts: This helps your site load faster.
- Custom Error Message: If someone fails the check, you can show them a message of your choice.
- Extra Failure Message: It shows additional detailed information when verification fails.
Whitelist: Let Trusted People Skip the Check
This is a useful feature. The whitelist lets you pick certain people who won’t see the security check at all.

- Logged-in users can skip the check entirely since they’ve already verified they’re human.
- You can add specific IP addresses, so your team never hits the check.
- You can also add User Agents to the whitelist.
Turnstile Logs
You can turn on logging so the plugin keeps a record of every time the Turnstile check runs. This is a friendly log if you want to see how many bots are being blocked over time.
Google reCAPTCHA
Google reCAPTCHA is a widely used bot-blocking tool. You’ve seen it before. It’s the “I’m not a robot” checkbox. Ultimate Security supports reCAPTCHA. Let’s see how quickly you can configure it.
Two Versions of reCaptcha
Google offers two versions of CAPTCHA to save your site. Enable any of them based on your preferences.

- reCAPTCHA v2 shows a visible checkbox on your form. Your visitor checks it to confirm they’re human. Simple and familiar.
- reCAPTCHA v3 works silently in the background. It watches how the visitor behaves on the page and gives them a score. If the score looks suspicious, it flags them as a bot. Your real visitors won’t even know it’s running.
For most beginners, v2 is easier to start with because you can see it working. But if you want a smoother experience for your visitors with no extra steps, v3 is the way to go.
Setup CAPTCHA
You’ll need a free Site Key and Secret Key from Google. Follow the steps below:

- Go to the Google reCAPTCHA website.
- Register your site and choose your version (v2 or v3).
- Copy your Site Key and Secret Key.
- In Ultimate Security, paste them into the matching fields.
Done. The check will appear on your site.
Customization Options
You can do more things that are available in the plugins setting:
- Theme: You can match your site theme between Light and Dark.
- Size: Normal or Compact. Compact is great if you want a smaller widget that doesn’t take up too much space on the form.
- Field Title: This is the label that appears above the checkbox. You can change it to anything you want.
- Error Messages: You can write your own message for when someone fails the check, and another message for when the connection to Google’s server fails.
No-Conflict Mode
It is worth mentioning that some WordPress themes and plugins can interfere with reCAPTCHA and cause it to break. If you turn on No-Conflict Mode, Ultimate Security handles that interference and makes sure reCAPTCHA works properly, no matter what else is running on your site.
WooCommerce Support
This one’s for WooCommerce owners. If your store lets customers create an account during checkout, bots can abuse that too. They create fake customer accounts, which is messy and potentially a security risk. This option lets you add reCAPTCHA to the WooCommerce registration form with a simple toggle. That stops fake accounts from being created on your store.
Read our plugin documentation to find more easy setup guides.
Cloudflare Turnstile or Google reCAPTCHA: Which One Should You Use?
Both tools do the same thing. They stop bots from getting through your forms.
- Choose Turnstile if you want a modern, privacy-friendly option that’s easy on your visitors. It rarely interrupts real users at all.
- Choose reCAPTCHA if you want something your visitors already recognize. The checkbox is familiar and builds trust.
But you don’t need to use both at the same time. Pick one and set it up. You can always switch later.
How to Get Started with Ultimate Security
If you don’t have Ultimate Security installed yet, here’s how to get going:
- Download Ultimate Security from the WordPress plugin page.
- Go to your WordPress dashboard → Plugins → Add New.
- Upload the plugin file and activate it.
- Once active, go to the plugin settings and find the Settings → Threat Protection → Bot Protection.
That’s the whole process. You can have bot protection running on your WordPress site in under 10 minutes.
Frequently Asked Questions
Is Cloudflare Turnstile free to use?
Yes. You can create a free Cloudflare account and generate your site key and secret key at no cost. Ultimate Security connects to it for free, too.
What’s the difference between reCAPTCHA v2 and v3?
reCAPTCHA v2 shows your visitors a visible “I’m not a robot” checkbox. They click it and move on. reCAPTCHA v3 runs silently in the background. Your visitors don’t see or do anything. It watches behavior and scores each visit. If the score looks like a bot, it gets blocked.
Does bot protection work on WooCommerce stores?
Yes. Ultimate Security lets you add Google reCAPTCHA to your WooCommerce registration form during checkout. This stops bots from creating fake customer accounts on your store.
Do I need both Cloudflare Turnstile and Google reCAPTCHA at the same time?
No. You only need one. Both tools do the same job. They block bots from getting through your forms. Pick the one you prefer, set it up, and you’re covered. Running both at the same time isn’t necessary and can confuse your visitors.
Will bot protection affect my SEO?
No. Bot protection only affects form submissions and login attempts. Google’s own crawler is a bot too, but it doesn’t submit forms. So it won’t be blocked. Your search rankings stay completely unaffected.
Conclusion
Ultimate Security gives you both Cloudflare Turnstile and Google reCAPTCHA built right in. Pick the one that fits your site, enter your free keys, and turn it on. That’s it. Your forms are protected, your database stays clean, and the bad bots get nothing.